
How to add On-Site Messaging on your vintage theme on Shopify.
Vintage Ad Placements will be deprecated by August 2025 as Shopify will no longer support this method as per the Checkout Extensibility upgrade. Please refer to the App blocks documentation to enable Klarna On-Site Messaging.
Placements are containers for the different messaging assets we offer. Placements are either dynamic, that is, the messaging is updated based on the purchase amount, or static, meaning that the messaging isn’t linked to the amount and isn’t updated dynamically.
You can add placements to the following types of pages in your Shopify store:
- Product Page supports amount-based (dynamic) and non-amount based (static) placements
- Cart Page supports amount-based (dynamic) and non-amount based (static) placements
- Home Page supports non-amount based (static) placements
- Collections Page supports non-amount based (static) placements
- Static Page supports non-amount based (static) placements
If you’re not sure which placements to pick, see the answer in our Frequently asked questions.
The preview window is no longer supported inside the Klarna On-site messaging app. This affects the usage of the Auto Picker and Drag and drop installation methods.
If your store doesn’t support Shopify Online Store 2.0, we recommend configuring your On-site messaging with App Blocks or using the CSS installation method.
If your store is using a vintage theme that doesn’t support Online Store 2.0, perform the following steps to add on-site messaging placements:
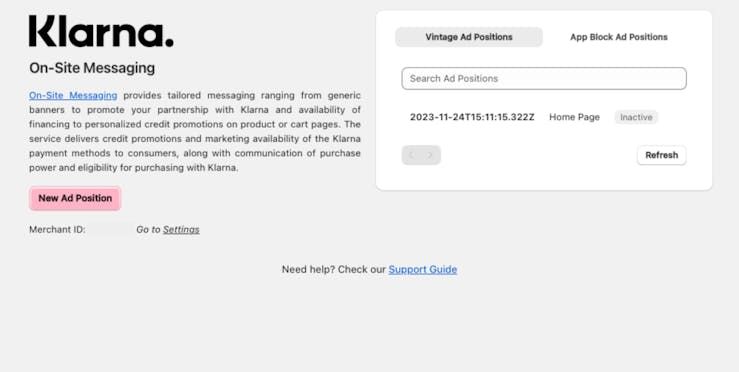
1. From the Klarna On-site messaging (OSM) Shopify app’s Dashboard, click the New Ad Position button
2. Enter a name for your Shopify Ad Position or use the default timestamp for the name.
3. If your country isn’t already defaulted, select the country that matches your Klarna API credentials. Make sure to select a country that uses the matching currency for your store.
4. The locale is selected by default, but you can change it manually if desired.
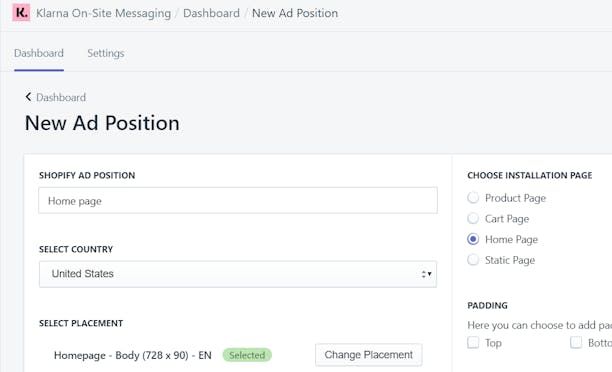
The Select Locale setting is available in the the New Ad Position panel's Dashboard.
5. Select your desired placement type. For Product and Cart pages, we recommend the dynamic amount-based credit-promotion placement. For static and home page placements please see this guide.
6. The app will automatically pick a placement it finds as best fit for your theme. If this doesn't work for your theme and page, find a CSS element, either class or id, on the page. The placement will be placed immediately above the specified CSS element. For example if you want a banner on the top of your website ".header" could be added to the CSS anchor selector box. Read more in the section below on how to do this.
7. Check the consent box “I have checked the preview...” and click Save.
8. Confirm in the modal pop-up window that changes take a few minutes before they will display on your storefront.
9. Review the messaging on your storefront. As there is no caching, we recommend that you open an incognito window to review immediate changes.
10. Repeat the above steps for your cart page, and any other pages (home or static) as desired.
Don’t add padding or change the alignment unless necessary. Before adjusting these settings, check how the Shopify ad displays in your store by viewing your storefront in a browser. Check both the desktop and mobile view to make sure the placement is displayed correctly in both.
Note that you don’t have to add code for placements to be updated when variants change on the product page or quantities change on the cart page. The update functionality is already included in the Klarna OSM Shopify app.
We recommend that you test the placements in a new incognito window to avoid caching. Additionally, wait a few minutes after you make the changes to give the code time to update the storefront.
When using the Klarna OSM Shopify app, don’t manually update your store’s theme files with code from the On-site messaging section in the Klarna Merchant portal as that will prevent the Klarna OSM Shopify app from working.
If you have problems with adding the placements, contact your region’s Klarna merchant support team.
As auto picker only works on some themes we recommend the CSS option for vintage themes. Below you will find a step by step example on how to add on-site messaging using this tool to your Shopify store.
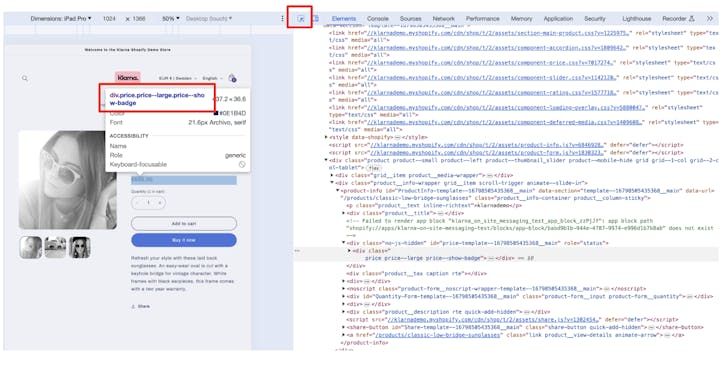
1. Navigate to your Shopify store's page. Navigate to the page you'd like to add Klarna On-Site Messaging. Right click the page and select Inspect. Click the small arrow and hover over the section where you'd like to add the placement. You'll need to find a section that begins with div. Once you've found a suitable section (such as price.price in the example above), type this down or copy it.
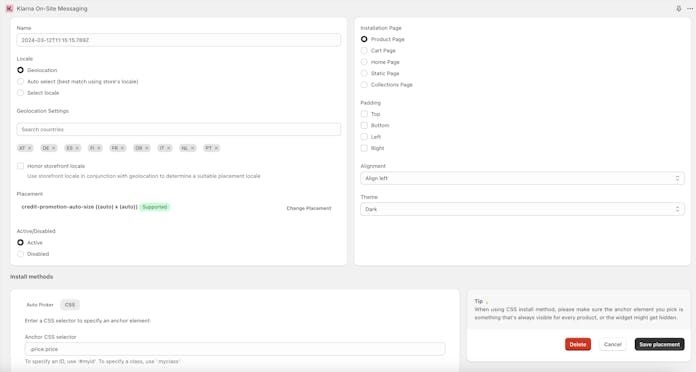
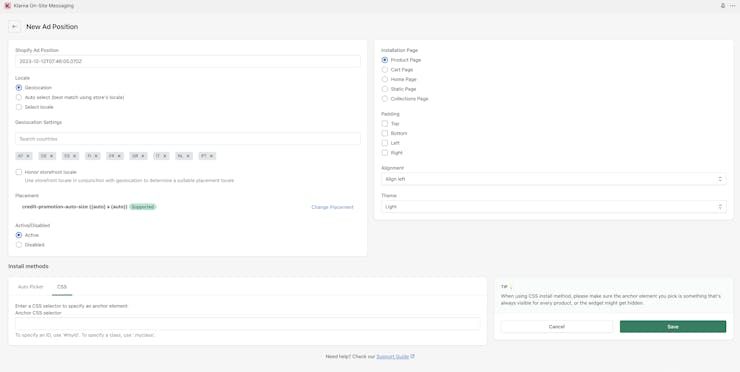
CSS installation page within the Klarna On-Site Messaging app's vintage theme placement section.
2. Go to the Klarna On-Site Messaging app and click New Ad Position. Select CSS as Install method. Select locale, placement and installation page. Finally select the theme (default/dark/custom). At the bottom on the page in Anchor CSS selector, type . and the class found when you hovered the arrow over your store page. In the example above this is .price.price. Ensure to add a dot in front of the class. Then, click Save placement.
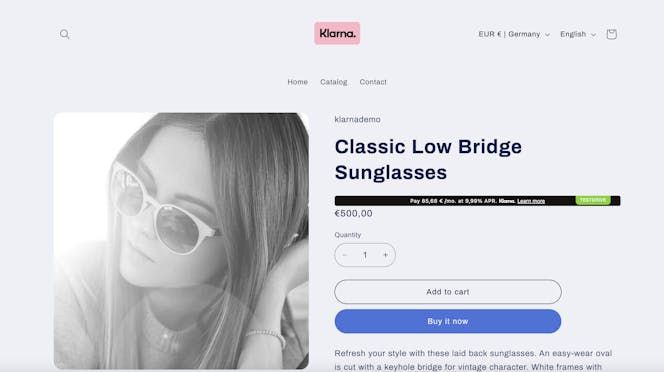
Example placement added to a Shopify store.
3. Wait a few seconds. Then open up your Shopify store in an incognito browser. Navigate to the page where you have added the placement and check that it is displaying correctly. If it is not displaying try to refresh the page. If it is not displaying, check the class is correct, try changing the theme (default or dark) for the placement or class and retry. If it is still not showing please visit our Troubleshooting Guide.
If you want to customize the the placements in your Shopify store, you can do it in one of the following ways:
1. Edit the underlying CSS styling in your store’s source code, as described in the Customize placements with CSS article on Klarna.Docs.
2. Edit the placements in the Klarna Merchant portal, as described in the Customize placements through Merchant portal article on Klarna.Docs.
Note that only the default light theme is customizable. If you use the dark theme, you won’t be able to see any customizations in the storefront.
Some customization options, that is, changes in padding and alignment, affect the placement itself and not the contents of the placement. These options are available in the Klarna On-site messaging Shopify app in Shopify admin.
Customizations in the app and the Merchant portal impact the placement differently and you may need to apply the custom styling in both to see the desired result. Examples of such customization are the Merchant portal placement text alignment within the placement and the Ad Position alignment in the Klarna OSM Shopify app that affects the position of a placement on the page. Additionally, only selected Klarna placements support text alignment within the placement, and some themes may not honor the styling for placement alignment on the page.
Geolocation
By default, the locale of placements in the Klarna On-site messaging (OSM) Shopify app is set to the dynamic locale configuration option, Geolocation.
When you choose the Geolocation option, you can display a single On-site messaging placement in a different language, based on the customer’s geolocation. The customer's country determines the On-site messaging placement's data-locale attribute. The language is selected from the list of languages matching the locale, either using the Shopify storefront language or the browser's language, based on the Ad Position's configuration setting, and injected into the klarna-placement HTML element on the storefront page.
If the customer's selected language isn’t supported for the country, English is used as a fallback. You can check the locale set for the placement by opening the web browser’s Developer tools > Elements menu and searching for klarna-placement.
If you’re testing geolocation when your computer isn’t located in the desired test region, you can use a VPN or manually set your desired region by entering the following code in your browser's Developer tools > Console and reloading the page for the change to take effect.
window.localStorage.setItem('klarnaosm_user_locale', 'SE')
The developer tools' Console lets you manually set a specific locale in your storefront.
Static locale settings
The following static locale configuration option is available:
- For vintage ad positions, Auto select and Select locale
Troubleshooting
If you are having trouble adding On-Site Messaging please see our Troubleshooting page for guidance.