This guide provides detailed instructions to install the cartridge on Salesforce Commerce Cloud (SFCC) SFRA stores.
The Klarna Payments LINK Cartridge contains two cartridges required for full functionality. Controller and SFRA support are separated into two distinct cartridges, facilitating the installation and use of either of the following models:
int_klarna_paymentsint_klarna_payments: Implements the core storefront functionality.int_klarna_payments_sfraint_klarna_payments_sfra: Implements the storefront functionality with SFRA code.
From version 24.5.0 of the cartridge SFRA 7 is supported. If you are using SFRA 6, additionally to the steps on this guide please make sure you modify the files specified in the user guide.
1. Import the int_klarna_payments cartridge into the SCC Studio Workspace:
- In SFCC Studio, click File > Import > General > Existing Projects into Workspace.
- Browse to the directory where you saved the
int_klarna_paymentscartridge. - Click Finish.
- Click OK when prompted to link the cartridge to the sandbox.
2. Import the int_klarna_payments_sfra cartridge into the SCC Studio Workspace:
- In SFCC Studio, click File > Import > General > Existing Projects into Workspace.
- Browse to the directory where you saved the
int_klarna_payments_sfracartridge. - Click Finish.
- Click OK when prompted to link the cartridge to the sandbox.
3. Prepend the Klarna cartridges to the effective site cartridge path:
- Log into the SFCC Business Manager.
- Click Administration > Sites > Manage Sites.
- Select the desired site.
- Click on the Settings tab.
- Prepend
int_klarna_payments_sfra:int_klarna_paymentsto the Cartridges field. - Click Apply.
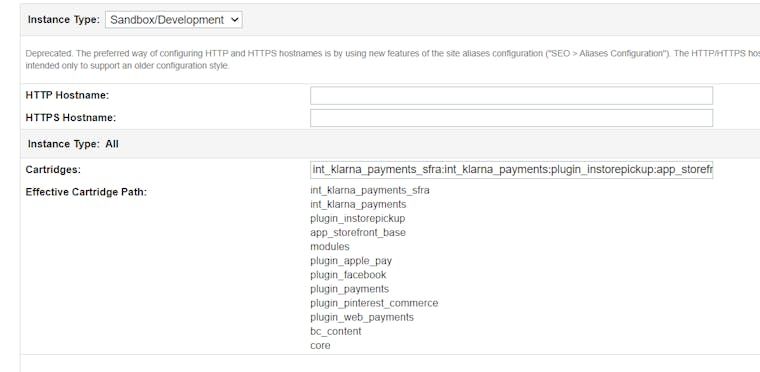
Effective Cartridge Path
- Go to the main directory metadata folder, review the site-template content, and edit if needed. (The site template is prepared to set up “SiteGenesis” and “RefArch” sites. You may want to change that to your actual sites and delete the ones that are not needed.)
- Zip the directory to create the
site-template.zipinstallation package. - Log into the SFCC Business Manager.
- Click Administration > Sites Development > Site Import & Export.
- Browse to the directory where you saved the
site-template.zip. - Click Upload.
- Select the uploaded site zip and click Import.
Review the default service.xml file in the site-template.zip and update the configuration for Playground and Production accordingly before importing.
Update the path to your base SFRA installation in the package.json file from the same root folder if necessary.
/**
* Call Credit Card Authorization Hook (for VCN settlement)
* @param {dw.order.order}.ord
Example Path Configuration
Ensure the correct path to the SFRA cartridge is configured.
Run the following commands from the root folder of the Klarna repository:
npm run compile:scssto compile the SCSS files.npm run compile:jsto build the Klarna-specific JavaScript files.
As of version 24.4.0, the cartridge configuration process has changed. If you are using a version older than 24.4.0, please refer to the Deprecated Features section of the Changelog for detailed information on the configuration changes.
- Click Merchant Tools > Site Preferences > Custom Preferences > Klarna Activation
- Enter
client_idto activate OSM and KEC. - Enter API Username and password.
- Select the region where your site operates.
- Select the markets on which Klarna should be available.
- To select the Klarna environment, in the field Run plugin in test mode - select yes for playground or no for production.
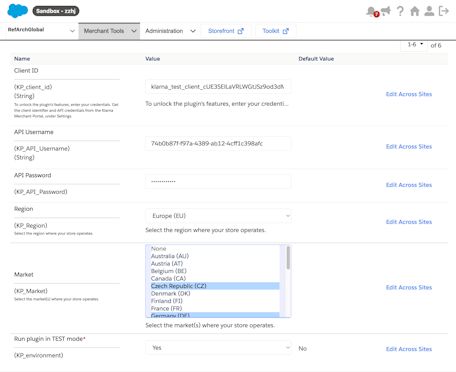
Klarna activation site preference
- In SFCC Business Manager, click Merchant Tools > Custom Objects > Custom Object Editor.
- Set the Object Type dropdown to Klarna Activation.
- Enter Klarna activation key, this will be the name of the custom object, we recommend using a name meaningful to you, easy to identify.
- Enter the required fields as mentioned in the Klarna Activation section.
- Repeat for the other regions or markets as necessary.
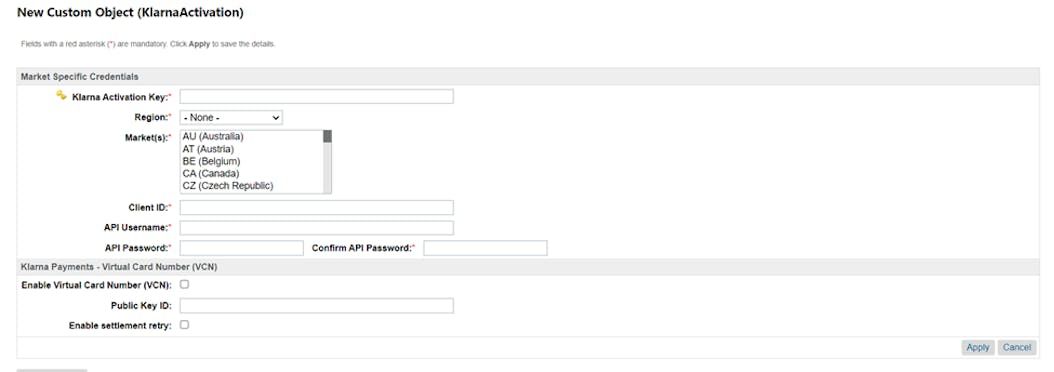
Klarna Activation Custom Object
| Controller | Start Node | Remarks |
|---|---|---|
Checkout.js | Begin | Extended to call Klarna session manager |
CheckoutServices.js | Get,SubmitPayment,PlaceOrder | Klarna payment method/category and totals are being stored |
CheckoutShippingServices.js | SubmitShipping, ToggleMultiShipping | Calling the Klarna session manager |
Order.js | Confirm | Extending Klarna order data to view data |
The templates have been updated to support On-site Messaging and Address Forms for Klarna. These templates are intended for reference, but you can customize them to suit your specific needs. Please ensure that the final review and sign-off align with your project requirements and contractual agreements.
This one-time clean-up job is applicable only to merchants integrated with Klarna Payments cartridge version earlier than 19.1.6, utilizing (or previously used) virtual card-based settlement (VCN) and stored decrypted card details within Business Manager.
The job iterates over orders with status Exported and the attribute custom.kpIsVCN=true to remove sensitive details saved in fields kpVCNPAN, kpVCNCSC, kpVCNExpirationMonth, and kpVCNExpirationYear from previous releases. No parameters are passed to the script.
Upon successful run, the job logs the result of processed orders in the custom debug log located in webdav/Sites/Logs. You will receive a message indicating the processed orders count for each storefront or a message indicating that there are no orders needing update.
In case of an error, the cause of the failure (message and stack trace) will be logged in the standard error log.
Ensure that you have access to the SFCC Business Manager and that the jobs.xml configuration file is prepared and accessible.
Import the Job Configuration (1)
Log into the SFCC Business Manager, and go to Administration > Operations > Import & Export.
Click on the Import button, and browse for the jobs.xml file and select it for import.
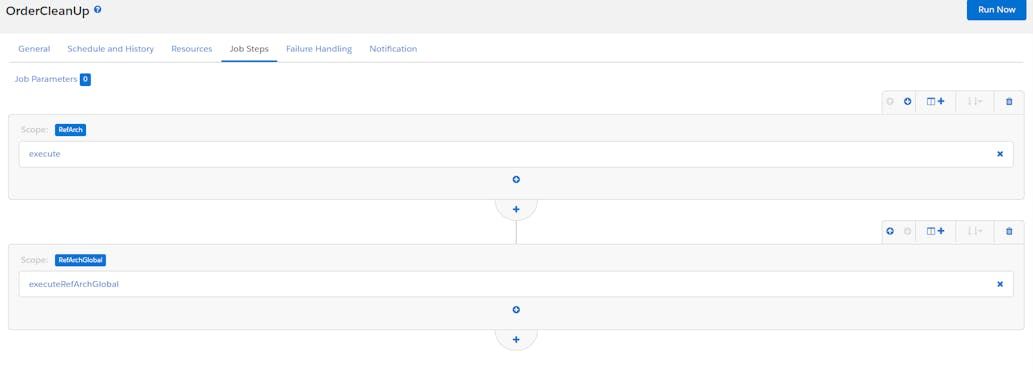
Job Steps
The default scope included in the XML file is for RefArch. If you have multiple sites using this functionality, you need to configure each site as a separate flow within this file.
Add a Sequential Flow (2)
After the job import is complete, navigate to the flow section within the job, and scroll down to the bottom of the current flow.
Click on the Add a sequential flow button. This action will create a new flow under the current job configuration.
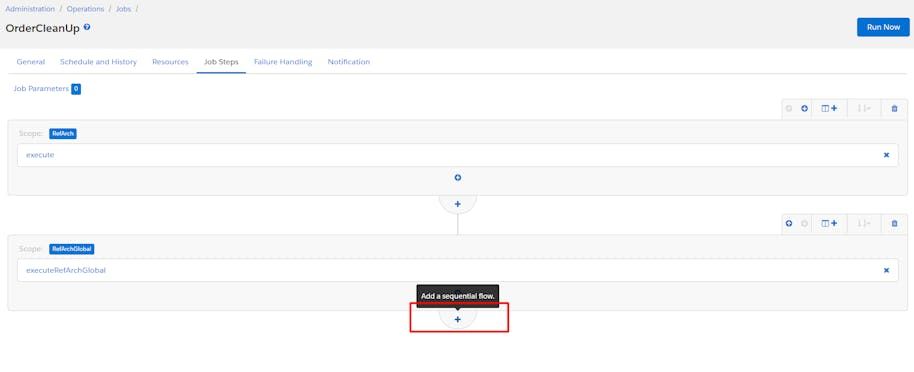
Add a new job
Configure the Job Step (3)
In the newly added flow, click on the Configure a step button. When the flyout appears, search for the term script, and select the ExecuteScriptModule from the list.
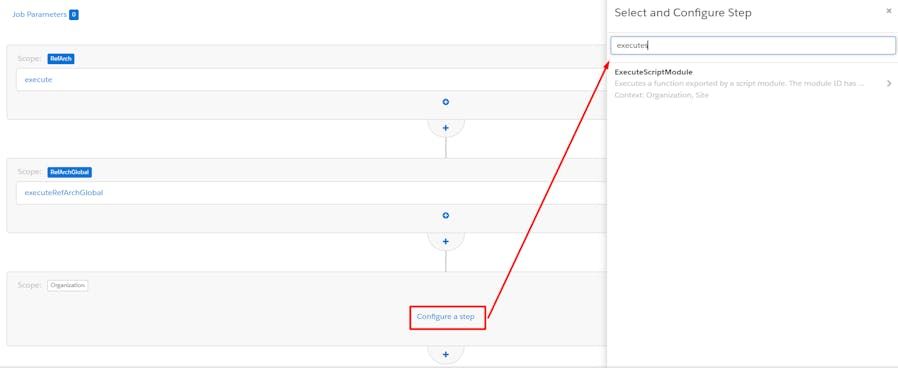
Configure Step
Populate the Step Fields (4)
Enter the step details:
- ID: Provide a meaningful and unique name for this job step. Ensure that the name is unique across all flows to avoid saving errors.
- ExecuteScriptModule.Module: Specify the location of the
OrderCleanUpJob.jsfile. The default path isint_klarna_payments/cartridge/scripts/job/OrderCleanUpJob.js, but this can vary depending on where the script is placed. - ExecuteScriptModule.FunctionName: Leave this field as execute.
Click on the Assign button to save the step configuration.
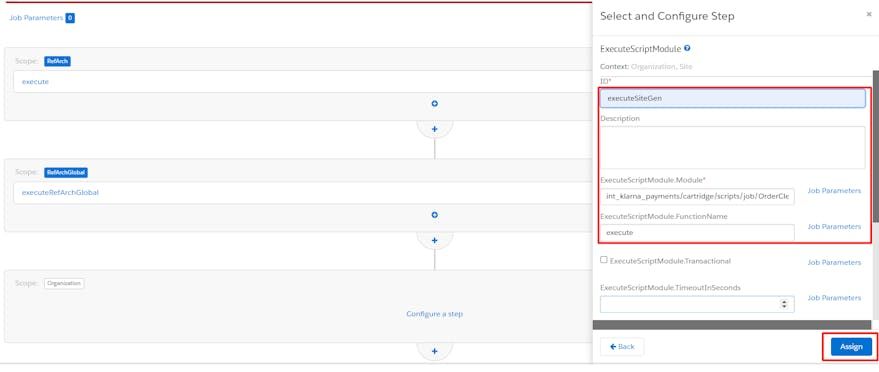
Configure step content
Assign to the Correct Site Scope (5)
- Select the Site Scope: Click on Organization within the step configuration flyout, and choose Specific Sites from the drop-down menu.
- Assign to the Relevant Site: From the list of sites, select the appropriate site ID (e.g., SiteGenesisGlobal), and click on Assign to apply the configuration to the selected site.
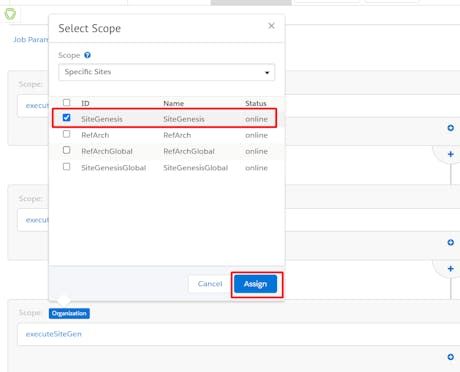
Job scope content
Repeat steps 1-5 for each site/storefront that you have using Klarna VCN and need additional configuration. This ensures that the clean-up job runs for all relevant sites and removes sensitive data as required.
The RecurringOrders job is designed to process subscription entries for all customers. The job performs the following functions:
- Eligibility Check: It verifies that the subscription is enabled and that either the
nextChargeDateornextRetryDatematches the current date. - Order Creation: It creates new Salesforce Commerce Cloud (SFCC) orders for eligible subscriptions, replacing the old ones.
- Trial Period Handling: It processes orders with expiring trial periods for charges.
Configuration
By default, the job is set to run on the RefArch site, as specified in the jobs.xml file. This setting can be modified either in the jobs.xml file or through the storefront configuration.
The job consists of a single step, createOrder, with the following configuration:
- ExecuteScriptModule.Module:
int_klarna_payments/cartridge/scripts/job/RecurringOrdersJob.js - ExecuteScriptModule.FunctionName:
execute
The job operates at site level.
Ensure your configuration matches these details to maintain the proper functionality of the RecurringOrders job.
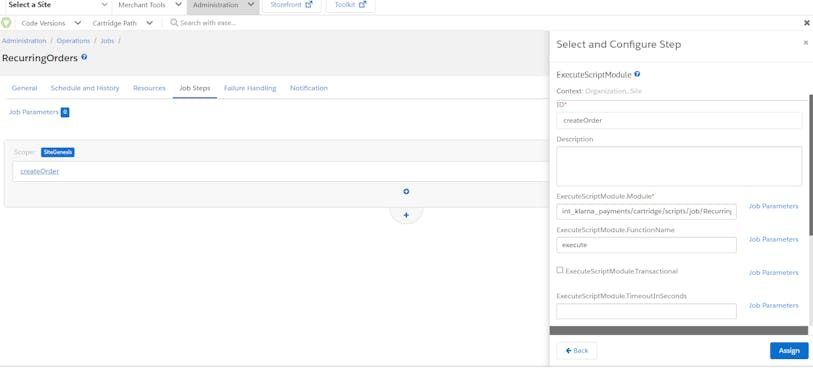
RecurringOrders Job
The Storefront Reference Architecture (SFRA) does not require modifications to the core cartridge to enable any of the LINK integration cartridges. The int_klarna_payments_sfra cartridge follows Salesforce's best practices. Below are two cases where changes may be applicable:
app_storefront_base\cartridge\client\default\js\checkout\checkout.js
After placing an order, every customer is redirected to Klarna and then sent back to the site with the order confirmation page. To prevent sending any additional URL parameters to Klarna, follow these steps:
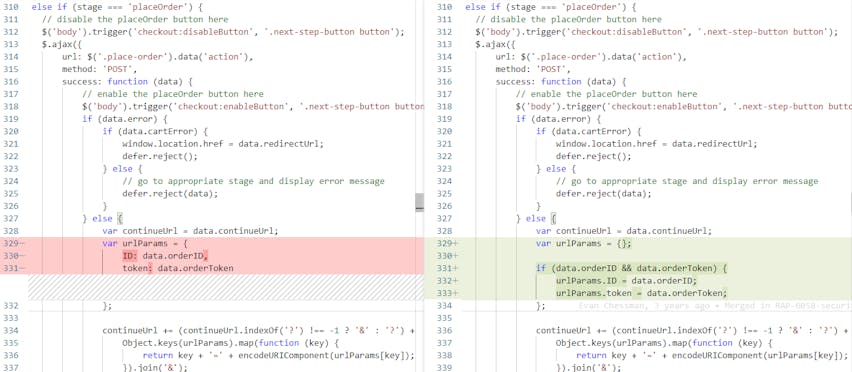
Changes in checkout.js
app_storefront_base\cartridge\client\default\js\cart\cart.js
To get updates for the cart On-Site Messaging (OSM) widget, make the following changes in cart.js or in your app cartridge.
In the updateCartTotals(data) function, add the following code at the bottom:
if (data.totals.klarnaTotal) {
    $('klarna-placement').attr('data-purchase-amount', data.totals.klarnaTotal);
    if (window.Klarna && window.Klarna.OnsiteMessaging) {
        window.Klarna.OnsiteMessaging.refresh();
    }
}
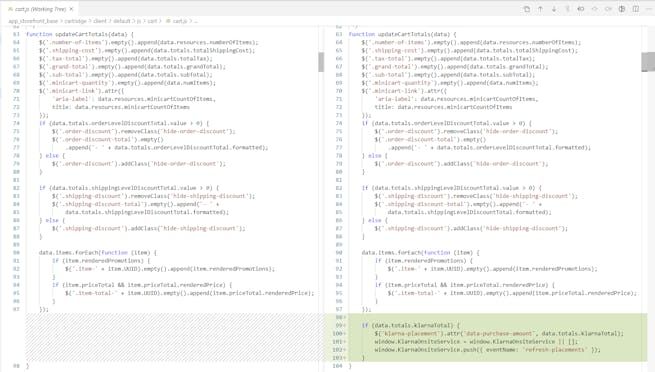
Changes in cart.js
Ensure these modifications are implemented to maintain proper integration with Klarna's services.
getPaymentIntent()
Merchants can extend the getPaymentIntent() function to implement their own logic for setting the payment intent, taking into account trial/non-trial and standard products in the basket.
.png)
getPayment()
buildItemSubscriptionObj()
Merchants can extend the function buildItemSubscriptionObj() function to implement their own logic for identifying subscription products and subsequently creating the subscription object, which should then be included in the order lines object.
.png)
buildItemSubscriptionObj()
getLineItemSubscriptionData()
Merchants can extend the function getLineItemSubscriptionData() function to implement their own logic for retrieving the line item subscription products.
.png)
getLineItemSubscriptionData()
This section is relevant if there are other payment cartridge integrations within the cartridge path besides Klarna Payments SFRA. Regardless of the order of those cartridges in the cartridge path, certain templates need to be overwritten by adding a new if condition and including the correct sub-template. The templates that require modifications are:
\templates\default\checkout\billing\paymentOptions\paymentOptionsContent.isml\templates\default\checkout\billing\paymentOptions\paymentOptionsSummary.isml\templates\default\checkout\billing\paymentOptions\paymentOptionsTabs.isml
If the website owner requires PayPal as well as Klarna, each of these templates must be copied to a new custom cartridge. The example below shows the new code for the paymentOptionsContent.isml template:
<isloop items="${pdict.order.billing.payment.applicablePaymentMethods}" var="paymentOption" status="loopSate">
    <isif condition="${paymentOption.ID === 'CREDIT_CARD'}">
        <isinclude template="checkout/billing/paymentOptions/creditCardContent" />
    </isif>
    <isif condition="${paymentOption.ID === 'KLARNA_PAYMENTS'}">
        <isinclude template="checkout/billing/paymentOptions/klarnaPaymentsContent" />
    </isif>
    ...
    <isif condition="${paymentOption.ID === 'PayPal'}">
<isinclude template="paypal/checkout/paypalContent" />The same applies to the other two templates (paymentOptionsSummary.isml and paymentOptionsTabs.isml).
All requests are made through Klarna’s REST API and are encrypted using SHA-256 with the shared secret provided by Klarna. Only HTTPS is allowed, and JSON is used for all communications.
For a full reference guide, along with the resource structure for requests and responses, refer to [ Klarna Payments API].