

Authorize a customer-initiated payment (Mobile SDK)
Authorize a customer-initiated payment when the Klarna Mobile SDK is embedded in a native iOS, Android, or React Native app. The SDK presents Klarna and orchestrates the Klarna Purchase Journey; the Partner authorizes the payment directly with Klarna using the Klarna Network Session Token.
429 min read
Overview
Use this guide when the Klarna Mobile SDK is embedded in a native iOS (Swift), Android (Kotlin), or React Native app and the Partner wants to present Klarna in the payment form and launch the Klarna Purchase Journey from the Klarna payment button.
The Mobile SDK renders Klarna's UI components and drives the customer-facing Klarna Purchase Journey, while the Partner's backend creates the Payment Request and finalizes the authorization with Klarna.
The underlying API calls mirror the server-side flow and the Web SDK flow: createPaymentRequest , retrieve the . What differs is the orchestration: the Mobile SDK presents Klarna and launches the Klarna Purchase Journey natively, and the Partner authorizes the payment directly with Klarna.
, retrieve the klarna_, then authorizePayment. What differs is the orchestration: the Mobile SDK presents Klarna and launches the Klarna Purchase Journey natively, and the Partner authorizes the payment directly with Klarna.This guide covers iOS (Swift), Android (Kotlin), and React Native integrations.
Prerequisites
Before you integrate, check that you meet the following prerequisites:
- 1.A valid Klarna Partner account with API credentials, obtained through your direct agreement with Klarna.
- 2.Access to the Klarna Partner Portal.
- 3.Inside the Klarna Partner Portal:
- 3.1.A client identifier has been generated.
- 3.2.An API key has been generated.
- 4.Backend capability to receive and process Klarna webhooks, with a subscription to the
payment.event. See Setup your webhooks.request. state-change. completed - 5.Terms and Conditions for client-side SDK usage are accepted as required by your Klarna agreement.
Integration overview
Here's an overview of all the steps to process a payment with Klarna via the Mobile SDK as a Partner:
- 1.Present Klarna as a payment method in the payment form.
- 2.The customer taps the Klarna payment button in your checkout.
- 3.You create the payment request — either client-side using the Klarna Mobile SDK, or server-side by calling the Klarna Payment Request API — sharing all available interoperability data points.
- 4.If customer interaction is required:
- 4.1.The Klarna Purchase Journey is launched.
- 4.2.The customer completes the Klarna Purchase Journey.
- 5.Klarna returns a
klarna_via thenetwork_ session_ token payment.webhook.request. state-change. completed - 6.You authorize the payment directly with Klarna by calling authorizePayment with the
Klarna-Network-Session-Tokenheader. - 7.Klarna responds with the authorization result and creates the Payment Transaction.
- 8.The customer is returned to your confirmation page.
sequenceDiagram
participant C as Customer
participant FE as Partner app (Mobile SDK)
participant BE as Partner backend
participant K as Klarna
C->>FE: Open checkout screen
FE->>K: Initialize Klarna Mobile SDK
FE->>K: Request payment presentation
K->>FE: Return assets and instructions
FE->>FE: Render payment selector<br>Show Klarna payment button
C->>FE: Tap Klarna payment button
Note over FE,BE: Handle the "Pay with Klarna" button tap
alt Client-side payment request initiation
FE->>K: Create and initiate payment request
else Server-side payment request initiation
FE->>BE: Request payment request
BE->>K: Create payment request
K->>BE: Return payment_request_id
BE->>FE: Return payment_request_id
FE->>K: Initiate with payment request ID
end
K->>C: Start Klarna Purchase Journey
C->>K: Complete Klarna Purchase Journey
K-->>BE: Webhook payment.request.state-change.completed
Note over K,BE: klarna_network_session_token
BE->>K: authorizePayment with Klarna-Network-Session-Token header
K->>BE: APPROVED, payment_transaction
BE->>FE: Confirmation
FE->>C: Return to confirmation page
Integration details
Present Klarna in the payment form
Integrate the Klarna Mobile SDK to display Klarna as a payment method within your own payment form. This approach lets you fully control the checkout experience while using Klarna's ready-made UI components for secure payment handling.
This guide explains how to present Klarna in your payment form, both during the initial load and after the customer selects Klarna. By following these steps, you'll ensure the payment flow meets Klarna's design and functionality standards:
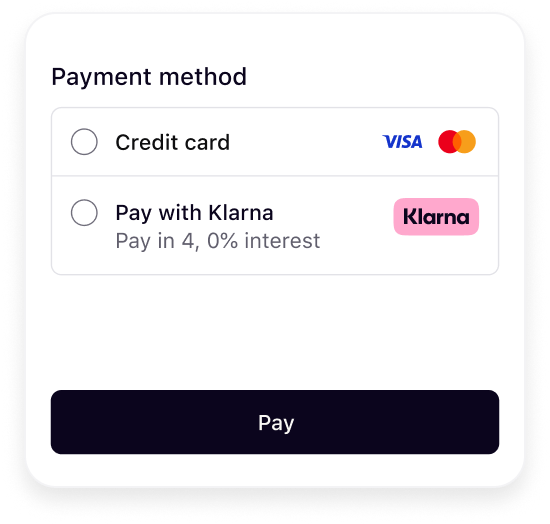 | 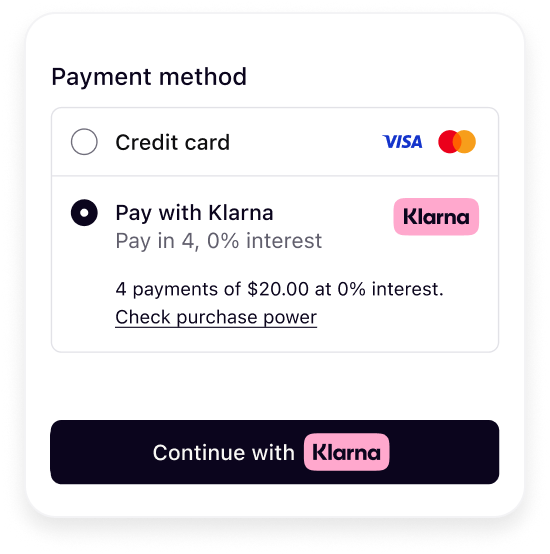 |
| Initial presentation | When Klarna is selected |
It's crucial that Klarna payment presentation is dynamic and not hardcoded on your server to deliver the best conversion outcome.
Present Klarna dynamically for best conversion
Klarna's best practice
To ensure the best user experience and optimal conversion rates when presenting Klarna as a payment method, please apply the following recommendations:
- Present Klarna dynamically alongside other payment methods in your payment form.
- Embed Klarna's UI elements directly in your frontend for a consistent and responsive design.
Import the Mobile SDK
Choosing Mobile SDK products
The Klarna Mobile SDK is split into several products (and packages) so your integration stays modular. Each capability is delivered as its own product, so you add only the frameworks your use case requires and keep your app's binary size and dependency footprint to a minimum.
For Klarna Network (KN) integrations, add only the
KlarnaNetwork* products your use case requires:| Product | Purpose |
|---|---|
KlarnaNetworkPayment | Payment presentation and the payment request and authorization flow. Required for this guide. |
KlarnaNetworkPaymentButton | The Klarna payment button UI component. |
KlarnaNetworkMessaging | On-site messaging and pre-qualification placements. |
KlarnaNetworkIdentity | Sign in with Klarna and identity flows. |
Several of these products also ship UI-framework-specific variants — such as Button frameworks with SwiftUI on iOS, and Jetpack Compose on Android — so you can pull in just the UI layer that matches your stack with appropriate product suffixes (
SwiftUI or -compose) without adding the rest.iOS
Swift Package Manager
To add the required dependency, do the following steps:
- 1.In Xcode, select File → Add Package Dependencies...
- 2.In the opened window, enter
https:/in the search bar./github. com/ klarna/ klarna-mobile-sdk-ios - 3.For Dependency Rule, select Up to Next Major Version and leave the default version as is.
- 4.For Add to Project, select your project.
- 5.Click Add Package.
- 6.In the new window that opens, add
KlarnaNetworkPaymentand the button product that matches your UI framework — eitherKlarnaNetworkPaymentButtonfor UIKit orKlarnaNetworkPaymentButtonSwiftUIfor SwiftUI — to your desired target.
Integration requirement
Add only one of the two button products.
KlarnaNetworkPaymentButtonSwiftUI is layered on top of KlarnaNetworkPaymentButton and depends on it, so the UIKit module comes along automatically and does not need to be added separately.Neither button module transitively includes
KlarnaNetworkPayment — neither the Swift Package Manager product nor the CocoaPods subspec — so you must always add KlarnaNetworkPayment alongside your chosen button module (or use the full KlarnaMobileSDK). The button modules import KlarnaNetworkPayment types, so omitting it results in a missing-module error.Cocoapods
First, add the Klarna Mobile SDK's Payment module and the Payment Button module for your UI framework to your Podfile:
SH
1
2
3
 pod "KlarnaMobileSDK/KlarnaNetworkPayment"
 pod "KlarnaMobileSDK/KlarnaNetworkPaymentButton"
Or, for example, if you're building the button with SwiftUI, use the
KlarnaNetworkPaymentButtonSwiftUI subspec instead:SH
1
2
3
 pod "KlarnaMobileSDK/KlarnaNetworkPayment"
 pod "KlarnaMobileSDK/KlarnaNetworkPaymentButtonSwiftUI"
Next, run the command below and then you should be able to import KlarnaMobileSDK module in your workspace and start using it.
SH
1
2
pod install
Android
Android button module dependency
Add only one of the two button modules —
klarna-network-payment-button-compose transitively includes klarna-network-payment-button.Kotlin
First, add the Klarna Mobile SDK Maven repository:
KOTLIN
1
2
3
4
repositories {
    maven("https://x.klarnacdn.net/mobile-sdk/")
}
Next, add the Klarna Mobile SDK's Payment library and the Payment Button library for your UI framework as dependencies to your application:
KOTLIN
1
2
3
4
5
dependencies {
     implementation("com.klarna.mobile.sdk:klarna-network-payment:<LATEST_VERSION>")
     implementation("com.klarna.mobile.sdk:klarna-network-payment-button:<LATEST_VERSION>")
}
Or, for example, if you're building the button with Jetpack Compose, use the
klarna-network-payment-button-compose module instead:KOTLIN
1
2
3
4
5
dependencies {
     implementation("com.klarna.mobile.sdk:klarna-network-payment:<LATEST_VERSION>")
     implementation("com.klarna.mobile.sdk:klarna-network-payment-button-compose:<LATEST_VERSION>")
}
To find the latest version you can always refer to this link.
Groovy
First, add the Klarna Mobile SDK Maven repository:
GROOVY
1
2
3
4
5
6
repositories {
    maven {
        url 'https://x.klarnacdn.net/mobile-sdk/'
    }
}
Next, add the Klarna Mobile SDK's Payment library and the Payment Button library for your UI framework as dependencies to your application:
GROOVY
1
2
3
4
5
dependencies {
    implementation 'com.klarna.mobile.sdk:klarna-network-payment:<LATEST_VERSION>'
    implementation 'com.klarna.mobile.sdk:klarna-network-payment-button:<LATEST_VERSION>'
}
Or, for example, if you're building the button with Jetpack Compose, use the
klarna-network-payment-button-compose module instead:GROOVY
1
2
3
4
5
dependencies {
    implementation 'com.klarna.mobile.sdk:klarna-network-payment:<LATEST_VERSION>'
    implementation 'com.klarna.mobile.sdk:klarna-network-payment-button-compose:<LATEST_VERSION>'
}
To find the latest version you can always refer to this link.
React Native
React native version requirements
The React Native packages require React Native 0.76.0 or later with the New Architecture (TurboModules) enabled, iOS 13+, and Android API 21+.
First, add the core package and the payment package as dependencies:
SH
1
2
yarn add @klarna/react-native-klarna-network-core @klarna/react-native-klarna-network-payment
Then import the payment package once at app startup (for example in your root
index.) to activate the payment property on Klarna:TS
1
2
import '@klarna/react-native-klarna-network-payment';
Source and package details are available on this link.
Initialize the Mobile SDK
The first step to add Klarna Payment to your application is to initialize the Klarna SDK:
SWIFT
1
2
3
4
5
6
7
8
9
10
// Create an instance of KlarnaConfiguration
let configuration = KlarnaConfiguration(
    clientId: <CLIENT_ID>,
    locale: <LOCALE>,
    appReturnUrl: <APP_RETURN_URL>,
    klarnaNetworkSessionToken: <KLARNA_NETWORK_SESSION_TOKEN>
)

// Initialize Klarna
let klarnaResult = Klarna.initialize(configuration: configuration)The following table lists the properties of
KlarnaConfiguration.| Name | Type | Presence | Description |
|---|---|---|---|
clientId | String | required | The client ID of the Partner account that is integrating the Mobile SDK. |
appReturnUrl | String | required on iOS and React Native | The URL that Klarna uses to return the customer to your app after the Klarna Purchase Journey. Not available on Android. |
locale | String | optional | The default locale (ISO 3166-1 alpha-2) that will be used by the SDK. If not set, the locale of the device will be used. |
klarnaNetworkSessionToken | String | optional | The klarna network session token allows the SDK to be initialized with an existing session. |
App return URL configuration
You set the app return URL once, when you initialize the SDK. On iOS and React Native,
appReturnUrl is a required property of KlarnaConfiguration, and the SDK sends it as app_ on the payment requests it creates on your behalf. On Android the property does not exist — the SDK derives the return URL from your app's package name and handles the hand-back itself, so there is nothing for you to configure.Klarna payment presentation request
Klarna payment presentation provides all the visual assets, localized texts, and instructions needed to correctly display Klarna in your checkout screen.
To fetch the payment presentation, you need to call the
KlarnaPaymentPresentation. method like below:SWIFT
1
2
3
4
5
6
7
8
9
10
// Create an instance of KlarnaPaymentPresentationData
let paymentPresentationData = KlarnaPaymentPresentationData(
    amount: <AMOUNT>,
    currency: <CURRENCY>,
    intent: <INTENT>,
    paymentProgramEnablementCodes: <PAYMENT_PROGRAM_ENABLEMENT_CODES>,
    subscriptionBillingInterval: <SUBSCRIPTION_BILLING_INTERVAL>,
    subscriptionBillingIntervalFrequency: <SUBSCRIPTION_BILLING_INTERVAL_FREQUENCY>
)
The following table lists the parameters of
KlarnaPaymentPresentation. method.| Name | Type | Presence | Description |
|---|---|---|---|
data | KlarnaPaymentPresentationData | required | Specifies the data that is used to tailor the payment presentation content. |
callback | KlarnaPaymentPresentationCallback | required | The callback to get notified of the result of payment presentation fetch. |
The table below lists the properties of
KlarnaPaymentPresentationData:| Name | Type | Presence | Description |
|---|---|---|---|
amount | Long (Android), Int64 (iOS) | required | The transaction amount in minor units following ISO 4217 exponents (e.g., $118.00 = 11800, ¥1400 = 1400). |
currency | String | required | Three-letter ISO 4217 currency code (e.g. USD, EUR). |
intent | KlarnaPaymentPresentationIntent | optional | Specifies the intent of the payment presentation content for your use case. It can be used when you need presentation elements tailored to specific payment scenarios. |
subscriptionBillingInterval | KlarnaInterval | optional | Specifies the interval of which the customer is charged for the subscription. |
subscriptionBillingIntervalFrequency | Int | required if the interval is set | Defines the subscription interval frequency. |
The
intent property is of type KlarnaPaymentPresentationIntent and can have the following possible values. If not set, PAY is used.| Swift | Kotlin and React Native | Description |
|---|---|---|
pay | PAY | Standard payment transaction. Requires amount. |
subscribe | SUBSCRIBE | Subscription-based payment. Requires amount, subscriptionBillingInterval, and subscriptionBillingIntervalFrequency. |
addToWallet | ADD_ | Add Klarna to the customer's wallet for later use. |
The
subscriptionBillingInterval property is of type KlarnaInterval and can have the following possible values.| Swift | Kotlin and React Native | Description |
|---|---|---|
day | DAY | The customer is charged daily. |
week | WEEK | The customer is charged weekly. |
month | MONTH | The customer is charged monthly. |
year | YEAR | The customer is charged yearly. |
Platform enum naming convention
On iOS these are Swift enum cases written in lower camel case, for example
addToWallet. On Android and React Native the same values are written in upper snake case, for example ADD_.Klarna payment presentation response
After a successful payment presentation fetch, you will get an instance of
KlarnaPaymentPresentationContent containing the full Klarna branding package and instructions that can be used to present Klarna as a payment method.Follow Klarna payment presentation instruction
This section explains how to handle Klarna's payment presentation instructions, which define how Klarna should appear within the checkout form. Adhering to these instructions is essential to maintain a consistent and optimized user experience—whether Klarna is displayed alongside other payment methods, preselected, or shown as the only available option.
Compliance with Klarna's presentation instructions is especially important when integrating Conversion features, such as Express checkout or Sign in with Klarna, to ensure a seamless and unified customer experience.
The
instruction property available in KlarnaPaymentPresentationContent can have the following possible values:| Name | Description |
|---|---|
SHOW_ | Show Klarna alongside other payment methods. |
PRESELECT_ | Show Klarna pre-selected but still alongside other payment methods. This is returned when using the customer_ issued from the Sign in with Klarna feature or the tokenization flow. |
SHOW_ | Show Klarna as the only payment method. This is returned when the customer has finished the first step of multi-step Express checkout. |
Skip if no conversion features
Skip this section if you don't use any Conversion features such as Express checkout, Sign in with Klarna, Klarna Messaging or Klarna Prequalification.
Here are example outcomes illustrating how Klarna should be displayed for each instruction:
| 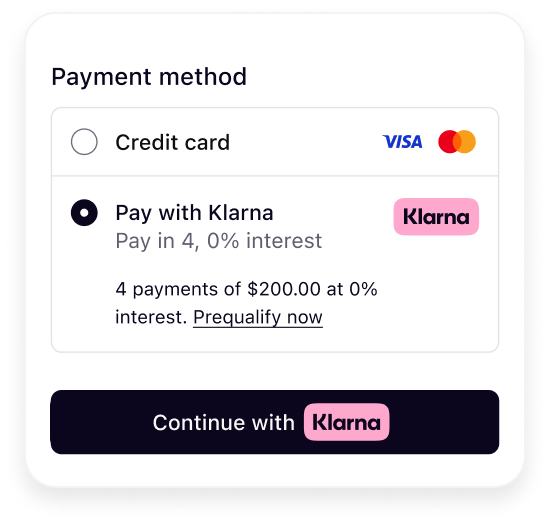 | 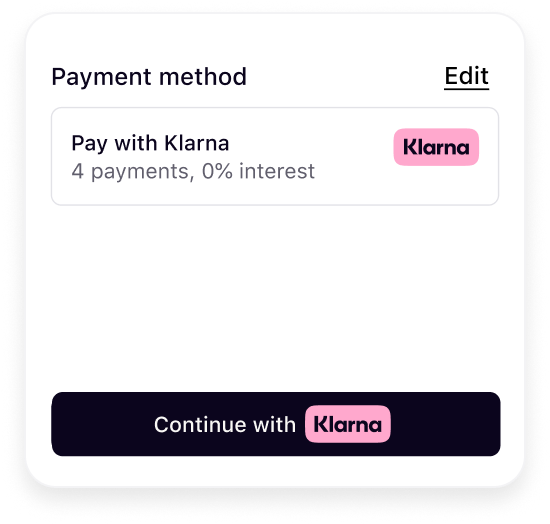 |
| Show Klarna | Preselect Klarna | Show only Klarna |
The presentation instructions are derived from possible customer purchase journeys described in Present Klarna in your checkout.
The following code snippet shows an example of how
instruction can be used to decide how to present Klarna as a payment method.SWIFT
1
2
3
4
5
6
7
8
9
10
private func renderKlarnaPresentation(content: KlarnaPaymentPresentationContent) {
    let instruction: KlarnaPaymentPresentationInstruction = content.instruction
    switch instruction {
    case .showKlarna:
        // Show Klarna alongside other payment options
    case .preselectKlarna:
        // Preselect Klarna as the default payment option
    case .showOnlyKlarna:
        // Show only Klarna as the payment option
}Mount Klarna payment option components
After fetching the payment presentation, you have access to an instance of
KlarnaPaymentPresentationContent. It can be used to present Klarna as a payment method. The Klarna payment option must be rendered in the payment selector according to Klarna's presentation guidelines.The following table lists the properties of
KlarnaPaymentPresentationContent.| Name | Type | Presence | Description |
|---|---|---|---|
instruction | KlarnaPaymentPresentationInstruction | required | Specifies how Klarna should be displayed as a payment option (e.g., whether to show, preselect, or display as show-only). Adhering to these payment presentation instructions ensures customers have the best possible experience and optimizes conversion rates. |
paymentOption | KlarnaPaymentPresentationPaymentOption | optional | Specifies the default payment option applicable to all purchase types. It includes the visual elements required to represent Klarna during checkout. |
paymentStatus | KlarnaPaymentPresentationPaymentStatus | optional | Specifies the payment status of the presentation. |
The
KlarnaPaymentPresentationPaymentOption type has the following properties:| Name | Presence | Description |
|---|---|---|
paymentOptionId | required | The identifier of the payment option. This value is required to be sent to the Payment Authorize API or the Payment Request API when initiating the payment. |
header | optional | The main descriptor that introduces Klarna in the payment form. The value will be dynamically adjusted based on the locale provided when you initialized the Klarna SDK. |
subheader | optional | The sub-header descriptor that must be loaded inline below the main descriptor header. It's a short and enriched descriptive text that provides transparency on available options like installments, pay later, etc. |
message | optional | Enriched tailored description with link. |
badge | optional | Badge used for saved options or promotions. |
terms | optional | Defines terms/disclosures potentially with links. |
- 1.icon
- 2.badge
- 3.header
- 4.subheader
- 5.message
- 6.terms
- 7.button
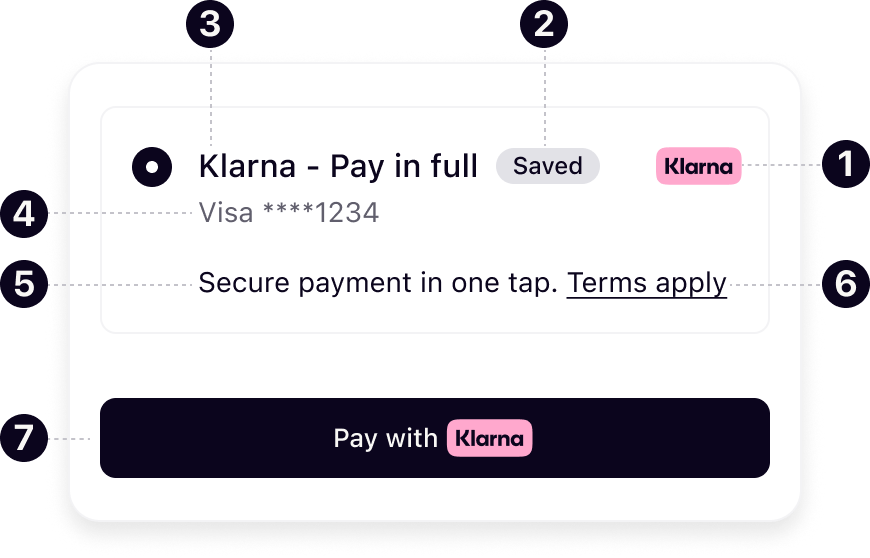
Present the Klarna payment option elements within your Klarna payment method view to render them in the payment form. The code snippet below shows a very basic sample of how you can do so:
SWIFT
1
2
3
4
5
6
7
8
9
10
private func renderKlarnaPresentation(content: KlarnaPaymentPresentationContent) {
    if let headerText = content.paymentOption?.header, case .plainText(let text) = headerText {
        // Show the header text in the UI (for example in a UITextView)
    }
    if let subheaderText = content.paymentOption?.subheader, case .plainText(let text) = subheaderText {
        // Show the subheader text in the UI (for example in a UITextView)
    }
    if let badgeText = content.paymentOption?.badge, case .plainText(let text) = badgeText {
        // Show the badge text in the UI (for example in a UITextView)
}Handle Klarna payment option selection and deselection
When a Klarna payment option is selected/deselected, ensure the additional visual components are shown/hidden properly.
SWIFT
1
2
3
4
5
6
7
8
9
10
// UIKit approach
func toggleKlarnaPaymentOptionSelection(isSelected: Bool) {
    // In this example, klarnaPresentationContainer is a view containing
    // presentation message, terms and button
    klarnaPresentationContainer.isHidden = !isSelected
}

// SwiftUI approach
struct KlarnaPaymentOption: View {
@State var isSelected: BoolHandling links in the message
The message contained within the payment object contains two different classifications of links as set forth by the
context value.| Context Value | Purpose |
|---|---|
info | This indicates that the content of the URL is purely informational. |
auth | This value indicates that the content of the URL requires customer authentication. |
Due to the authentication requirements associated with the
auth context, it is necessary for the link to be opened in a non-ephemeral ASWebAuthenticationSession on iOS and a CustomTab on Android. By contrast, info context links can be opened in any WebView. To simplify the requirements associated with properly handling these links, we have created the following method for you to call.SWIFT
1
2
3
4
5
6
7
8
9
10
// Handle the presentation link
klarna.payment.presentation.handleLink(
    content: <PAYMENT_PRESENTATION_CONTENT>,
    url: <URL>)
{ (result: Result<KlarnaPaymentPresentationContent, KlarnaSDKError>) in
    switch result {
    case .success(let paymentPresentationContent):
        // Payment presentation link handling was successful. paymentPresentationContent contains
        // the latest payment presentation information.
print("Payment presentation link handling succeeded.")The following table lists the parameters of
KlarnaPaymentPresentation. method.| Name | Type | Presence | Description |
|---|---|---|---|
activity | Activity | required for Android only | The Activity instance of your app. |
content | KlarnaPaymentPresentationContent | required | The presentation content that you've already fetched using the KlarnaPaymentPresentation. method. |
url | String | required | The URL to handle. |
callback | KlarnaPaymentPresentationCallback | required | The callback to get notified of the result of payment presentation link handling. |
Rendering the Klarna payment button
The Mobile SDK provides a native UI view called
KlarnaPaymentButton that follows Klarna's visual identity.Klarna payment button variants
Choose the theme and shape of the payment button to best fit into your online store in a way that complements your brand and encourages user engagement. More details on the button styling can be found here.
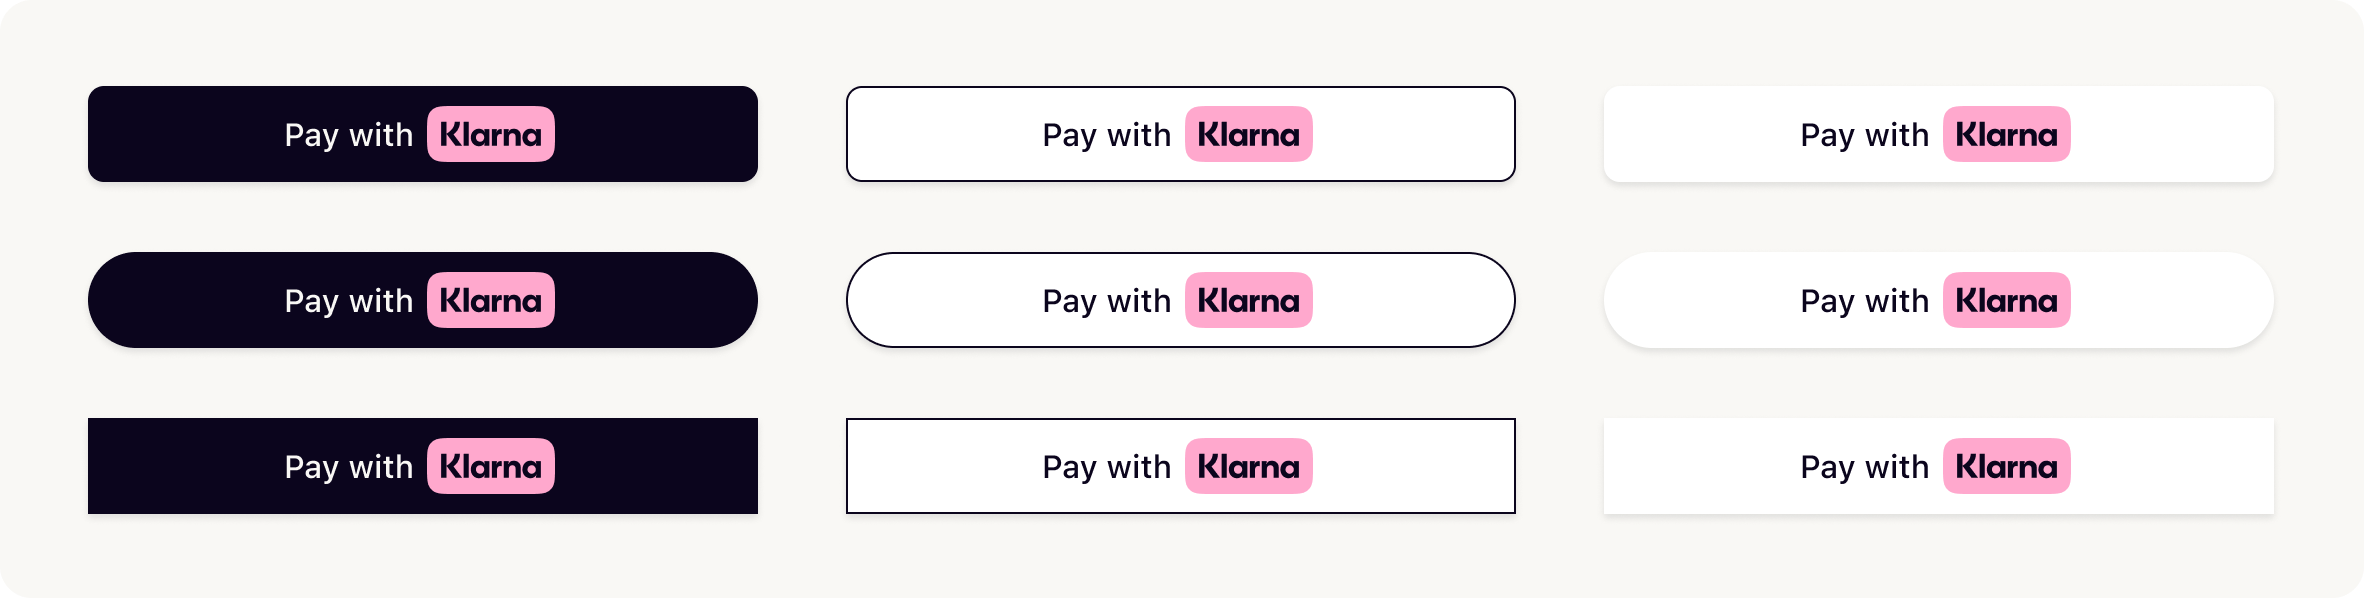
Creating Klarna payment button
To add the Klarna payment button to your app you can do something like below:
SWIFT
1
2
3
4
5
6
7
8
9
10
// Create an instance of KlarnaPaymentButtonConfiguration
let paymentButtonConfiguration = KlarnaPaymentButtonConfiguration(
    state: .default,
    intent: .pay,
    shape: .pill,
    style: .outlined,
    theme: .light
)

// Create the payment buttonThe table below lists the properties of
KlarnaPaymentButtonConfiguration:| Name | Type | Presence | Description |
|---|---|---|---|
state | KlarnaButtonState | optional | Sets the initial state of the button. If not set, "default" will be used. |
shape | KlarnaButtonShape | optional | Defines the shape of the button. If not set, "rounded rect" will be used. |
style | KlarnaButtonStyle | optional | Defines the style of the button. If not set, "filled" will be used. |
theme | KlarnaTheme | optional | Defines the theme of the button. If not set, "dark" will be used. |
intent | KlarnaPaymentButtonIntent | optional | Defines the intent that the payment button will be used for. Possible values: pay, subscribe, addToWallet. |
Handle payment button tap
When the payment button is tapped, you should initiate the payment request process. This is done by calling the
KlarnaPayment. method. There are two options for initiating the payment request using the initiate() method:- Client-side, sharing the details of customer's checkout session (
paymentRequestData) when calling theinitiate()method. - Using the Klarna
payment_associated with the customer's checkout session that was generated server-side by calling the Klarna Payment Request API.request_ id
Client-side payment request initiation
In client-side payment request initiation, you pass all the data needed to create and initiate a payment request to the Mobile SDK and the Mobile SDK takes care of creating and initiating the payment request.
The following table lists the parameters of
KlarnaPayment. method.| Name | Type | Presence | Description |
|---|---|---|---|
activity | Activity | required for Android only | The Activity instance of your app. |
data | KlarnaPaymentRequestData | required | The data needed to create and initiate the payment request. |
callback | KlarnaPaymentRequestCallback | required | The callback to get notified of the result of payment request initiation. |
The table below lists all the properties of
KlarnaPaymentRequestData.| Parameter | Presence | Description |
|---|---|---|
currency | required | Three-letter ISO 4217 currency code (e.g., USD, EUR). |
amount | required | Total amount of a one-off purchase, including tax and any available discounts. The value should be in non-negative minor units. Eg: 25 Dollars should be 2500. |
paymentRequestReference | optional | Reference to the payment session or equivalent resource created on the integrator's side. |
supplementaryPurchaseData | optional | Provides additional details about the transaction to help reduce fraud risk and enhance transparency. See Sharing supplementary purchase data. |
shippingConfig | optional | Configure how the shipping collection form will behave in the purchase flow. Without the shipping config, no shipping collection form will be displayed. |
requestCustomerToken | optional | Object to request customer account linking to be set up, effectively returning a token called customer_ on successful confirmation of the payment request. |
SWIFT
1
2
3
4
5
6
7
8
9
10
// Create an instance of KlarnaPaymentRequestData
let paymentRequestData = KlarnaPaymentRequestData(
    amount: <AMOUNT>,
    currency: <CURRENCY>,
    paymentRequestReference: <PAYMENT_REQUEST_REFERENCE>,
    requestCustomerToken: <REQUEST_CUSTOMER_TOKEN>,
    shippingConfig: <SHIPPING_CONFIG>,
    collectCustomerProfile: <COLLECT_CUSTOMER_PROFILE>,
    supplementaryPurchaseData: <SUPPLEMENTARY_PURCHASE_DATA>
)Server-side payment request initiation
Call the Klarna Payment Request API to initiate a transaction from your backend. If customer verification is required, Klarna processes the request and creates a unique payment identifier for tracking. The Payment Request is then returned in the
SUBMITTED state with the interaction details needed to complete the payment flow.For the full resource model and the states a Payment Request can transition through, see Payment Request.
Request
Call createPaymentRequest with the payment context and a
with the payment context and a customer_. For Mobile SDK integrations, set method to HANDOVER and provide both return URLs. return_ is required by the API and is used whenever the Klarna Purchase Journey ends in a browser, including a WebView inside your app. app_ is what returns the customer to your native app, so set it for any app integration.Configure customer interaction parameters:
When integrating Klarna's purchase flow, it's essential to define how the customer should be redirected after completing or exiting the Klarna experience. Depending on whether the flow runs in a web or mobile app environment, Klarna uses one or both return URLs to ensure a seamless handoff back to the Partner's experience.
| Parameter name | Presence | Description |
|---|---|---|
return_ | required when method is HANDOVER | If the Klarna purchase flow is launched in a web environment, Klarna will redirect the customer to this URL after the customer finishes their interaction with Klarna, either by approving or aborting the purchase flow. This is a URL collected from the Partner. |
app_ | recommended for app integrations | The customer may be redirected to a third party app (bank app) or the Klarna app during the Klarna Purchase Journey on mobile environments. This URL enables Klarna to return the customer back to the Partner's mobile app. Ensure the app_ is set up to register a URL scheme (e.g., partnerapp:/) that resumes the payment flow. The Partner is expected to open the integrating mobile application in its last state (no state changes or deeplink navigations). |
Visual representations for Web flow and App handover flow:
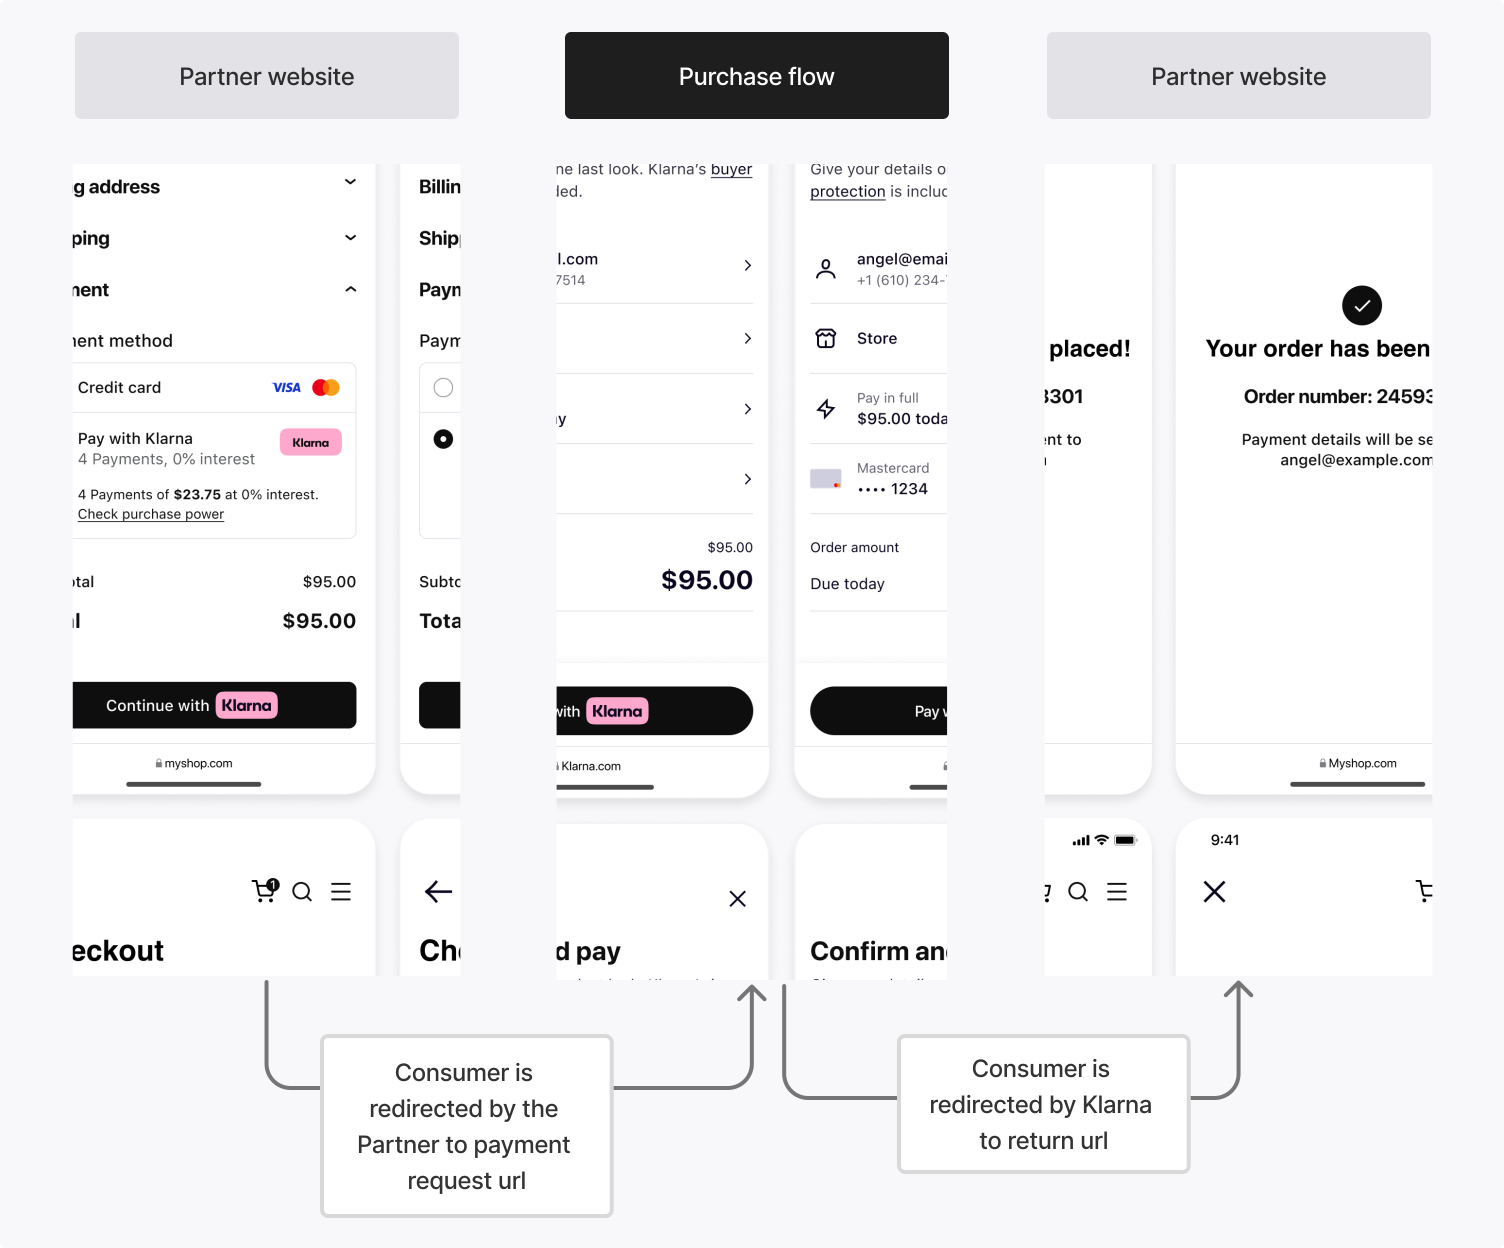 | 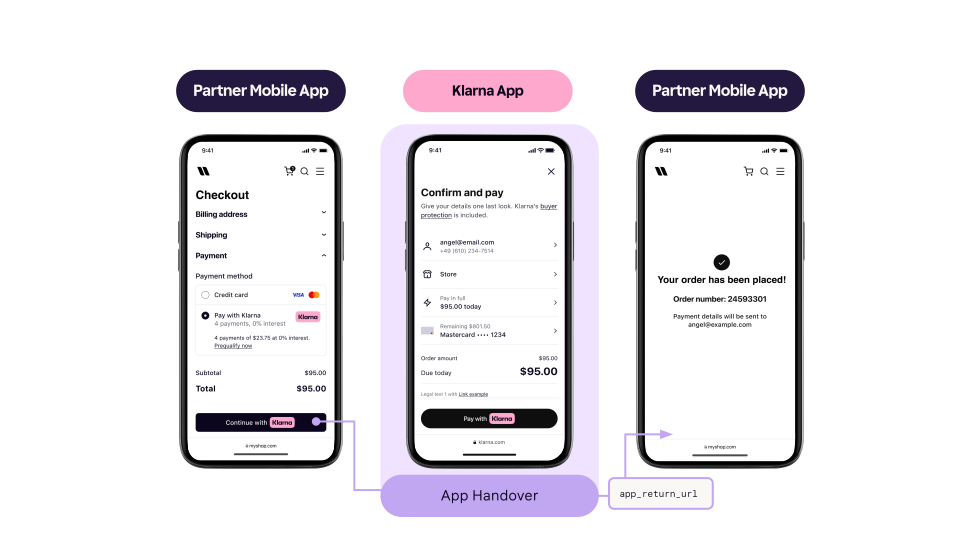 |
| Web handover | App handover |
Return URL trigger scenarios
return_ and app_ are not mutually exclusiveIn different scenarios, either or both of the
return_ and app_ can be triggered:Example 1: Only
app_ is triggered – App-to-app flowThe Partner's native mobile app opens the Klarna purchase flow using a universal link. If the Klarna app is installed, the customer is taken directly into the Klarna app. After approval, they are redirected to the
app_, returning them to the Partner's app.Example 2: Both URLs are triggered – WebView flow with app handover
The Partner's native mobile app starts the Klarna purchase flow in a System WebView. If the customer needs to authenticate via an external banking app, they're handed back to the Partner's app using
app_. They then resume the purchase flow in the WebView and, upon completion, are redirected to the return_.Provide supplementary purchase data:
Supplementary Purchase Data refers to additional transaction details shared with Klarna that provide greater context about a purchase. These data points—such as line items, subscription details, or industry-specific attributes—help improve underwriting accuracy, fraud assessment, and the customer's post-purchase experience. See Sharing supplementary purchase data.
Integration requirement
Data requirements
Depending on the business type, certain
supplementary_ fields are required under the Klarna Network Rules. However, purchase_, line_, customer and shipping whenever available must always be submitted, as they enable transaction-level traceability, power Klarna's fraud prevention and underwriting models, dispute handling, and ensure a consistent customer experience across Klarna's ecosystem.Sample request
SHELL
1
2
3
4
5
6
7
8
9
10
curl https://api-global.test.klarna.com/v2/payment/requests \
  -H 'Authorization: Basic <API key>' \
  -H 'Content-Type: application/json' \
  -d '{
        "currency": "USD",
        "amount": 11800,
        "payment_request_reference": "partner-request-reference-1234",
        "customer_interaction_config": {
          "method": "HANDOVER",
"return_url": "https://partner.example/klarna-redirect?id={klarna.payment_request.id}",Response
When the request succeeds, Klarna returns a Payment Request in the
SUBMITTED state.The response includes:
- 1.
payment_— a unique identifier for the Payment Request.request_ id - 2.
payment_— the URL used to initiate the customer's Klarna Purchase Journey.request_ url
Sample payload
JSON
1
2
3
4
5
6
7
8
9
10
{
"payment_request_id": "krn:payment:us1:request:552603c0-fe8b-4ab1-aacb-41d55fafbdb4",
"state": "SUBMITTED",
"state_context": {
"customer_interaction": {
"method": "HANDOVER",
"payment_request_id": "krn:payment:us1:request:552603c0-fe8b-4ab1-aacb-41d55fafbdb4",
"payment_request_url": "https://pay.test.klarna.com/na/requests/6bbf6775-[...]/start"
}
},Once you have created the Payment Request, take the
payment_ from the server-side response and provide it in the Mobile SDK initiate method as highlighted in the code below.| Name | Type | Presence | Description |
|---|---|---|---|
activity | Activity | required for Android only | The Activity instance of your app. |
paymentRequestId | String | required | The ID of the payment request that has been created server-side. |
callback | KlarnaPaymentRequestCallback | required | The callback to get notified of the result of payment request initiation. |
SWIFT
1
2
3
4
5
6
7
8
9
10
@objc func didTapPaymentButton() {
    // Initiate the payment request
    klarna.payment.initiate(paymentRequestId: <PAYMENT_REQUEST_ID>) { (result: Result<KlarnaPaymentRequest, KlarnaSDKError>) in
        switch result {
        case .success(let paymentRequest):
            // Payment request initiation was successful. paymentRequest contains the
            // information about the payment request.
            print("Payment request initiation succeeded.")
        case .failure(let error):
// Payment request initiation failed. More information about the failureReceive the klarna_network_session_token
Once the customer completes the Klarna Purchase Journey, Klarna issues a
klarna_ and the Payment Request transitions to COMPLETED. This token is used in the next step to finalize the authorization directly with Klarna.Klarna provides multiple methods to retrieve the token. Subscribing to the webhook event is required and may be combined with reading the Payment Request as a fallback for resilience.
Integration requirement
The
klarna_ is valid for only 1 hour and must be used within this time frame to finalize the authorization. See Klarna Network Session Token — Expiration for the expiration model and where to read the expiration timestamp.Method: Subscribe to the payment.request.state-change.completed webhook (required)
Klarna sends this event when the Payment Request reaches the
COMPLETED state, indicating that the customer has approved the purchase and the authorization can be finalized. Subscribe via the Setup your webhooks guide.Sample payload
JSON
1
2
3
4
5
6
7
8
9
10
{
  "metadata": {
    "event_type": "payment.request.state-change.completed",
    "event_id": "d9f9b1a0-5b1a-4b0e-9b0a-9e9b1a0d5b1a",
    "event_version": "v2",
    "occurred_at": "2024-01-01T12:00:00Z",
    "correlation_id": "2d1557e8-17c3-466c-924a-bbc3e91c2a02",
    "subject_account_id": "krn:partner:global:account:test:HGBY07TR",
    "recipient_account_id": "krn:partner:global:account:test:LWT2XJSE",
"product_instance_id": "krn:partner:product:payment:ad71bc48-8a07-4919-[...]",Integration requirement
Never use Mobile SDK events to trigger Payment Authorization. Always rely on Klarna webhooks to receive the
klarna_ and finalize the payment after the customer completes the purchase.Method: Read the Payment Request (optional fallback)
As a fallback (for example, when the webhook is delayed or the handler missed it) retrieve the token by calling readPaymentRequest. Once the Payment Request reaches the
. Once the Payment Request reaches the COMPLETED state, the token is available in state_.Authorize the payment
Finalize the payment by calling authorizePayment from your backend with the
from your backend with the klarna_ in the Klarna-Network-Session-Token request header. Klarna creates the Payment Transaction and returns the result.The customer's selected payment method is carried by the Klarna Network Session Token. There is no need to send
payment_.Include at minimum:
| Parameter | Required | Description |
|---|---|---|
Klarna-Network-Session-Token (header) | Yes | The Klarna Network Session Token received in the previous step. |
currency | Yes | Same currency used in the Payment Request. |
request_ | Yes | Same amount used in the Payment Request. |
request_ | Recommended | The Partner's own reference for the Payment Transaction, used for reconciliation. |
supplementary_ | Recommended | Same supplementary data sent in the Payment Request. Significant differences may cause Klarna to require re-confirmation. |
acquiring_ | Conditional | Routes the Payment Transaction to a specific Payment Account or Payment Acquiring Account, and optionally requests the currency Klarna uses to settle the transaction. Add settlement_ (ISO 4217) when a settlement currency that differs from the Payment Transaction currency is required. See Request settlement currency. |
step_ | Recommended | Opts the Partner in to the STEP_ outcome. When included, Klarna can request additional customer interaction (returning a new Payment Request) instead of declining cases where it needs more risk signals. Without it, those cases are returned as DECLINED. Set customer_ to HANDOVER and provide return_, which the API requires, together with app_, which returns the customer to your native app after the step-up Klarna Purchase Journey. See Payment Authorization. |
Sample request
SHELL
1
2
3
4
5
6
7
8
9
10
curl https://api-global.test.klarna.com/v2/payment/authorize \
  -H 'Authorization: Basic <API key>' \
  -H 'Content-Type: application/json' \
  -H 'Klarna-Network-Session-Token: krn:network:us1:test:session-token:eyJhbGciOiJIU...' \
  -d '{
        "currency": "USD",
        "request_payment_transaction": {
          "amount": 11800,
          "payment_transaction_reference": "partner-transaction-reference-1234"
},Handle the authorization result
Klarna returns a
payment_ object. The result field indicates the outcome and determines the next action:| Result | Description | Next steps |
|---|---|---|
APPROVED | The authorization succeeded and a payment_ was created. | Store the payment_ and proceed with post-purchase operations (capture, refund, etc.). Return the customer to a confirmation page. |
DECLINED | The authorization was not approved. No transaction is created. Common causes include an expired Klarna Network Session Token, significant discrepancies between the Payment Request and the authorize call, or risk evaluation requiring additional customer interaction when step_ was not included in the request. | Show the customer a decline or alternative payment page. |
STEP_ | Klarna requires additional customer interaction before approving. Only returned when step_ was included in the authorize request. The response includes a new Payment Request with state_. | Pass the new Payment Request to the Mobile SDK so it can launch the step-up Klarna Purchase Journey. When the customer completes it, a new Klarna Network Session Token arrives via webhook. Call authorizePayment again with the new token. |
Step-up config recommendation
Without
step_ in the authorize request, Klarna cannot return STEP_. It returns DECLINED instead in cases where additional customer interaction would have been needed. Klarna recommends including step_ by default to recover those cases.JSON
1
2
3
4
5
6
7
8
9
10
{
"payment_transaction_response": {
"result": "APPROVED",
"payment_transaction": {
"payment_transaction_id": "krn:payment:us1:transaction:6debe89e-98c0-[...]",
"payment_transaction_reference": "partner-transaction-reference-1234",
"amount": 11800,
"currency": "USD",
"payment_pricing": {...},
"payment_funding": {Handle STEP_UP_REQUIRED
When
authorizePayment returns STEP_, Klarna creates a new Payment Request that drives the customer through an additional Klarna Purchase Journey to gather the missing risk signals. The integration loops once more through initiating the new Payment Request with the Mobile SDK, receiving the new klarna_, and authorizing again — ending with a second authorizePayment call that returns APPROVED or DECLINED.Launch the step-up Klarna Purchase Journey
Extract
payment_ from the STEP_ response and pass it to the Mobile SDK by calling KlarnaPayment.. The SDK launches the step-up Klarna Purchase Journey — no additional data is needed. The customer completes the additional verification, and the new Payment Request transitions to COMPLETED.Receive the new Klarna Network Session Token
A second
payment. webhook is delivered, carrying a fresh klarna_ for the new Payment Request. Handle it with the same webhook handler used earlier.Retry authorizePayment with the new token
Call authorizePayment again, using the new
again, using the new klarna_ in the Klarna-Network-Session-Token header. Send the same currency, request_, acquiring_, and supplementary_ used in the original authorize call. Klarna returns APPROVED or DECLINED — STEP_ is not returned a second time once the customer has gone through the step-up Klarna Purchase Journey.Step-up retry guidance
Treat the step-up loop as a single recoverable detour, not a full restart. Reuse the Payment Transaction reference, supplementary data, and routing from the first authorize call — only the Klarna Network Session Token changes between the two requests.
Optional functionality available via the Mobile SDK
Klarna payment request fetching
To get the information associated with a payment request, you can use the
KlarnaPayment. method. The following code shows a sample implementation:SWIFT
1
2
3
4
5
6
7
8
9
10
// Fetch the payment request
klarna.payment.fetch(paymentRequestId: <PAYMENT_REQUEST_ID>) { (result: Result<KlarnaPaymentRequest, KlarnaSDKError>) in
    switch result {
    case .success(let paymentRequest):
        // Payment request fetch was successful. paymentRequest contains the
        // information about the payment request.
        print("Payment request fetch succeeded.")
    case .failure(let error):
        // Payment request fetch failed. More information about the failure
// is available in the error object.The following table lists the parameters of
KlarnaPayment. method.| Name | Type | Presence | Description |
|---|---|---|---|
paymentRequestId | String | required | The ID of the payment request to fetch. |
callback | KlarnaPaymentRequestCallback | required | The callback to get notified of the result of payment request fetch. |
Klarna payment request cancelation
To cancel a payment request, you can use the
KlarnaPayment. method. The following code shows a sample implementation:SWIFT
1
2
3
4
5
6
7
8
9
10
// Cancel the payment request
klarna.payment.cancel(paymentRequestId: <PAYMENT_REQUEST_ID>) { (result: Result<KlarnaPaymentRequest, KlarnaSDKError>) in
    switch result {
    case .success(let paymentRequest):
        // Payment request cancelation was successful. paymentRequest contains the
        // information about the canceled payment request.
        print("Payment request cancelation succeeded.")
    case .failure(let error):
        // Payment request cancelation failed. More information about the failure
// is available in the error object.The following table lists the parameters of
KlarnaPayment. method.| Name | Type | Presence | Description |
|---|---|---|---|
paymentRequestId | String | required | The ID of the payment request to cancel. |
callback | KlarnaPaymentRequestCallback | required | The callback to get notified of the result of payment request cancelation. |
Jump to section...