

Activation of SAP Commerce Cloud Add-on
This guide helps you activate Klarna Payments by setting up configurations and credentials in the SAP Commerce Backoffice.
Prerequisites
Before you start, ensure:
- The
klarnapaymentaddonis successfully installed. - You have access to the SAP Commerce Backoffice.
- Credentials from the Klarna Merchant Portal, including API username, API password, and Public Key ID.
Steps to Activate Klarna Payments
Step 1: Create a Klarna Payments configuration
1. Navigate to Klarna Payment Configuration: Go to SAP Commerce Backoffice → Klarna → Klarna Payments Config.
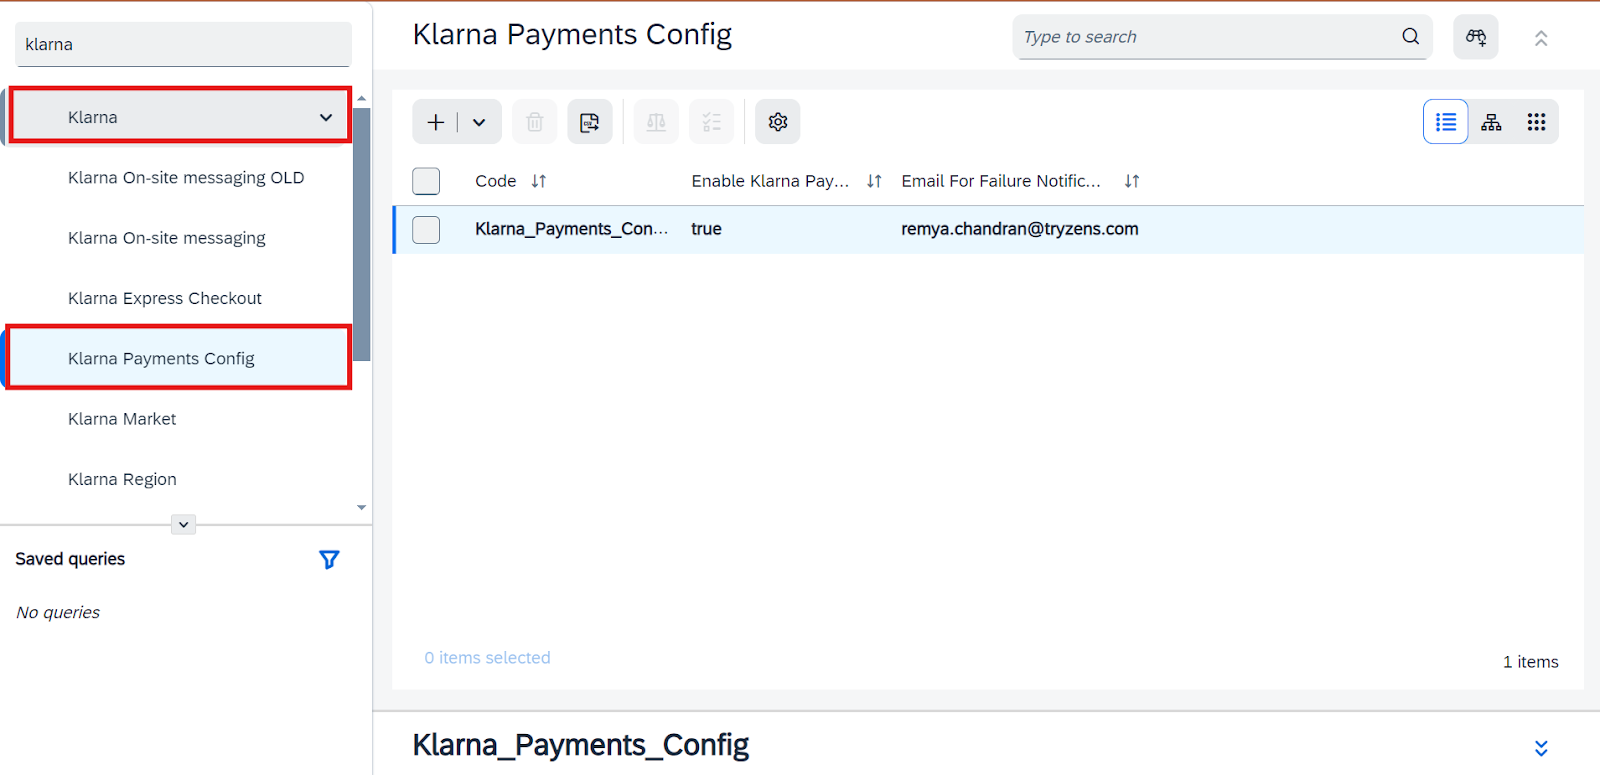
Navigate to Klarna Payment Configuration
2. Create a new Klarna configuration: Select the option to create a new Klarna configuration.
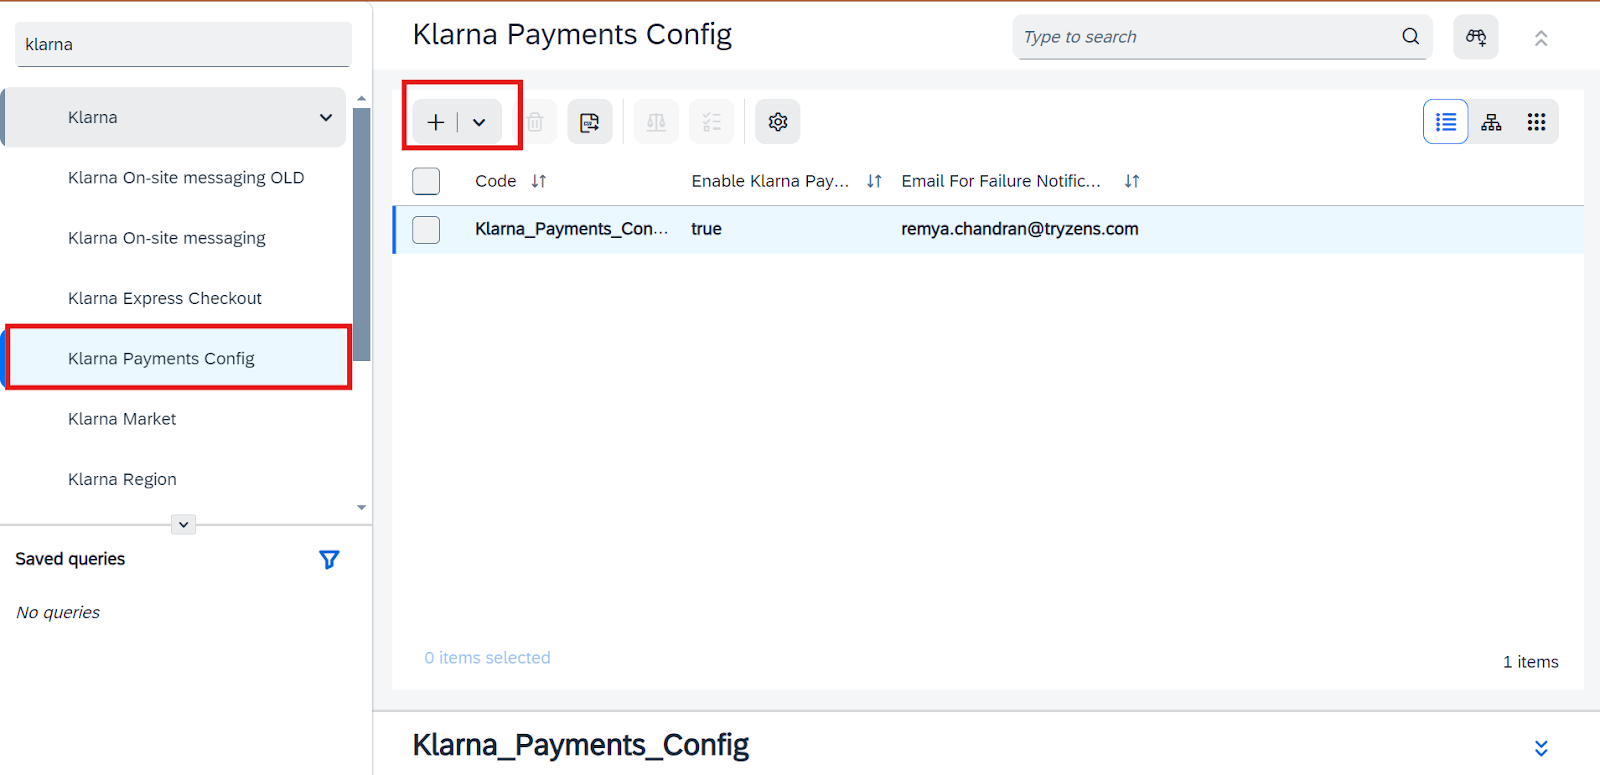
Create a New Klarna Configuration
3. Fill in mandatory fields:
- Code: A unique identifier for the configuration.
- Enable Klarna Payments: Toggle to enable the feature.
- Email for Failure Notifications: Email for receiving alerts.
- Click Next to proceed.
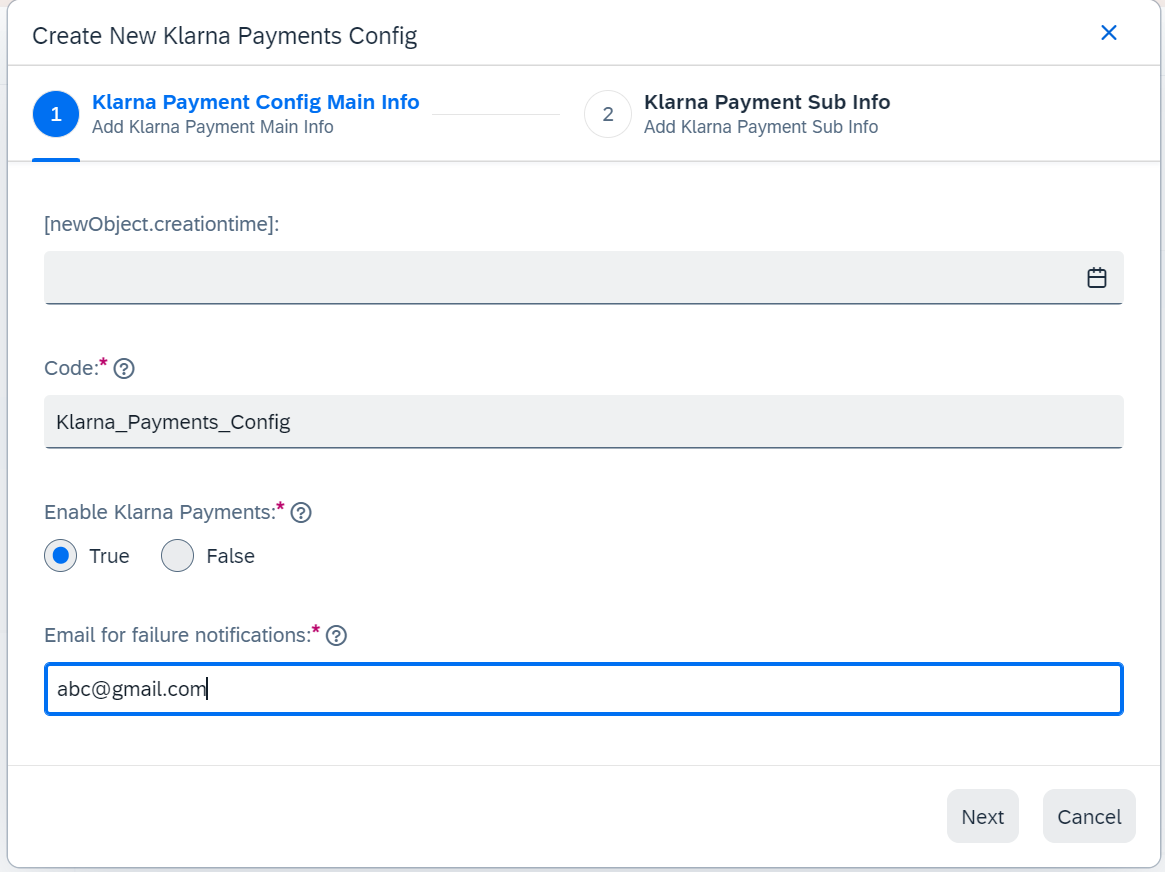
Fill in the Klarna Payments Specific Fields
4. Provide additional details:
- Enable AutoCapture (optional).
- Enable Extra Merchant Data (EMD) (optional).
- Set Merchant Reference 2 and optional color customization for the Klarna interface.
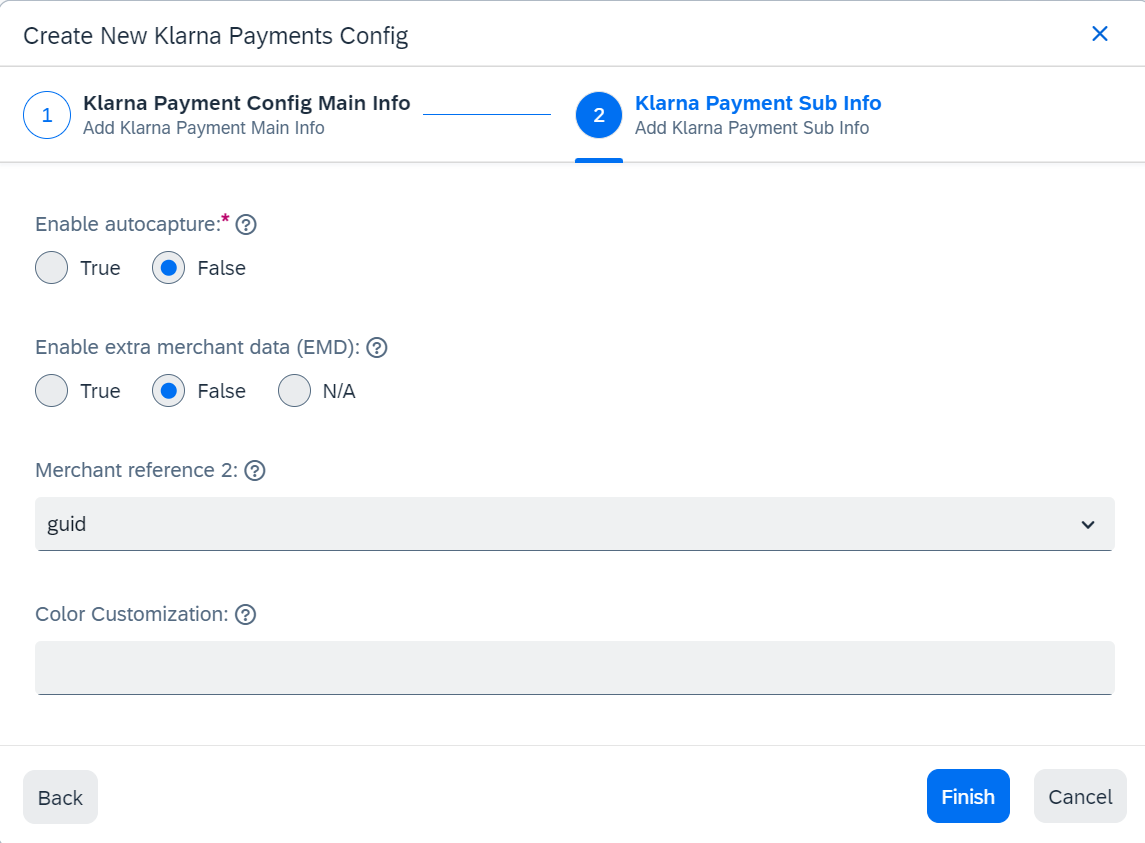
Fill in the Klarna Payments Specific Fields 2
Step 2: Create credential data
1. Navigate to Klarna Activation: In the Backoffice, go to Klarna → Klarna Activation.
2. Add a new credential: Click the + icon below the Klarna Activation section.
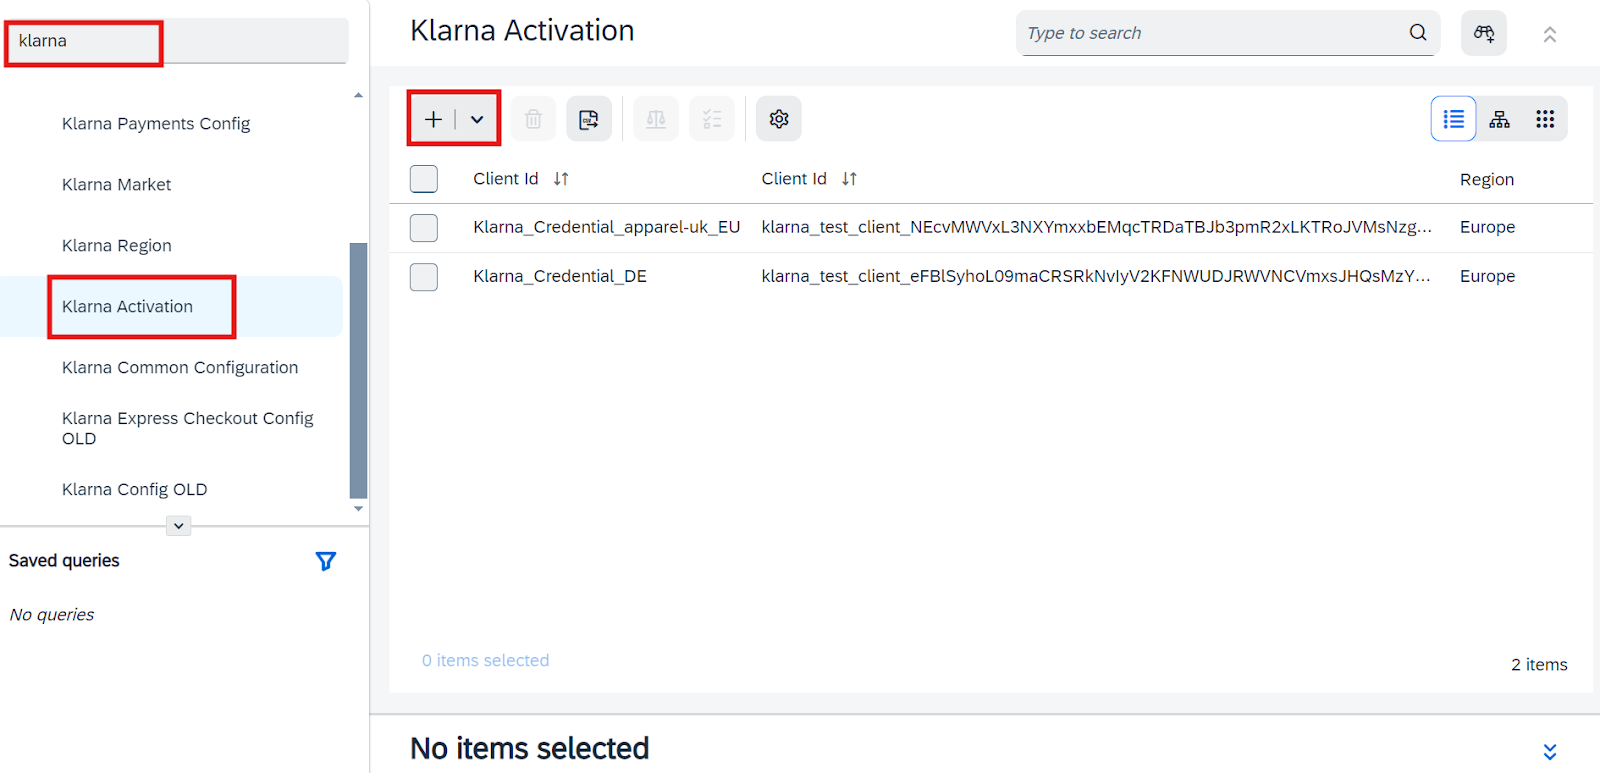
Klarna Activation
3. Fill in mandatory fields:
- Code: Identifier for the credentials.
- Client ID, API Username, and API Password: Retrieved from the Klarna Merchant Portal.
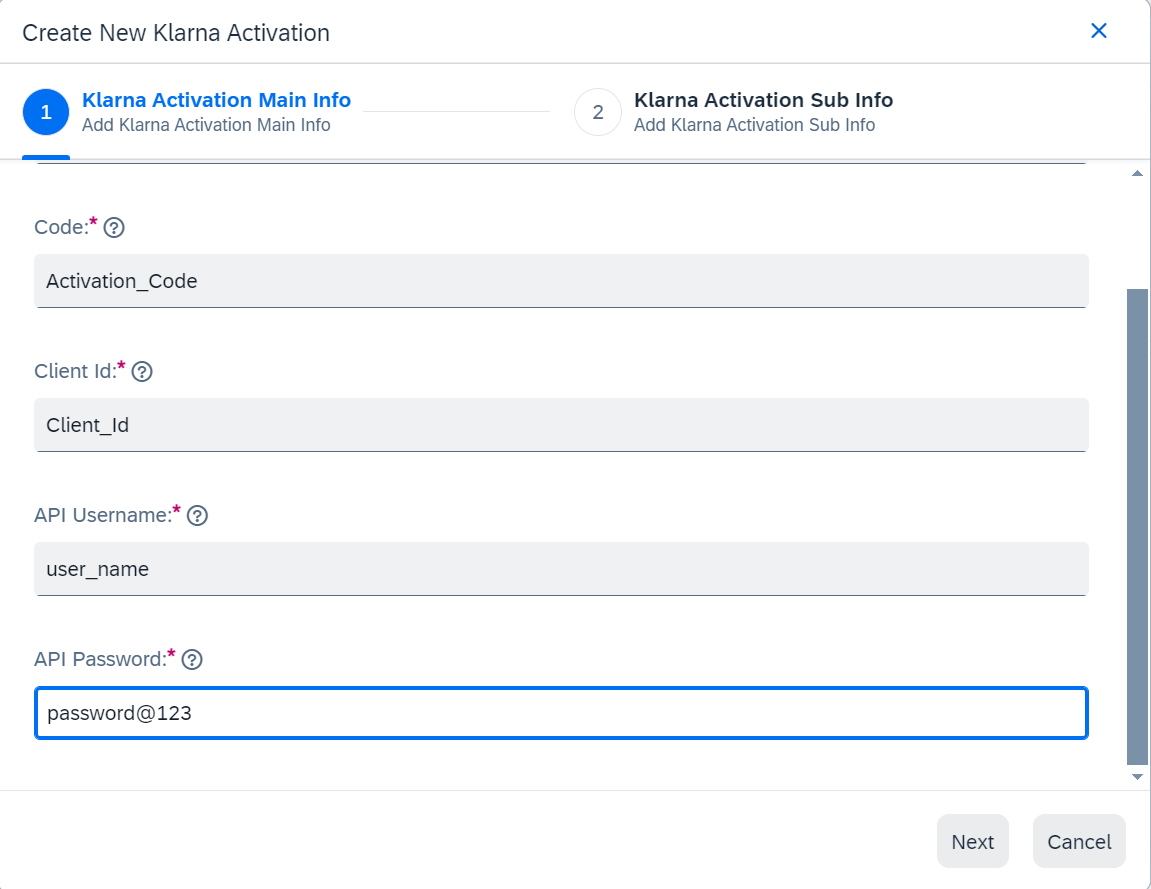
Create new credential
4. Provide additional details:
- Region (e.g., EUROPE, NORTH_AMERICA).
- Supported Markets.
- Enable VCN if applicable.
- Public Key ID: For encrypting VCN data.
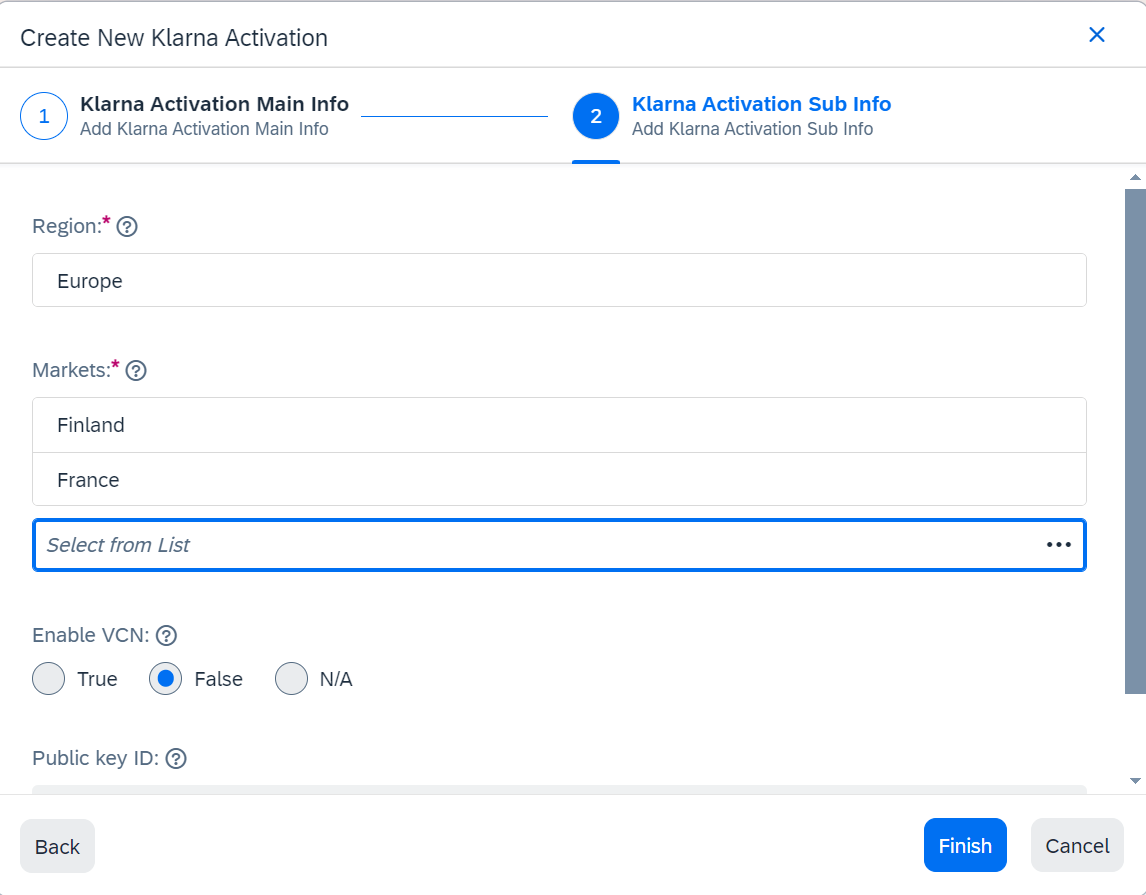
Credential additional details
Step 3: Map credentials and Klarna Payments configuration
1. Navigate to Klarna Common Configuration: Go to Klarna → Klarna Common Configuration.
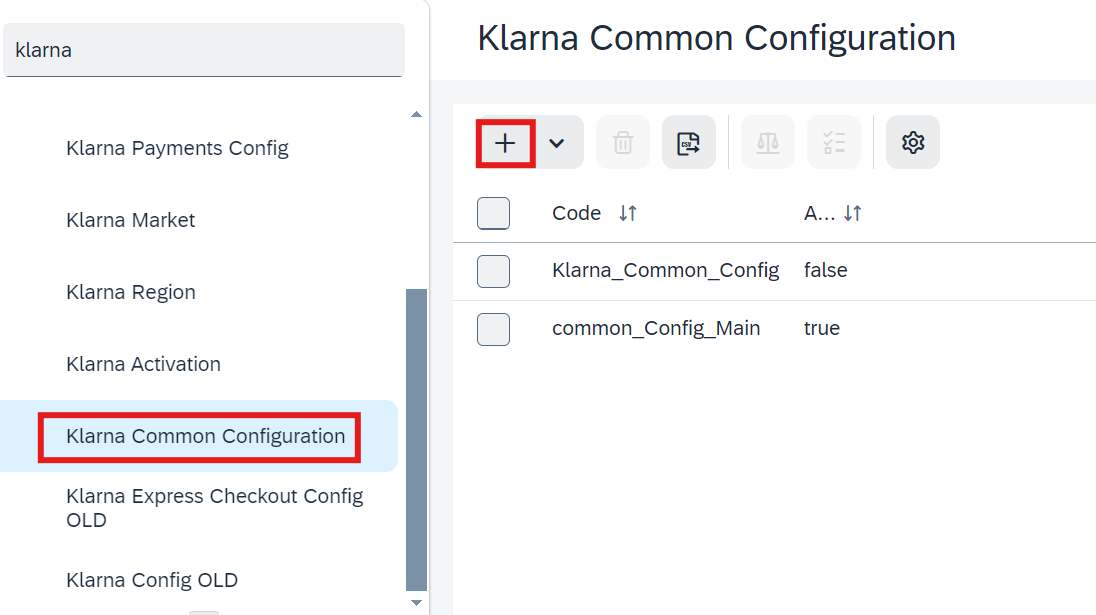
Common Configuration
2. Create a mapping:
- Click the + icon to create a new mapping.
- Fill in details such as Code, Active, and Environment (TEST or LIVE).

Mapping credentials
3. Link Klarna credentials and payment configuration:
- Select the Klarna credentials created in Step 2.
- Associate the Klarna Payments configuration created in Step 1.
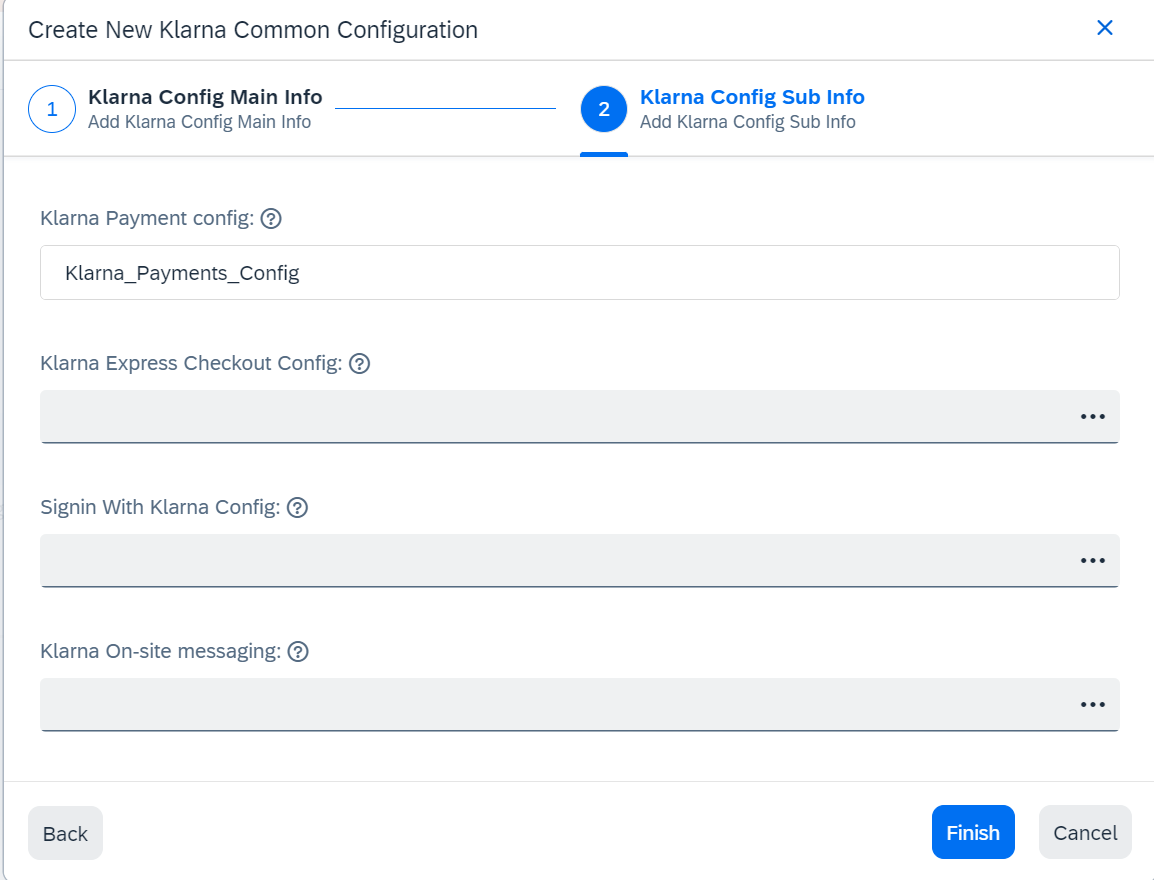
Mapping details
Klarna Payments Configuration Fields
| Attribute | Mandatory | Description |
|---|---|---|
| Klarna API Username | Yes | Generated in Klarna Merchant Portal. |
| Klarna API Password | Yes | Generated in Klarna Merchant Portal. |
| Region | Yes | Choose from EUROPE, NORTH_AMERICA, or OCEANIA. |
| Markets | Yes | Countries supported under the selected region. |
| Environment | Yes | TEST (playground) or LIVE (production). |
| AutoCapture | No | Enables auto capturing during order placement (not relevant if VCN is enabled). |
| Enable VCN | No | Toggles VCN-based settlement. |
| Public Key ID | No | RSA public key provided in JWK format for VCN settlement. Recommended: 4096-bit RSA keypair. |
Tips for an Optimal User Experience
Ensure the Klarna Payments iframe is visible and text is legible by using a consistent minimum width for checkout and billing pages. This enhances the experience for mobile users.
Setting Up Virtual Card Numbers (VCN)
Steps to Enable VCN
Step 1: Enable VCN in Klarna Configuration
- 1.Access Klarna Activation:
- 1.1.Navigate to SAP Commerce Backoffice → Klarna → Klarna Activation.
- 2.Enable VCN:
- 2.1.Select the Enable VCN option.
Step 2: Generate a 4096-bit RSA Key Pair
1. Open a terminal and run the following commands:
BASH
1
2
3
openssl genpkey -algorithm RSA -out private_key.pem -pkeyopt rsa_keygen_bits:4096
openssl rsa -pubout -in private_key.pem -out public_key.pem
2. This will create two files:
private_key.pem(Private key)public_key.pem(Public key)
Step 3: Configure Klarna with RSA Keys
- 1.In Klarna Activation, set the Public Key ID using the contents of
public_key.pem. - 2.Example
public_key.pemfile contents:
TEXT
1
2
3
4
5
6
7
8
9
10
-----BEGIN PUBLIC KEY-----
MIICIjANBgkqhkiG9w0BAQEFAAOCAg8AMIICCgKCAgEAoNYG7l2G8nZa+22oBYZk
tV228lw3UE9WO4oxfknJtKEdHn84x55ULt8KQTh9NVtdeKC8nTfTgyvMt/GNCa18
xuZV/lGYDftKt85hbV5EjOum+StAIufEXvlBX7nMOMc1KyWm9kp2kbqd88mFIX63
KV94OoNEXcNatRDFYR+qz53+ifadDQtQ1slVNStdroCZDJ1+LxtBy9V+BdmsBK1E
RLsKh/JLXyWE24FJKV+z00s7TQkdWW/5ET12OGQYZsWo1yqgi9HplNvrisve8vWP
xaL4m8iZ3I/9yYdg7yANQbTxSJcbbRCgaaagPo30CNxeqU6qafY5g8vY3E52CoXH
DdO4UslX1qcuYIDhqaDzey6W+b8m755xLi+rqQyM4PBWL0J0dM3FVid8+4YKILex
3AKBFciqRCMHSOGaEeyrXKTjlAsghr9RS8PifvQRrL440cHzqw2vX0DvpjSWcmUJ
tW4wUq5RNSsobrxnVmoV6fj1z67Q/1P+l5Ie+oowdahR5ztVqJlO+2PNoX4I5VDsVCN
Important Notes on PCI Compliance
- Do not save decrypted PCI data (e.g., VCN or CVV) on servers.
- Ensure PCI-DSS compliance by securely handling card data.
- Collaborate with partners, Payment Service Providers (PSP), and Acquirers for secure data management.
- Delete any historical decrypted PCI data, regardless of its validity.
Verifying VCN Data in Backoffice
1. Access the Order
- Navigate to Order in the SAP Commerce Backoffice.
- Search for the specific order number.
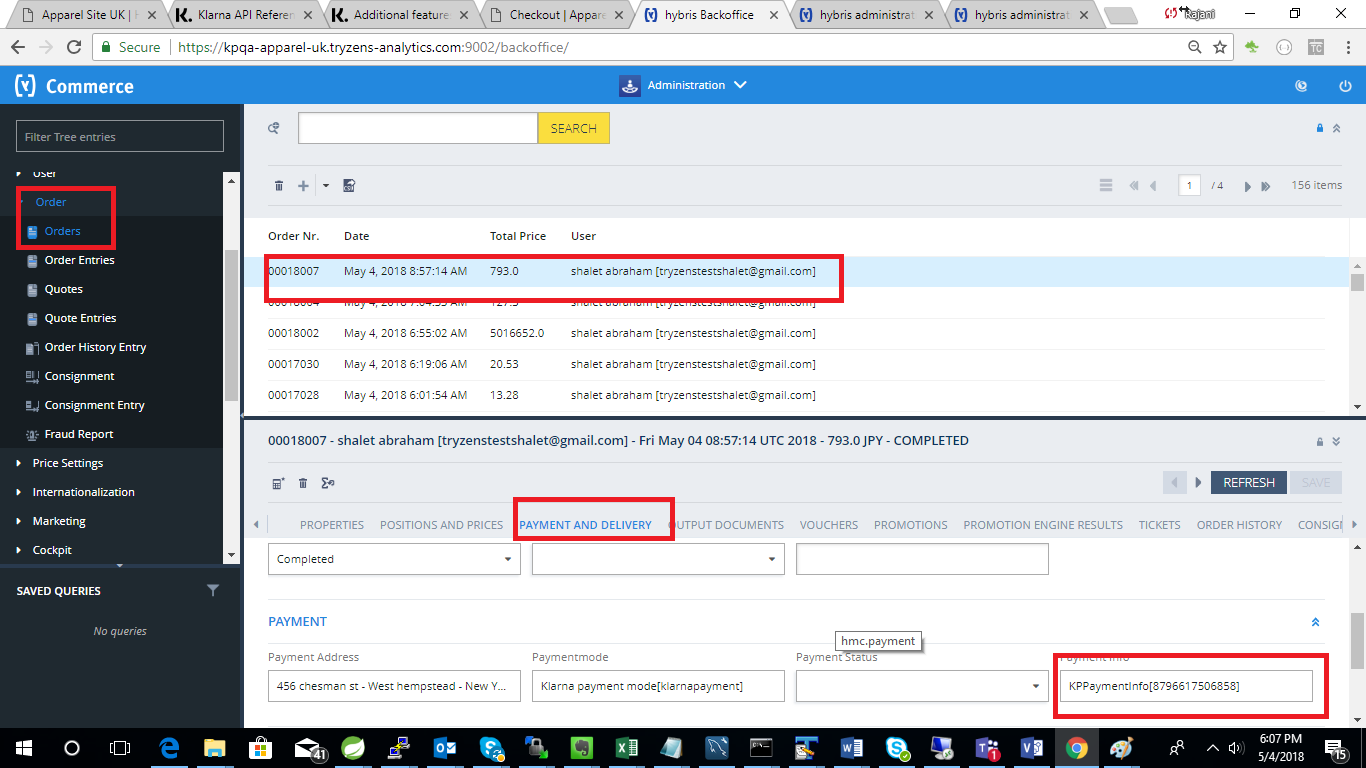
Verifying VCN in order
2. View Order Details
- Click the order number.
- Go to the Payment & Delivery section.
- Select Payment Information to view the VCN details.
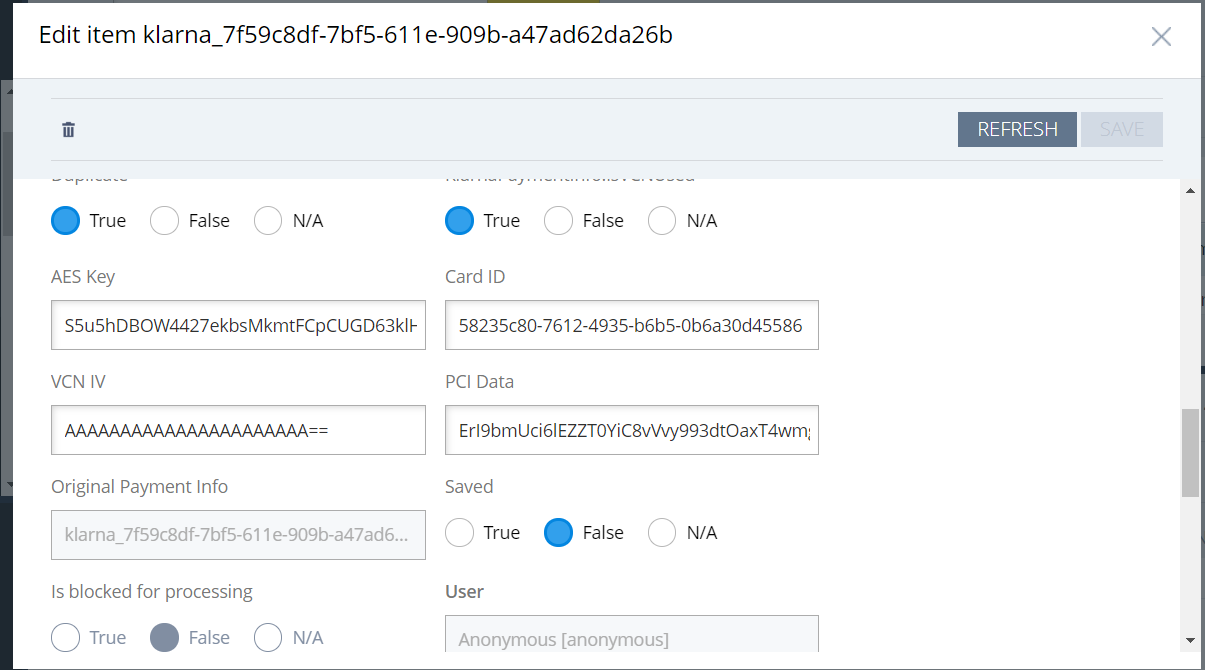
VCN Details
Important!
- VCNs are one-time use cards tied to individual orders.
- Merchants are responsible for securely managing the cards.
- Avoid storing decrypted PCI data in production environments.
Verifying Klarna Order IDs in Backoffice
Steps to Verify Klarna Orders
- 1.Log in to SAP Commerce Backoffice.
- 2.Navigate to Orders:
- 2.1.Click Orders in the left-side menu.
- 3.Search for a Specific Order:
- 3.1.Enter the order number in the search bar.
- 3.2.Open the order by clicking its entry in the results.
Viewing Klarna-Specific Details
1. Verify Klarna Order ID:
- Go to the Properties tab of the order.
- Locate and confirm the Klarna Order ID.
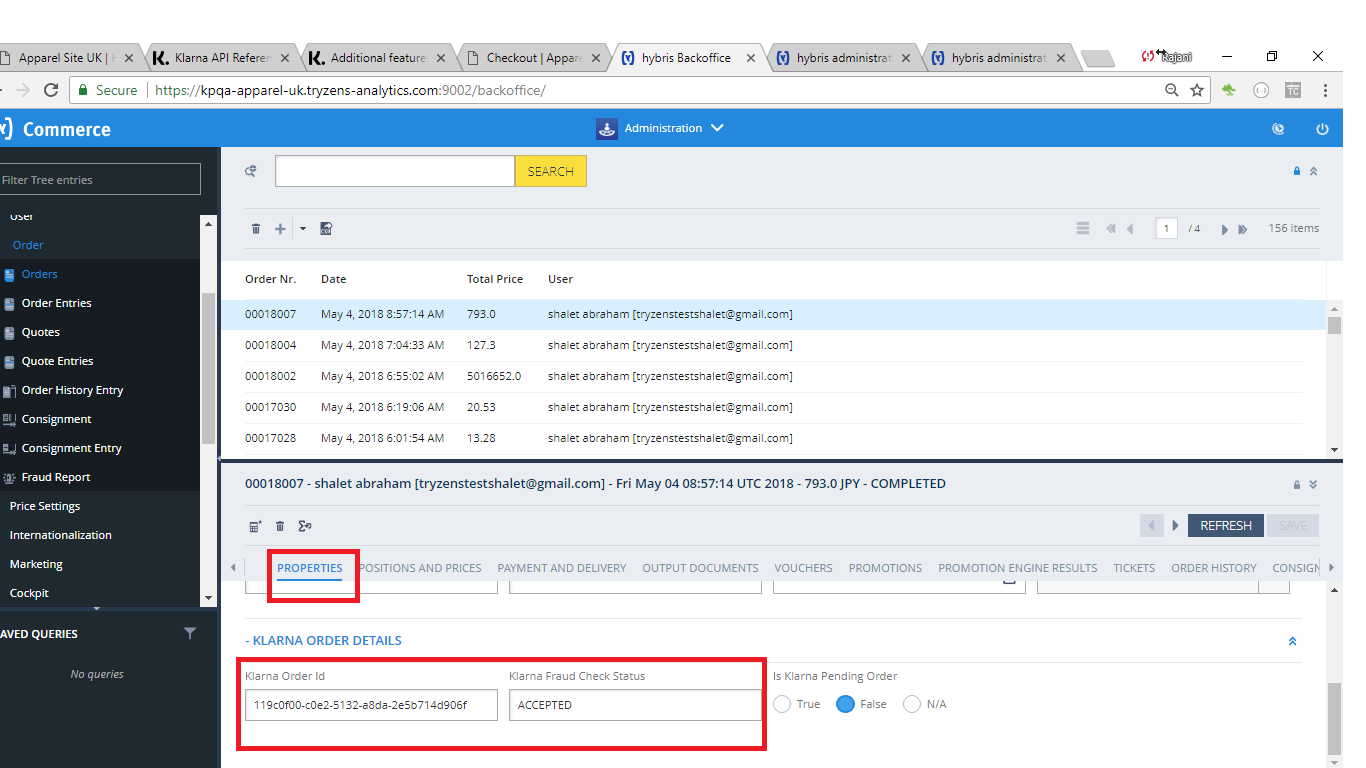
Verify Klarna Order ID
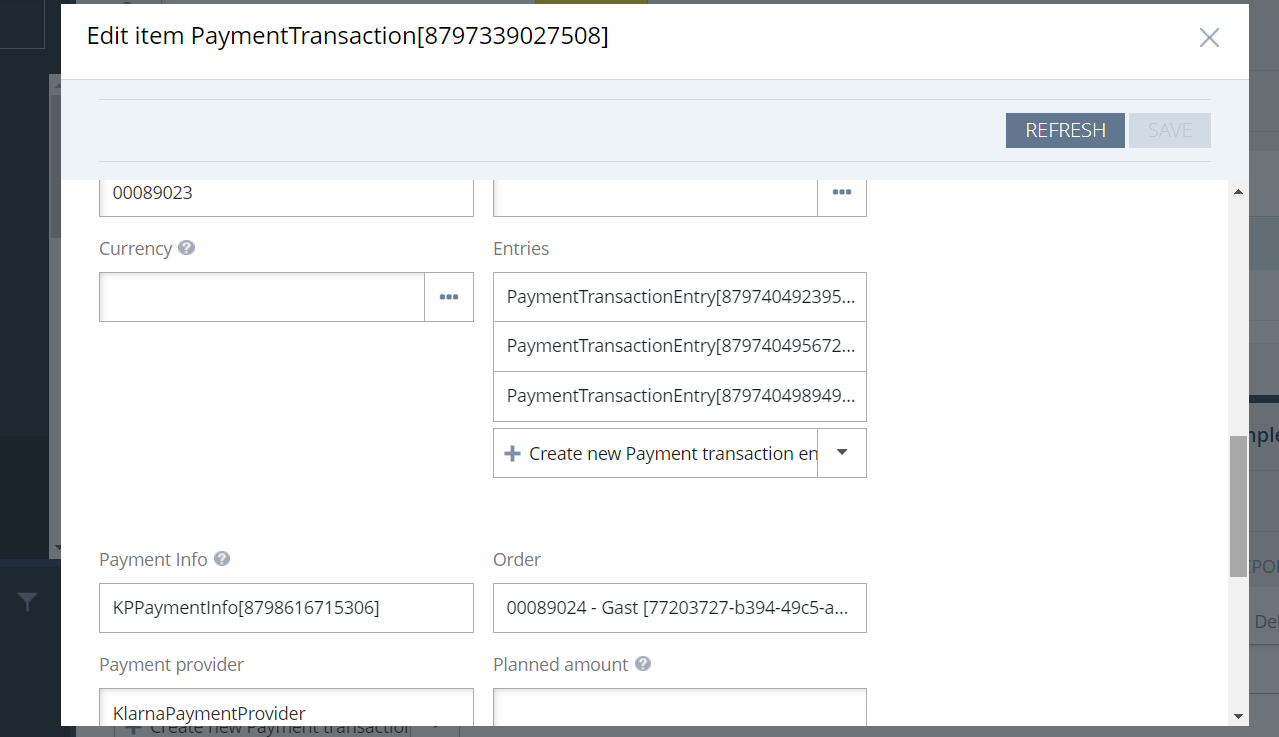
2. Check Payment Transactions:
- Go to the Administration tab.
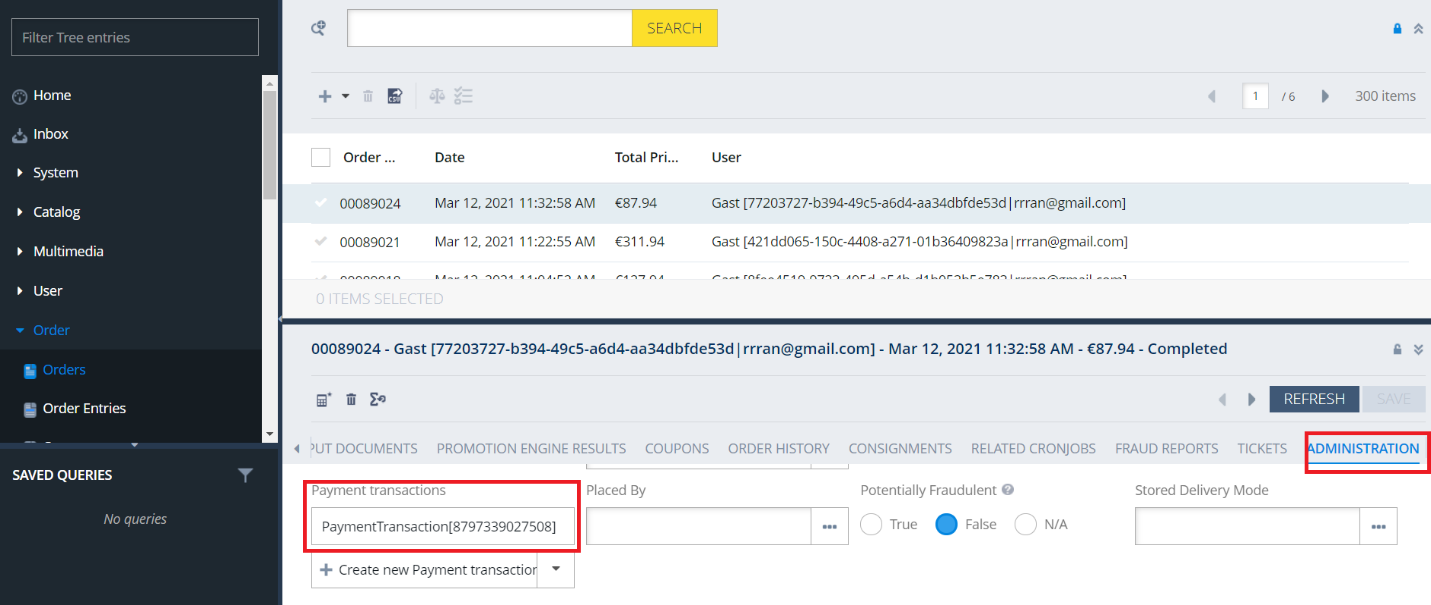
Verify Payment Transactions
- Look for the transaction type
KLARNA*ORDER_PLACED*to verify Klarna-specific transactions
KLARNA_ORDER_PLACE
Configuring Extra Merchant Data (EMD)
The Extra Merchant Data (EMD) feature allows merchants to send additional customer information to Klarna, such as alternative delivery addresses and reservation details. By default, only logged-in customer information is sent.
Steps to Enable EMD in SAP Commerce Backoffice
- 1.Navigate to the Backoffice:
- 1.1.Open SAP Commerce Backoffice.
- 1.2.Go to Klarna → Klarna Payments Configuration.
- 2.Enable the EMD Option:
- 2.1.Locate the Enable EMD setting in the Klarna Payments configuration.
- 2.2.Toggle the option to enable it.
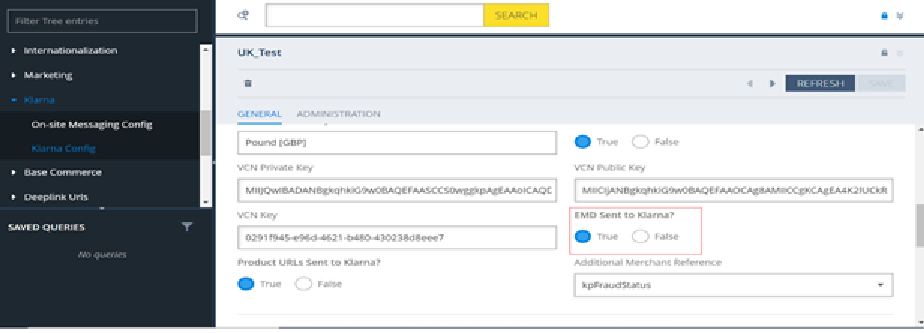
Enable EMD
Configuring EMD in Code
To extend the EMD functionality beyond the default behavior:
- 1.Open the KPCreditSessionPopulator.java File: Locate the file in your SAP Commerce extension codebase.
- 2.Use the
addAttachmentMethod:- 2.1.This method is exposed for configuring EMD data.
- 2.2.Replace
yourDataObjectwith the required data (e.g., customer preferences or reservation details). - 2.3.Example usage:
addAttachment("additionalData", yourDataObject);
- 3.Compile and Deploy the Changes: Build your extension and deploy it to the SAP Commerce environment.
Best Practices for EMD and Order Verification
- Use the addAttachment method to ensure relevant EMD fields are properly configured for Klarna Payments.
- Regularly monitor orders in Backoffice to ensure accurate mappings between Klarna and SAP Commerce configurations.
Appendix
Extension Model and Classes
| Model | OOB Model | Attributes |
| BaseStore | BaseStore | klarnaPayConfig |
| AbstractOrder | AbstractOrder | kpIdentifier kpAnonymousGUID kpOrderId kpFraudStatus isKpPendingOrder isKpAuthorised isKpFraudRiskStopped |
| KPPaymentInfo | InvoicePaymentInfo | paymentOption finalizeRequired description authToken isVCNUsed vcnBrand vcnCSC vcnValidToYear vcnValidToMonth vcnHolder vcnPan vcnCVV |
Classes extended from OOB SAP (Hybris) Commerce platform
| Class | OOB Class |
| KPPaymentMethodCheckoutStepController | PaymentMethodCheckoutStepController |
| KPSummaryCheckoutStepController | AbstractCheckoutStepController |
| KlarnaResponsiveSummaryCheckoutStepValidator | AbstractCheckoutStepValidator |
| KlarnaSummaryCheckoutStepValidator | AbstractCheckoutStepValidator |
| KPAddressPopulator | AddressPopulator |
| KPOrderPopulator | AbstractOrderPopulator |
| KlarnaEventPublishingSubmitOrderStrategy | SubmitOrderStrategy |
| KPPaymentTypeCheckoutStepController | AbstractCheckoutStepController |
Klarna Payment Method Reference
| Use Case | Class | Method |
| Create/Update payment session | DefaultKPPaymentFacade | getORcreateORUpdateSession |
| Authorize Payment | DefaultKPPaymentFacade | getPaymentAuthorization |
| Create Klarna Order | DefaultKPPaymentCheckoutFacade | saveKlarnaOrderId |
| Cancel Klarna Order | KPOrderConfirmationController | orderConfirmation |
KlarnapaymentAPI Method Reference
| Use Case | Class | Method |
| Get Klarna Payment session | Client | newPaymentsSessionsApi |
| Authorize Payment | Client | newPaymentsOrdersApi |
| Get Klarna Order by ID | Client | newOrderManagementOrdersApi |
| Create payment Settlement | Client | newVirtualCreditCardSettlementsApi |
| Delete Auth | newPaymentsOrdersApi | |
| Capture Payment | newOrderManagementCapturesApi |