

Installing the cartridge on SiteGenesis Stores
This guide provides detailed instructions to install the cartridge on Salesforce Commerce Cloud (SFCC) SiteGenesis stores.
The Klarna Payments LINK Cartridge contains two cartridges required for full functionality. Controller and SiteGenesis support are separated into two distinct cartridges, facilitating the installation and use of either model:
int_klarna_paymentsint_klarna_payments: Implements the core storefront functionality.int_klarna_payments_controllersint_klarna_payments_controllers: Implements the storefront functionality with SG code.
Setup of business manager
Cartridge upload and assignment
1. Import the int_klarna_payments cartridge into the SCC Studio Workspace:
- In SFCC Studio, click File > Import > General > Existing Projects into Workspace.
- Browse to the directory where you saved the
int_klarna_paymentscartridge. - Click Finish.
- Click OK when prompted to link the cartridge to the sandbox.
2. Import the int_klarna_payments_controllers cartridge into the SCC Studio Workspace:
- In SFCC Studio, click File > Import > General > Existing Projects into Workspace.
- Browse to the directory where you saved the
int_klarna_payments_controllerscartridge. - Click Finish.
- Click OK when prompted to link the cartridge to the sandbox.
3. Prepend the Klarna cartridges to the effective site cartridge path:
- Log into the SFCC Business Manager.
- Click Administration > Sites > Manage Sites.
- Select the desired site.
- Click on the Settings tab.
- Prepend
int_klarna_payments_controllers:int_klarna_paymentsto the Cartridges field. - Click Apply.
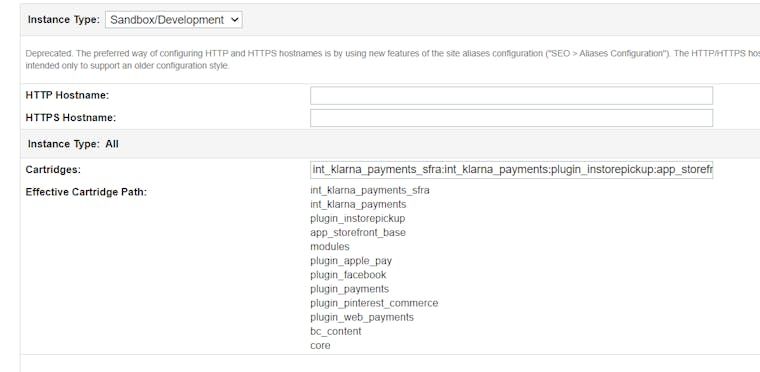
Effective Cartridge Path
Metadata import
- Go to the main directory metadata folder, review the site-template content, and edit if needed. (The site template is prepared to set up “SiteGenesis” and “RefArch” sites. You may want to change that to your actual sites and delete the ones that are not needed.)
- Zip the directory to create the
site-template.zipinstallation package. - Log into the SFCC Business Manager.
- Click Administration > Sites Development > Site Import & Export.
- Browse to the directory where you saved the
site-template.zip. - Click Upload.
- Select the uploaded site zip and click Import.
Review the default service.xml file in the site-template.zip and update the configuration for Playground and Production accordingly before importing.
Configuration
As of version 24.4.0, the cartridge configuration process has changed. If you are using a version older than 24.4.0, please refer to the Deprecated Features section of the Changelog for detailed information on the configuration changes.
Single Klarna API credentials per site
- Click Merchant Tools > Site Preferences > Custom Preferences > Klarna Activation
- Enter
client_idto activate OSM and KEC. - Enter API Username and password.
- Select the region where your site operates.
- Select the markets on which Klarna should be available.
- To select the Klarna environment, in the field Run plugin in test mode - select yes for playground or no for production
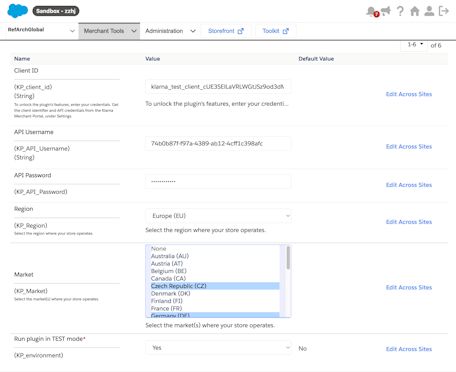
Klarna activation site preference
Multiple Klarna API credentials per site
- In SFCC Business Manager, click Merchant Tools > Custom Objects > Custom Object Editor.
- Set the Object Type dropdown to Klarna Activation.
- Enter Klarna activation key, this will be the name of the custom object, we recommend using a name meaningful to you, easy to identify.
- Enter the required fields as mentioned in the Klarna Activation section.
- Repeat for the other regions or markets as necessary.
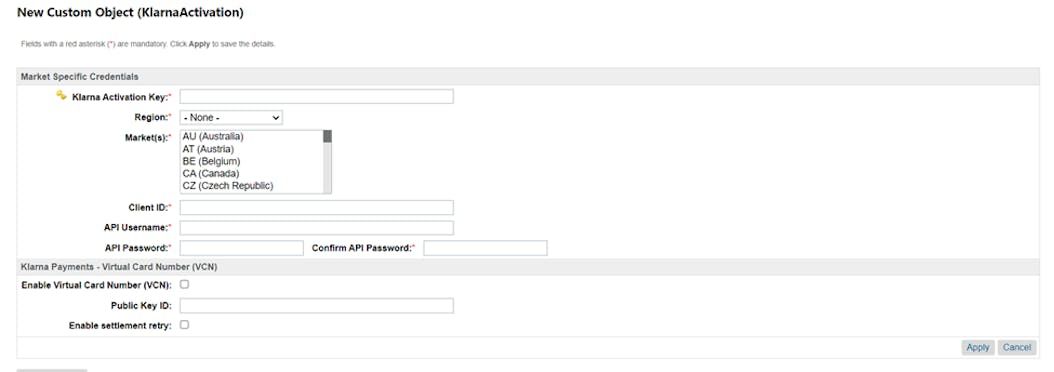
Klarna Activation Custom Object
Extended controllers
| Controller | Start Node | Remarks |
|---|---|---|
|
| Extended to call Klarna session manager |
|
SubmitPayment,PlaceOrder | Klarna payment method/category and totals are being stored |
|
| Calling the Klarna session manager |
|
| Extending Klarna order data to view data |
Template updates
The templates have been updated to support On-site Messaging and Address Forms for Klarna. These templates are intended for reference, but you can customize them to suit your specific needs. Please ensure that the final review and sign-off align with your project requirements and contractual agreements.
Jobs
Job “OrderCleanUp” (Optional)
This one-time clean-up job is applicable only to merchants integrated with Klarna Payments cartridge version earlier than 19.1.6, utilizing (or previously used) virtual card-based settlement (VCN) and stored decrypted card details within Business Manager.
The job iterates over orders with status Exported and the attribute custom.kpIsVCN=true to remove sensitive details saved in fields kpVCNPAN, kpVCNCSC, kpVCNExpirationMonth, and kpVCNExpirationYear from previous releases. No parameters are passed to the script.
Upon successful run, the job logs the result of processed orders in the custom debug log located in webdav/Sites/Logs. You will receive a message indicating the processed orders count for each storefront or a message indicating that there are no orders needing update.
In case of an error, the cause of the failure (message and stack trace) will be logged in the standard error log.
Setting up a job step by step:
Ensure that you have access to the SFCC Business Manager and that the jobs.xml configuration file is prepared and accessible.
Import the job configuration (1)
Log into the SFCC Business Manager, and go to Administration > Operations > Import & Export.
Click on the Import button, and browse for the jobs.xml file and select it for import.
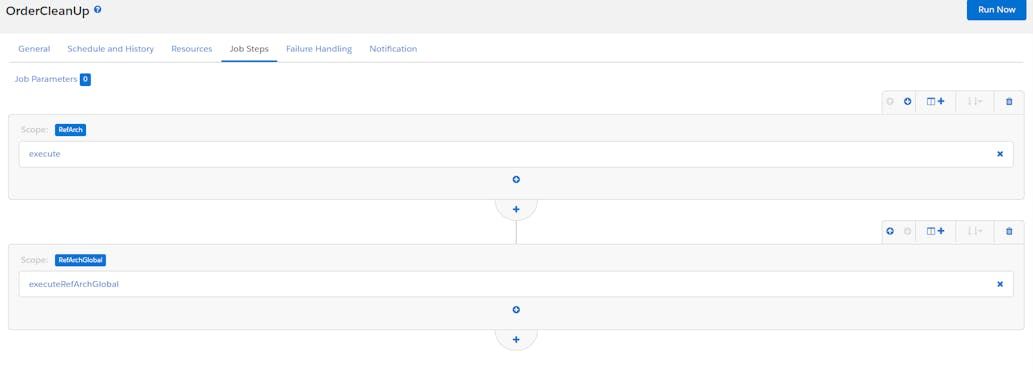
Job Steps
The default scope included in the XML file is for RefArch. If you have multiple sites using this functionality, you need to configure each site as a separate flow within this file.
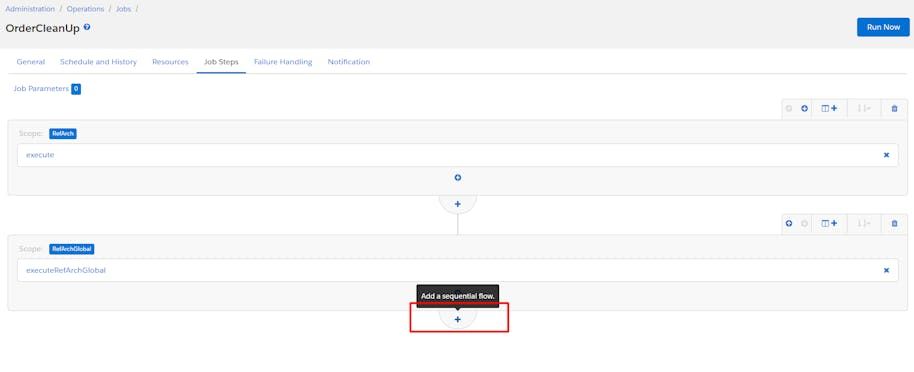
Add a sequential flow (2)
After the job import is complete, navigate to the flow section within the job, and scroll down to the bottom of the current flow.
Click on the Add a sequential flow button. This action will create a new flow under the current job configuration.
Add a new job
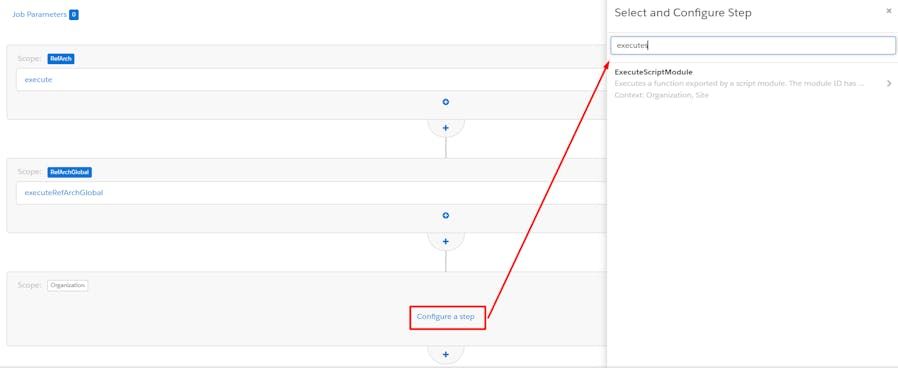
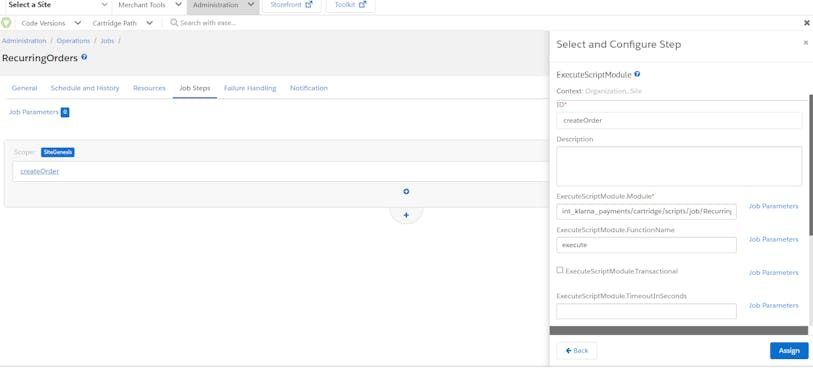
Configure the job step (3)
In the newly added flow, click on the Configure a step button. When the flyout appears, search for the term script, and select the ExecuteScriptModule from the list.
Configure Step
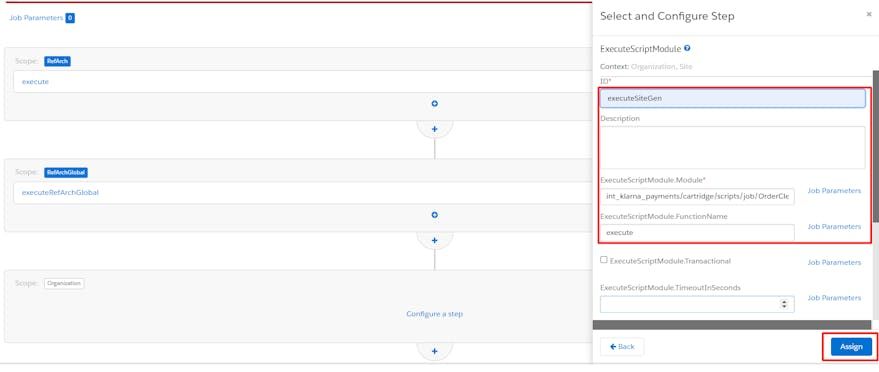
Populate the step fields (4)
Enter the step details:
- ID: Provide a meaningful and unique name for this job step. Ensure that the name is unique across all flows to avoid saving errors.
- ExecuteScriptModule.Module: Specify the location of the
OrderCleanUpJob.jsfile. The default path isint_klarna_payments/cartridge/scripts/job/OrderCleanUpJob.js, but this can vary depending on where the script is placed. - ExecuteScriptModule.FunctionName: Leave this field as execute.
Click on the Assign button to save the step configuration.
Configure step content
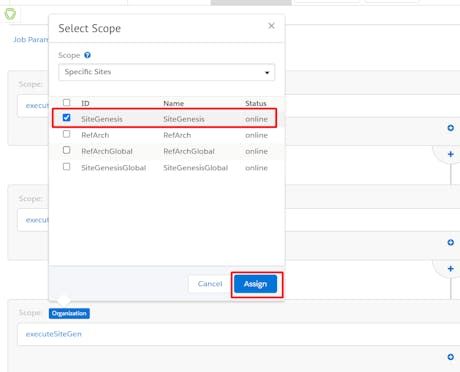
Assign to the correct site scope (5)
- Select the Site Scope: Click on Organization within the step configuration flyout, and choose Specific Sites from the drop-down menu.
- Assign to the Relevant Site: From the list of sites, select the appropriate site ID (e.g., SiteGenesisGlobal), and click on Assign to apply the configuration to the selected site.
Job scope content
Repeat steps 1-5 for each site/storefront that you have using Klarna VCN and need additional configuration. This ensures that the clean-up job runs for all relevant sites and removes sensitive data as required.
The job RecurringOrders
The RecurringOrders job is designed to process subscription entries for all customers. The job performs the following functions:
- Eligibility Check: It verifies that the subscription is enabled and that either the
nextChargeDateornextRetryDatematches the current date. - Order Creation: It creates new Salesforce Commerce Cloud (SFCC) orders for eligible subscriptions, replacing the old ones.
- Trial Period Handling: It processes orders with expiring trial periods for charges.
Configuration
By default, the job is set to run on the RefArch site, as specified in the jobs.xml file. This setting can be modified either in the jobs.xml file or through the storefront configuration.
The job consists of a single step, createOrder, with the following configuration:
- ExecuteScriptModule.Module:
int_klarna_payments/cartridge/scripts/job/RecurringOrdersJob.js - ExecuteScriptModule.FunctionName:
execute
The job operates at site level.
Ensure your configuration matches these details to maintain the proper functionality of the RecurringOrders job.
RecurringOrders Job
Custom code
Integration may vary based on the storefront version. Site Genesis version 105.0.0 is used as a reference to demonstrate Klarna integration.
Template modifications
The following template changes should be made regardless of whether a controller or a pipeline integration approach are being used:
default/checkout/summary/summary.ismldefault/checkout/billing/billing.ismldefault/checkout/billing/paymentmethods.ismldefault/checkout/shipping/minishipments.ismldefault/components/header/header.ismldefault/components/footer/footer.ismldefault/components/footer/footer_UI.ismldefault/product/producttopcontentPS.ismldefault/product/productcontent.ismldefault/product/productcontent.ismldefault/checkout/cart/cart.ismldefault/mail/orderconfirmation.ismldefault/components/order/ordrdetailsemail.ismldefault/checkout/cart/minicart.ismljs/pages/cart.js 79default/checkout/shipping/singleshipping.isml 82scripts/cart/ValidateCartForCheckout.js 83scripts/util/Resource.ds 84js/pages/account.js 84default/account/orders.isml 87default/checkout/components/minicheckout_address.isml 87js/minicart.js
default/checkout/summary/summary.isml
Add the following code before the closing </isdecorate> tag at the end of the file:
```isml
<isif condition="${session.privacy.KlarnaPaymentsFinalizeRequired}">
<script>
<isinclude template="/resources/klarnapaymentsresources.isml"/>
</script>
<script defer src="${URLUtils.staticURL('/js/klarna-payments-finalize.js')}"></script>
<script defer src="https://x.klarnacdn.net/kp/lib/v1/api.js"></script>
</isif>

<isif condition="${!session.privacy.KlarnaPaymentsFinalizeRequired && dw.system.Site.getCurrent().getCustomPreferenceValue('kpUseAlternativePaymentFlow')}">
<isinclude template="klarnapayments/modules.isml"/>
<isset name="billingAddress" value="${pdict.Basket.billingAddress}" scope="page"/>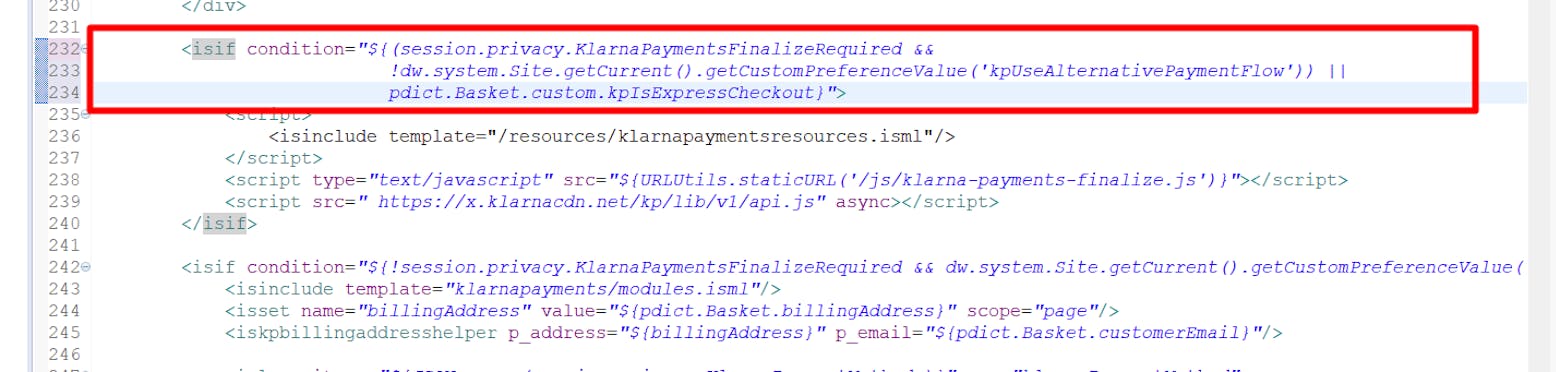
Modifications in summary.isml
Update the condition on line 232, for the finalize script include:
```isml
<isif condition="${(session.privacy.KlarnaPaymentsFinalizeRequired && !dw.system.Site.getCurrent().getCustomPreferenceValue('kpUseAlternativePaymentFlow')) || pdict.Basket.custom.kpIsExpressCheckout}">
\```
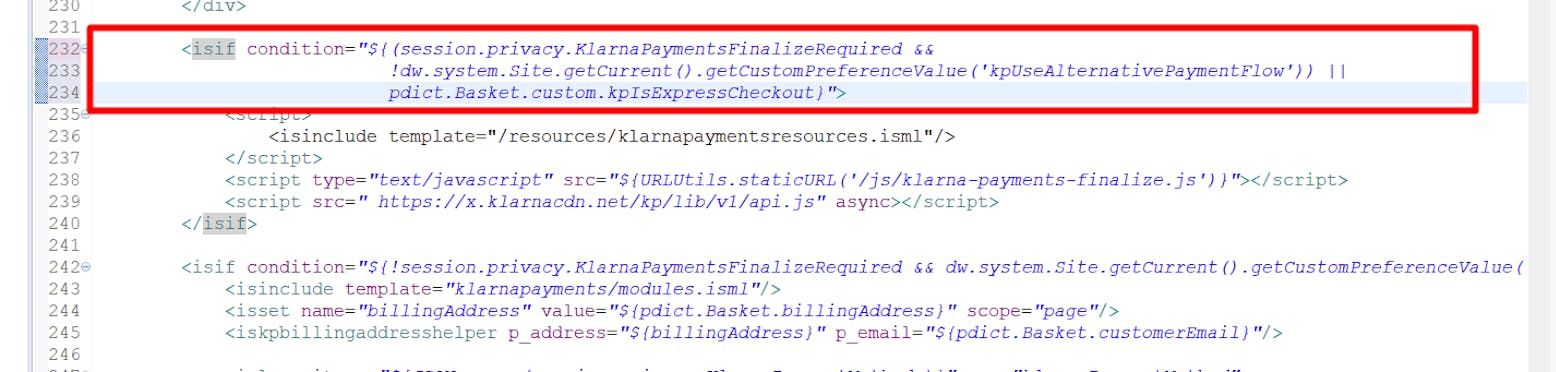
Modifications in summary.isml content
Ensure the updated condition for the finalize script is applied correctly to handle both the finalize and express checkout scenarios.
default/checkout/billing/billing.isml
Add the following code before the closing </isdecorate> tag at the end of the file:
```isml
<script>
<isinclude template="/resources/klarnapaymentsresources.isml"/>
</script>
<script defer src="${URLUtils.staticURL('/js/klarna-payments.js')}"></script>
<script defer src="https://x.klarnacdn.net/kp/lib/v1/api.js"></script>
<link rel="stylesheet" href="${URLUtils.staticURL('/css/klarna-payments.css')}" />
\```
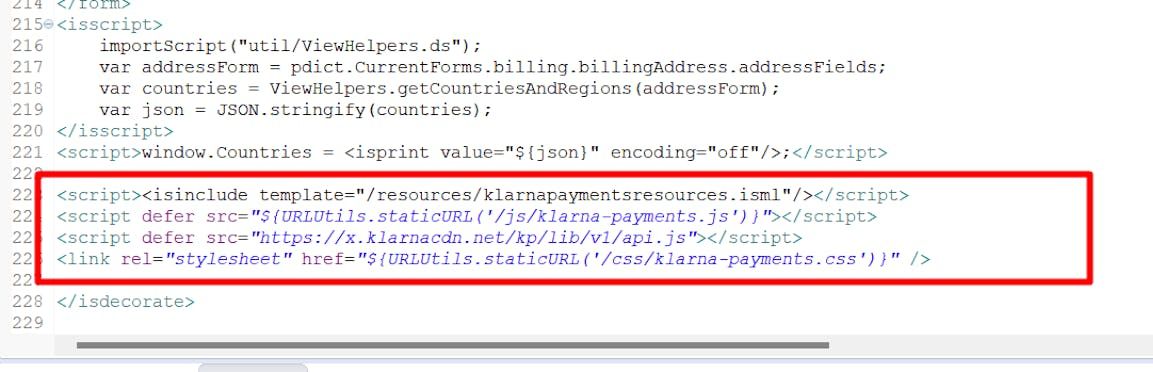
Modifications to billing.isml
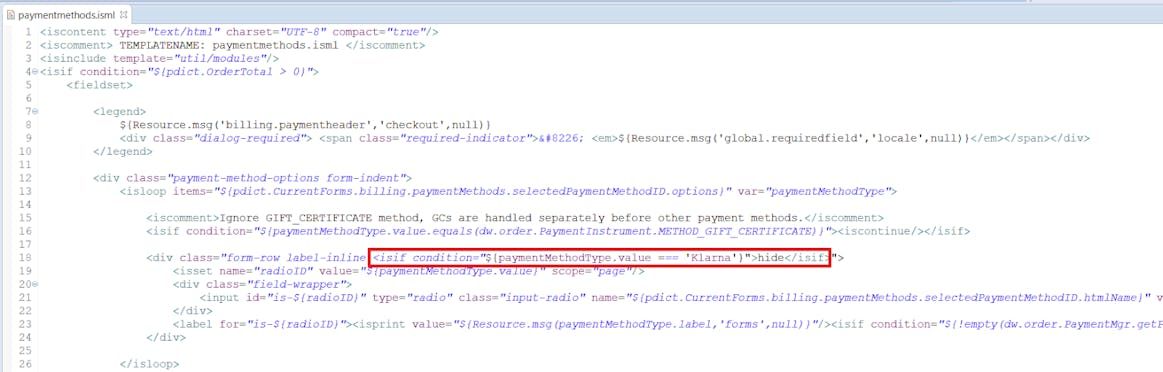
default/checkout/billing/paymentmethods.isml
Add the following code after <div class="form-row label-inline close to line 18 as shown below:
```isml
<isif condition="${paymentMethodType.value === 'Klarna'}">hide</isif>
\```
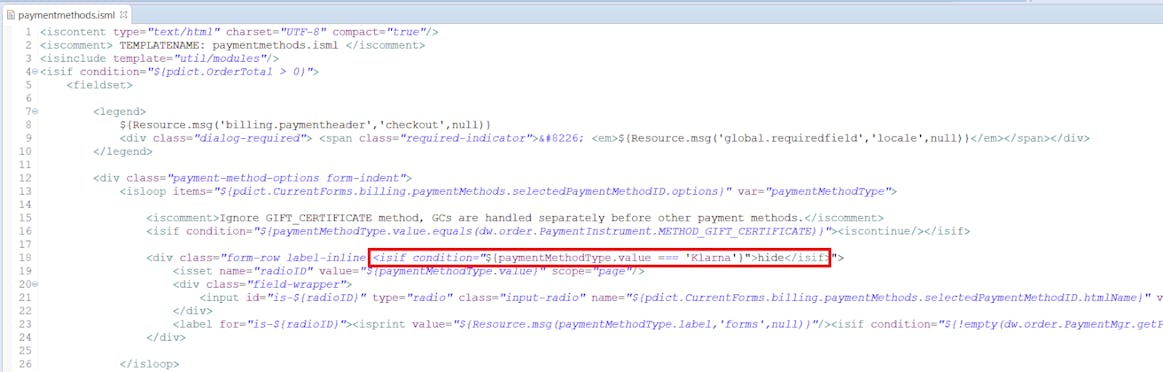
Modifications to paymentmethods.isml
Add the following code after the </isloop> tag, close to line 28:
```isml
<isinclude template="klarnapayments/klarnapaymentscategories.isml"/>
\```
Modifications to paymentmethods.isml content
Add the following code before the closing </fieldset> tag, close to line 150:
```isml
<iscomment>
Klarna Payments
--------------------------------------------------------
</iscomment>
<isinclude template="klarnapayments/klarnapaymentblock.isml"/>
\```
Modifications in paymentmethods.isml content
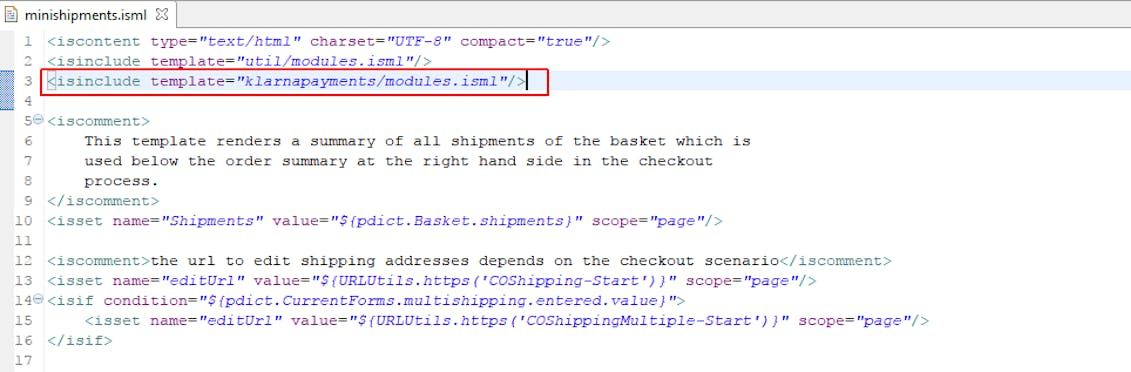
default/checkout/shipping/minishipments.isml
To integrate Klarna Payments into the minishipments.isml file, follow these steps:
Add the following code at the beginning of the minishipments.isml file. This step includes the necessary Klarna Payments modules for the mini shipments template.
```isml
<isinclude template="klarnapayments/modules.isml"/>
\```

Modifications to paymentmethods.isml
After the line containingining <isminicheckout_address p_address="${shipment.shippingAddress}"/>, add the code below. This step adds the Klarna Payment Address Helper, which manages the shipment and shipping address.
```isml
<iskpaddresshelper p_shipment="${shipment}" p_address="${shipment.shippingAddress}"/>
\```
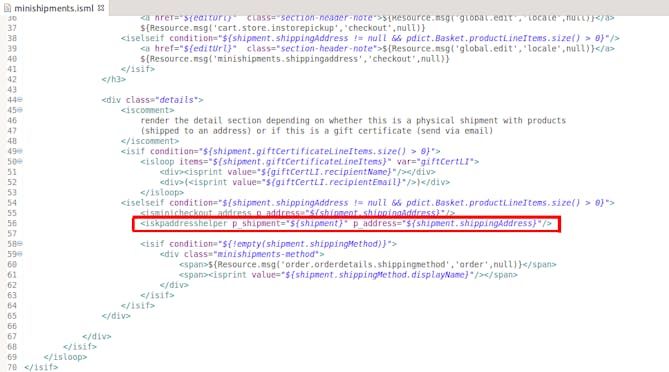
Modifications to minishipments.isml content
default/components/header/header.isml
Add the following code before the script tag:
```isml
<isinclude template="klarnapayments/scripts.isml"/>
\```
default/components/footer/footer.isml
Add the following code right after the </footer> end tag and before the <iscontentasset aid="footer-copy"/> tag:
```isml
<!-- Klarna OSM footer -->
<div class="klarna-footer">
<isinclude template="klarnapayments/modules.isml"/>
<iskosmfooter />


</div>

<!-- /Klarna OSM footer -->
<!-- Klarna KEB form -->
<iskebform />This includes the Klarna OSM footer and KEB form in the footer template.
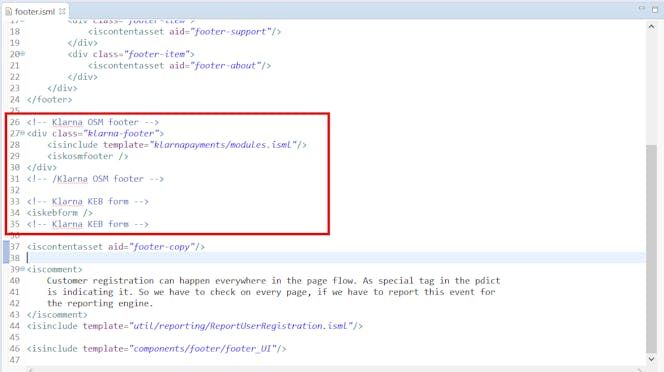
Modifications in footer.isml
default/components/footer/footer_UI.isml
Add the following code right under the pricing template include:
```isml
<isinclude template="klarnapayments/modules.isml"/>
<iskosmpdp p_product="${psProduct}" />
\```

Modifications in producttopcontentPS.isml
default/product/producttopcontentPS.isml
Add the following code right under the pricing template include:
```isml
<isif condition="${!isQuickView}">
<isinclude template="klarnapayments/modules.isml"/>
<iskosmpdpp_product="${pdict.Product}" />
</isif>
\```

Modifications in producttopcontent.isml
Add the following JavaScript code on line 24 within the <isscript> element:
var isStandardProduct = !empty(product.custom.kpIsStandardProduct) ? product.custom.kpIsStandardProduct : true;
var isSubscriptionProduct = !empty(product.custom.kpIsSubscriptionProduct) ? product.custom.kpIsSubscriptionProduct : false;
var isSubscriptionOnly = (isSubscriptionProduct && !isStandardProduct);

Modifications in productcontent.isml
Add the following code on line 256, right after the "Add to Cart" button:
```isml
<isif condition="${!isSubscriptionOnly}">
<iskecpdp />
</isif>
\```

Modifications in poductcontent.isml content
default/product/productcontent.isml
Add the following code in the variation update callback on line 35:
if (window.Klarna && window.Klarna.OnsiteMessaging) { window.Klarna.OnsiteMessaging.refresh(); }
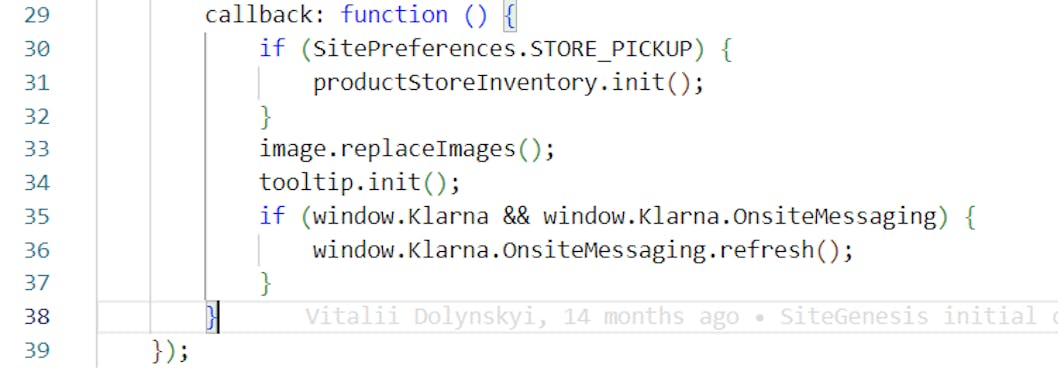
Modifications in variant.js
Add the following code in the variation update callback on line 37:
Modifications to variant.js content
if (window.klarnaExpressCheckout) { window.klarnaExpressCheckout.klarnaExpressCheckoutPDP(); }
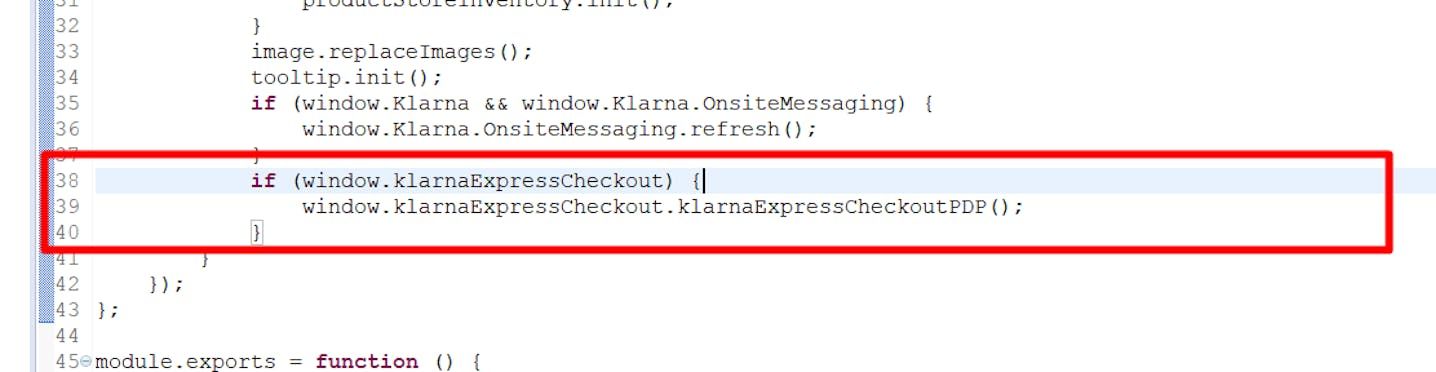
Modifications to variant.js content
default/product/productcontent.isml
Add the following code on line 5:
```isml
<isinclude template="klarnapayments/modules.isml"/>
\```
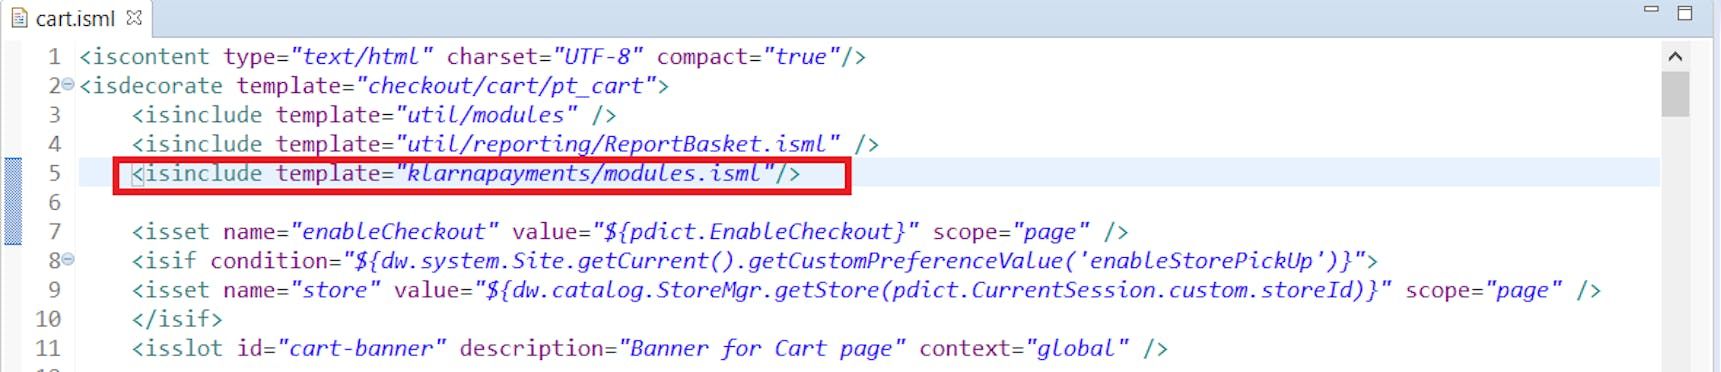
Modifications to cart.isml
Add the following code on line 823, right after the <isordertotals> tag:
```isml
<iskosmcart p_lineitemctnr="${pdict.Basket}" />
\```
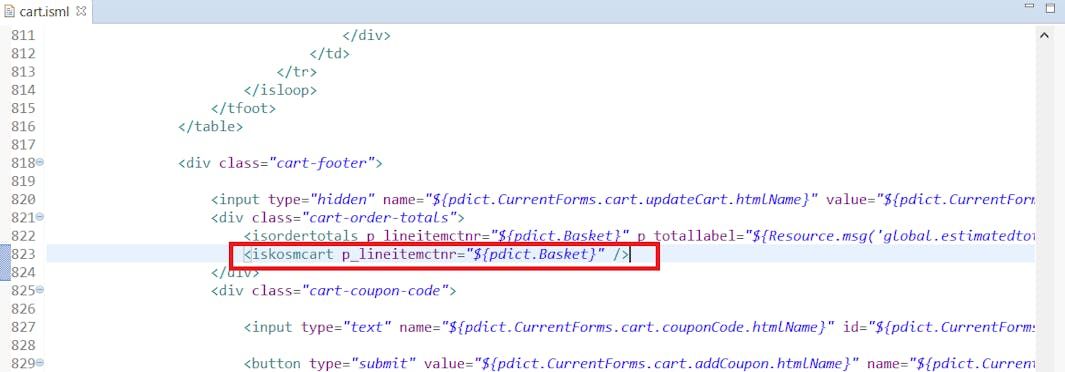
Modifications to cart.isml content
Add the following code on lines 33 and 864, right after the <isif condition="${enableCheckout}"> tag:
```isml
<iskebcart />
\```
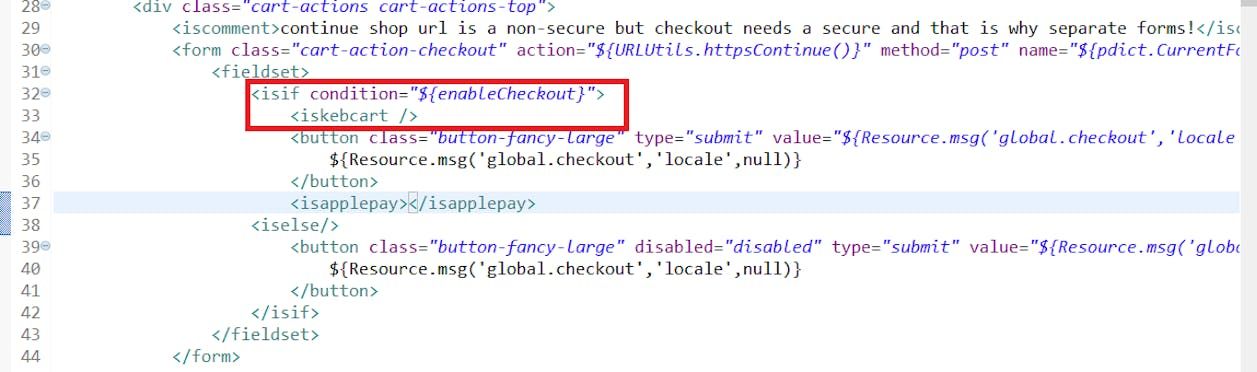
Modifications to cart.isml content line 33
Modifications to cart.isml content line 864
Add the following code on line 182:
```isml
<isset name="kpIsStandardProduct"   value="${!empty(product.custom.kpIsStandardProduct) ? product.custom.kpIsStandardProduct : true}" scope="page" />
<iskpsubscription lineitem="${lineItem}" showsubscription="${product.custom.kpIsSubscriptionProduct}"                               disablesubscribe="${product.custom.kpIsSubscriptionProduct && !kpIsStandardProduct}"
kptrialdaysusage="${product.custom.kpTrialDaysUsage}"
lmkpsubscription="${lineItem.custom.kpSubscription}"/>
\```
after the deliveryoptions include:
```isml
<isinclude template="checkout/cart/storepickup/deliveryoptions" />
\```

Modifications to cart.isml content line 182
Add the following code on line 65, inside the div with class error-form:
```isml
<iselseif condition="${pdict.BasketStatus.code != null && pdict.BasketStatus.code == 'SubscriptionError'}">
${pdict.BasketStatus.message}
\```
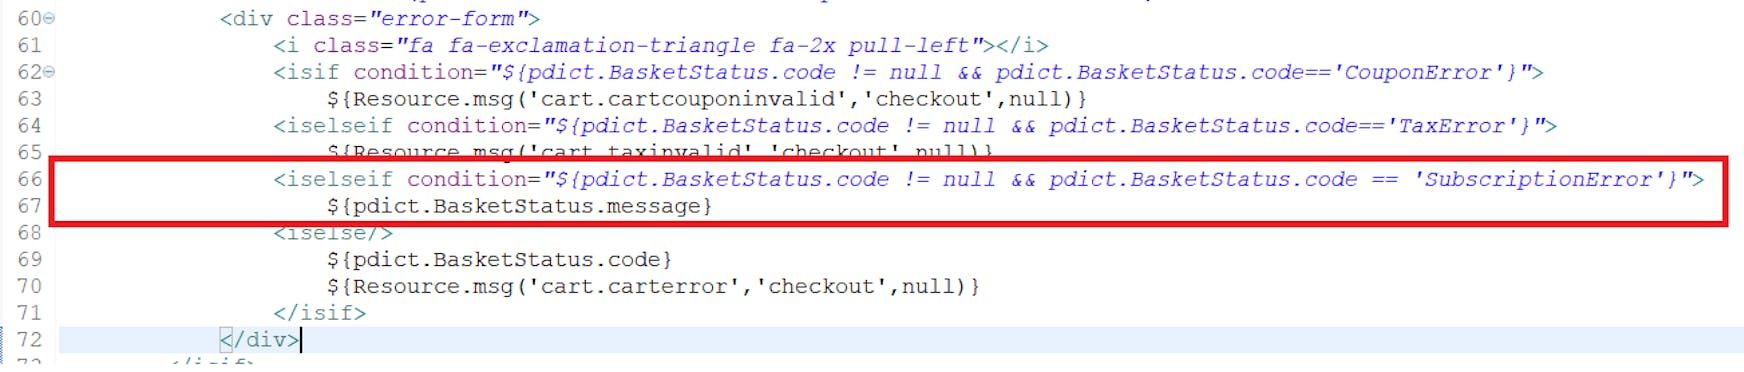
Modifications to cart.isml content line 65
Add the following code on line 862, at the end of the div with class cart-footer:
```isml
<isinclude template="klarnapayments/subscription/cartSubscriptionDetails" />
\```

Modifications to cart.isml content line 862
Add the following code on line 34, before the checkout button:
```isml
<iskeccart container_id="klarnaExpressCheckout"/>
\```
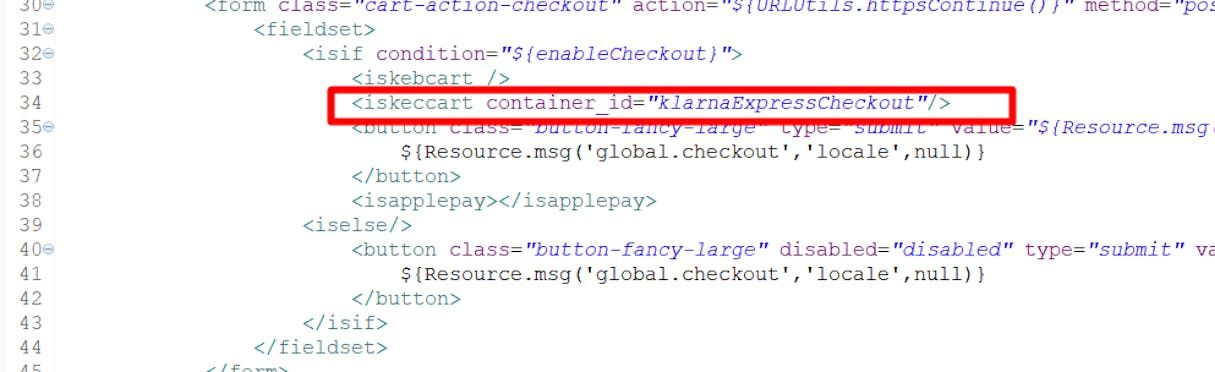
Modifications to cart.isml content line 34
Add the following code on line 879, in the enabledCheckout case before the checkout button:
```isml
<iskeccart container_id="klarnaExpressCheckoutBottom"/>
\```
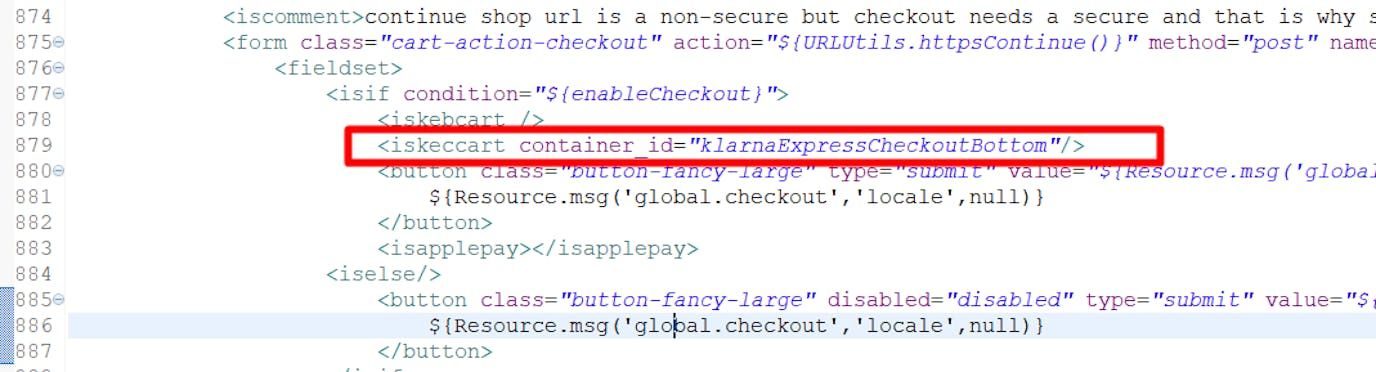
Modifications to cart.isml content line 879
This includes the Klarna Express Checkout component for the enabled checkout case.
default/checkout/cart/cart.isml
Add the following code at the end of the file:
<!-- Klarna OSM header -->
<isinclude template="klarnapayments/modules.isml"/>
<iskosmheader />
<!-- /Klarna OSM header -->
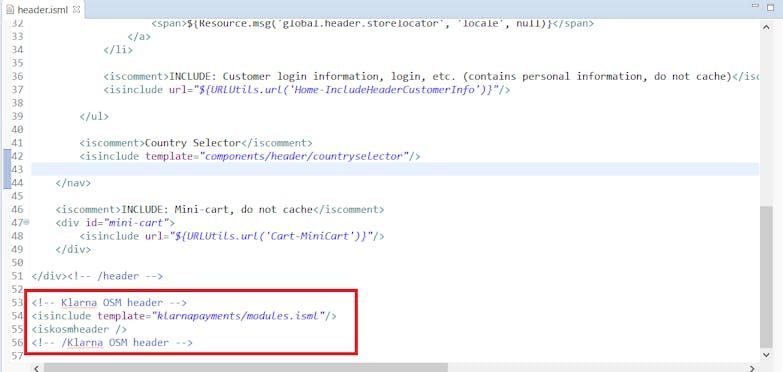
Modifications in header.isml
default/mail/orderconfirmation.isml
Add the following code before the closing </table> tag:
<tr>
<td style="font-size:12px;font-family:arial;padding:20px 10px;vertical-align:top;">
<isset name="confirmationAsset" value="${require('*/cartridge/scripts/util/klarnaHelper').getConfirmationEmailAsset()}" scope="page" />
<isprint value="${confirmationAsset}" encoding="off" />
</td>
</tr>
This includes the Klarna confirmation email asset in the order confirmation email.

Modifications in orderconfirmation.isml
default/components/order/ordrdetailsemail.isml
Add the following code before the closing </isif> tag on line 51:
<iselseif condition="${paymentInstr.paymentMethod.equals('Klarna')}">
${Resource.msg('email.order.reference','klarnapayments',null)}: ${Order.custom.kpOrderID} <br />
This conditionally includes the Klarna order reference in the order details email if the payment method is Klarna.
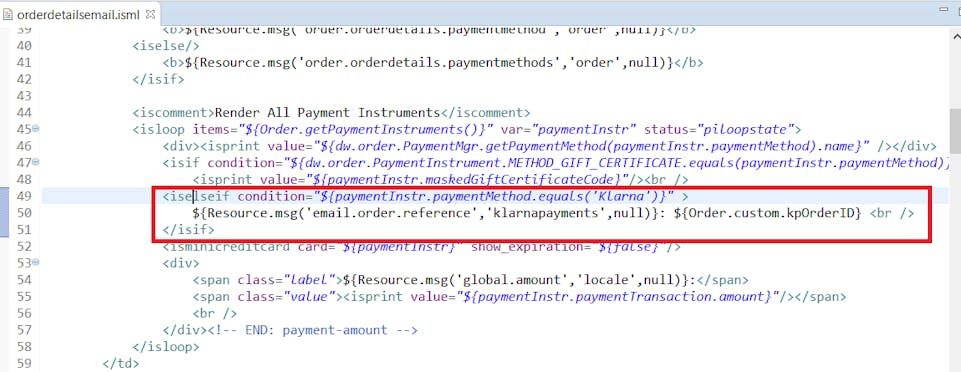
Modifications in orderdetailsemail.isml
default/checkout/cart/minicart.isml
Add the following code before the <a class="mini-cart-link-checkout"... tag on line 74:
<isset name="KlarnaOSM" value="${require('*/cartridge/scripts/marketing/klarnaOSM')}" scope="page" />
<isif condition="${KlarnaOSM.isEnabledMCExpressButton()}">
<isinclude template="klarnapayments/modules.isml"/>
<ismckeb />
<script type="text/javascript" src="${URLUtils.staticURL('/js/minicart-keb.js')}"></script>
</isif>
This sets the Klarna OSM variable, checks if the mini cart express button is enabled, and includes the necessary Klarna templates and scripts.
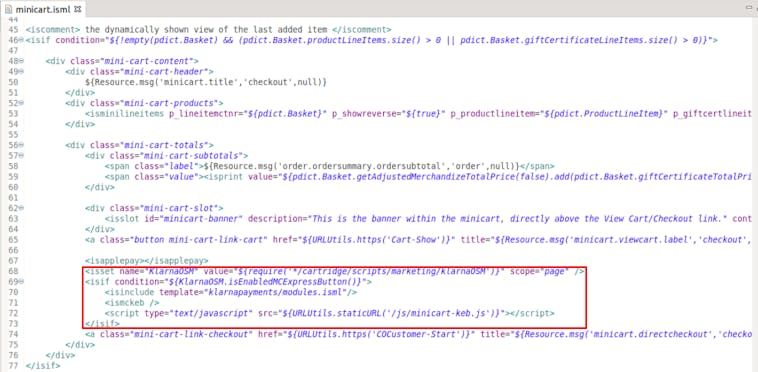
Modifications in minicart.isml
Add the following code before the <a class="mini-cart-link-checkout"... tag on line 81:
<isif condition="${KlarnaOSM.isKlarnExpressCheckoutEnabled() && KlarnaOSM.showExpressCheckoutButton().miniCart}">
<isset name="SubscriptionHelper" value="${require('*/cartridge/scripts/subscription/subscriptionHelper')}" scope="page" />
<isif condition="${!SubscriptionHelper.hasSubscriptionOnly()}">
<isinclude template="klarnapayments/modules.isml" />
<iskecminicart />
</isif>
</isif>
This conditionally includes the Klarna Express Checkout button in the mini cart based on specific conditions.

Modifications in minicart.isml (cont.)
js/pages/cart.js
Add the following code after line 6:
util = require('../util'),
This imports the util module for use in the cart script.

Modifications to js/pages/cart.js line 6
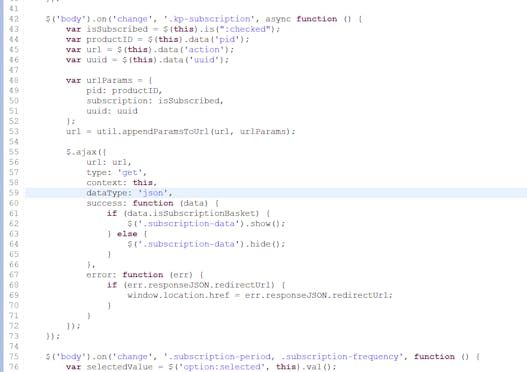
Add the following code at the end of the initializeEvents() function:
$('body').on('change', '.kp-subscription', async function () {
var isSubscribed = $(this).is(":checked");
var productID = $(this).data('pid');
var url = $(this).data('action');
var uuid = $(this).data('uuid');

var urlParams = {
pid: productID,
subscription: isSubscribed,
uuid: uuid
};
url = util.appendParamsToUrl(url, urlParams);This handles changes to the subscription checkbox.
changes to the subscription checkbox
Add the following code on line 75:
$('body').on('change', '.subscription-period, .subscription-frequency', function () {
var selectedValue = $('option:selected', this).val();
console.log(selectedValue);
var url = $(this).data('url');
var subscriptionField = $(this).data('field');

var urlParams = {
selectedValue: selectedValue,
subscriptionField: subscriptionField
};

url = util.appendParamsToUrl(url, urlParams);This handles changes to the subscription period and frequency dropdowns.
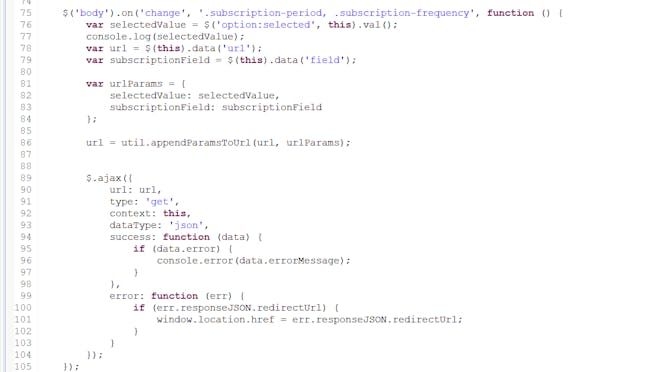
Modifications to js/pages/cart.js line 75
default/checkout/shipping/singleshipping.isml
Add the following code after line 98, after the shipping method list:
<fieldset>
<isinclude template="checkout/shipping/subscriptionDetails" />
</fieldset>
This includes the subscription details template within a fieldset after the shipping method list.

Modifications in singleshipping.isml
Add the following code on line 145, before the closing </isdecorate> tag:
<isif condition="${KlarnaOSM.isKlarnExpressCheckoutEnabled() && KlarnaOSM.getKlarnExpressCheckoutClientKey()}">
<script src="https://x.klarnacdn.net/kp/lib/v1/api.js" async></script>
</isif>

Modifications to js/pages/cart.js line 145
scripts/cart/ValidateCartForCheckout.js
Add the following code block in the validate function before the DONE section on line 115:
var Resource = require('dw/web/Resource');
var SubscriptionHelper = require('*/cartridge/scripts/subscription/subscriptionHelper');
var subValidation = SubscriptionHelper.validateCartProducts(basket);
if (subValidation && subValidation.error) {
return {
BasketStatus: new Status(Status.ERROR, 'SubscriptionError', subValidation.message)
};
}
var subscriptionUserError = session.privacy.guest_subscription_error;
session.privacy.guest_subscription_error = null;
if (subscriptionUserError) {
var msg = Resource.msg('klarna.subscription.checkout.guestuser.error', 'subscription', null);This code block performs validation on the cart products for subscriptions and handles any subscription-related errors.
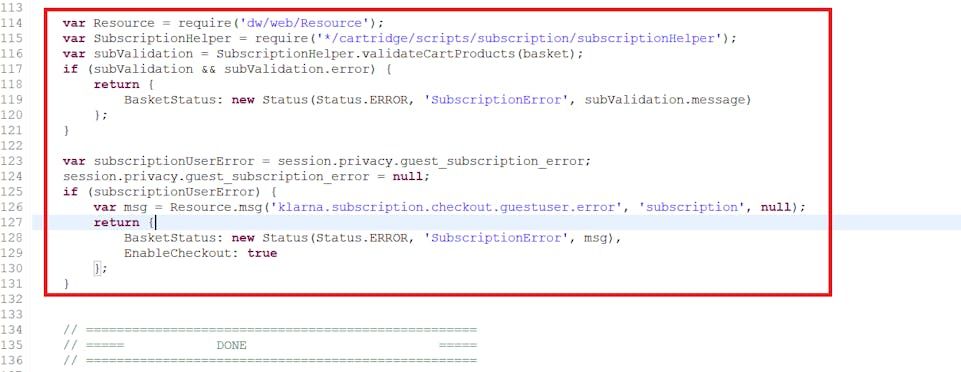
Modifications to js/pages/cart.js line 115
scripts/util/Resource.ds
Add the following code block before the validation messages section:
CANCEL_SUBSCRIPTION: Resource.msg('heading.cancel.subscriptions', 'subscription', null),
CANCEL: Resource.msg('global.cancel', 'locale', null),
This includes resource messages for canceling subscriptions and a global cancel action.

Modifications in Resource.de
js/pages/account.js
Add the following code block after the initializePaymentForm() function:
function initSubscriptionEvents() {
$('.cancel-subscription').on('click', function (e) {
e.preventDefault();
var subid = $(this).attr('data-subid');
var cancelBtn = $(this);
console.log(subid);

var cancelDialogHTML = $('#subscription-dialog-body').html();

dialog.open({
html: cancelDialogHTML,
options: {This function initializes events for handling subscription cancellation.
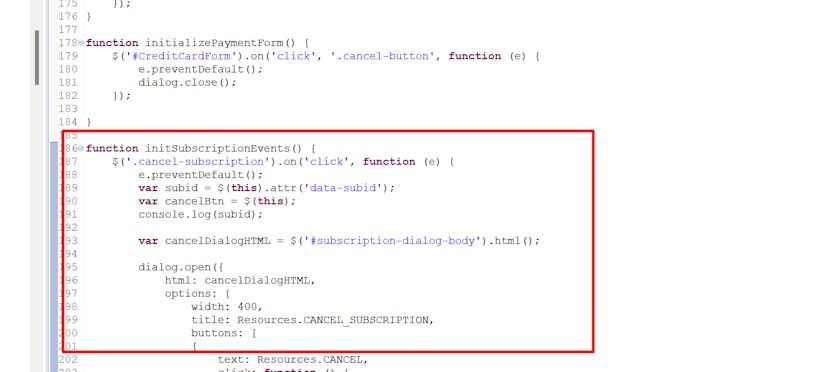
events for handling subscription cancellation
Add the following code in the initializeEvents() function to call the initSubscriptionEvents() function:
initSubscriptionEvents();
This ensures that the subscription events are initialized when the account page is loaded.
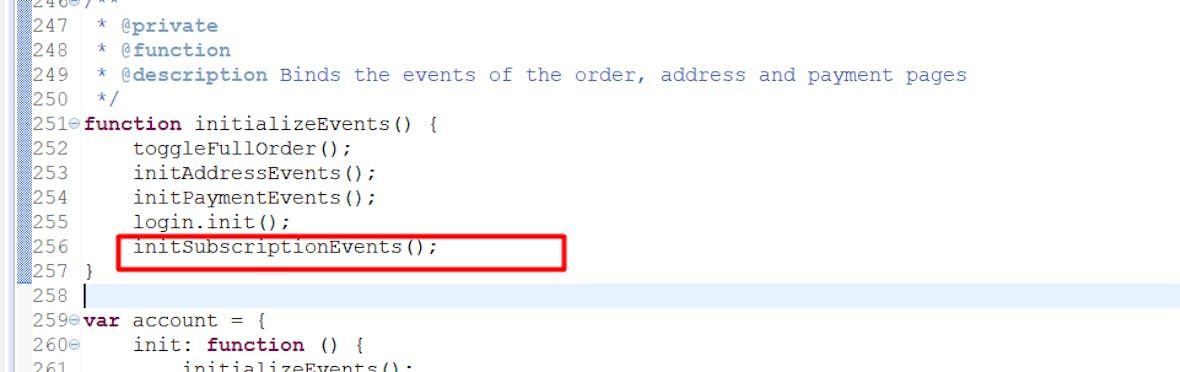
Modifications in account.js (cont.)
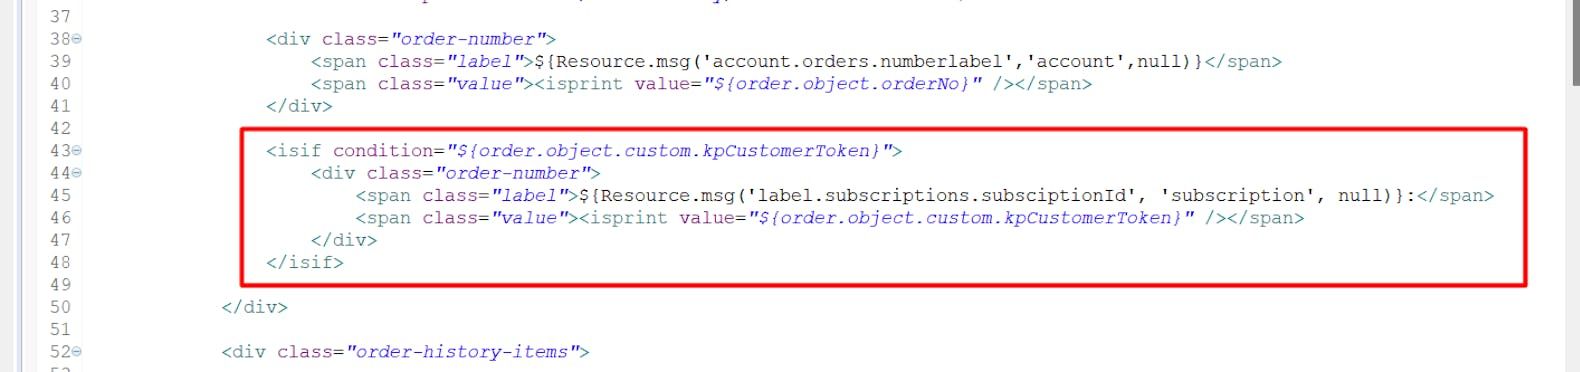
default/account/orders.isml
Add the following code within the order-history-header div:
<isif condition="${order.object.custom.kpCustomerToken}">
<div class="order-number">
<span class="label">${Resource.msg('label.subscriptions.subsciptionId', 'subscription', null)}:</span>
<span class="value"><isprint value="${order.object.custom.kpCustomerToken}" /></span>


</div>

</isif>
This conditionally displays the subscription ID if the kpCustomerToken custom attribute is present on the order.
Modifications in orders.isml
default/checkout/components/minicheckout_address.isml
Add the following code on line 16:
<div><isprint value="${Resource.msg('country.' + pdict.p_address.countryCode.value.toLowerCase(), 'forms', null)}"/>

</div>

Modifications in minicheckout_address.isml
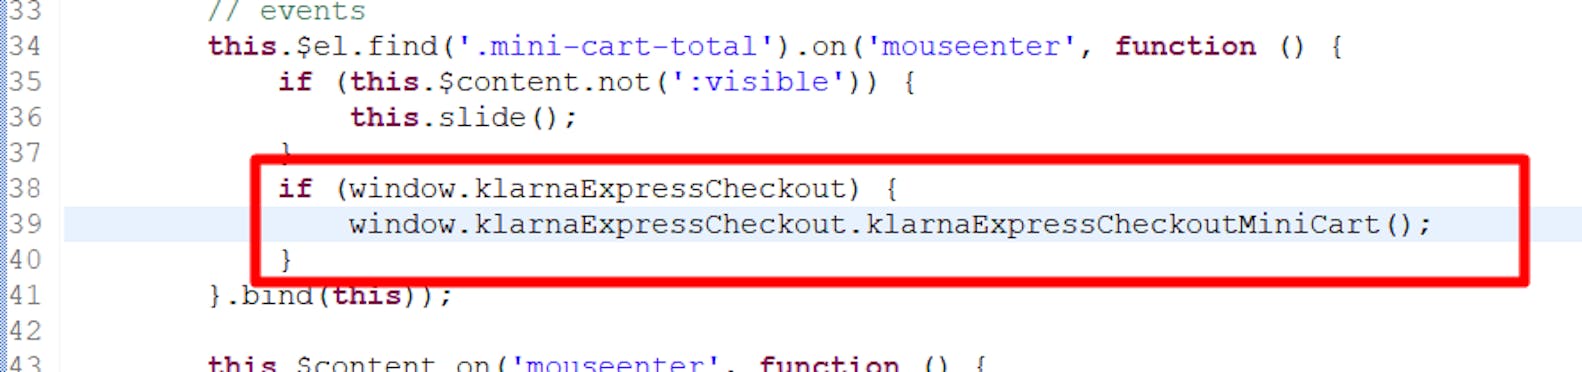
js/minicart.js
Add the following code on line 38 in the mouseenter event:
if (window.klarnaExpressCheckout) {
window.klarnaExpressCheckout.klarnaExpressCheckoutMiniCart();
}
This code initializes Klarna Express Checkout in the mini cart when the mouse enters the mini cart area.
Modifications in minicart.js
Add the following code on line 60 in the show minicart event:
if (window.klarnaExpressCheckout) {
window.klarnaExpressCheckout.klarnaExpressCheckoutMiniCart();
}
This code initializes Klarna Express Checkout in the mini cart when the mini cart is shown.

initializes Klarna Express Checkout in the mini cart
intklarna_payments/cartridge/scripts/util/klarnaHelper.js
Update the existing getExpressKlarnaMethod() function as shown below:
 * Read and update Klarna Express Payment Method SitePreference
 * @param {object} paymentMethodCategories klarna payment categories received from Klarna authorize call
 * @returns {Object} paymentMethods JSON string of payment methods
 */
function getExpressKlarnaMethod(paymentMethodCategories) {
	// Use the payment method received from Klarna authorize call. If not available, fall back to the default value from KlarnaConstants
	var paymentMethods = paymentMethodCategories ? paymentMethodCategories : KlarnaConstants.KLARNA_EXPRESS_CATEGORY_CONTENT.KEC_CONTENT;
	var paymentMethod = null;
	if (!empty(paymentMethods)) {
		if (!empty(paymentMethods) && paymentMethods.length > 0) {
			paymentMethod = paymentMethods[0];
		}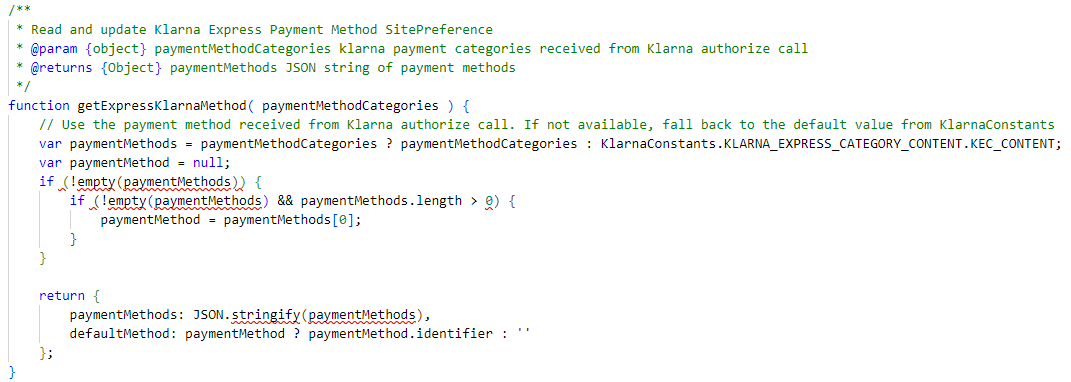
int klarna payments:cartridge:scripts:util:klarnaHelper
int_klarna_payments/cartridge/static/default/js/klarna-payments-finalize.js
Update existing Klarna.Payments.finalize() (within KEC condition) to send an empty object instead of sending the paymentmethod_categories in the KEC flow finalize call, as shown below:
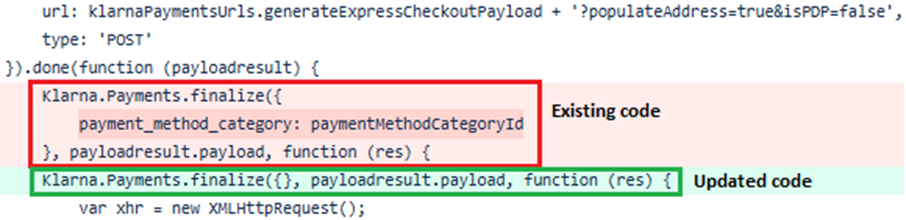
int klarna payments:cartridge:static:default:js:klarna-payments-finalize 1
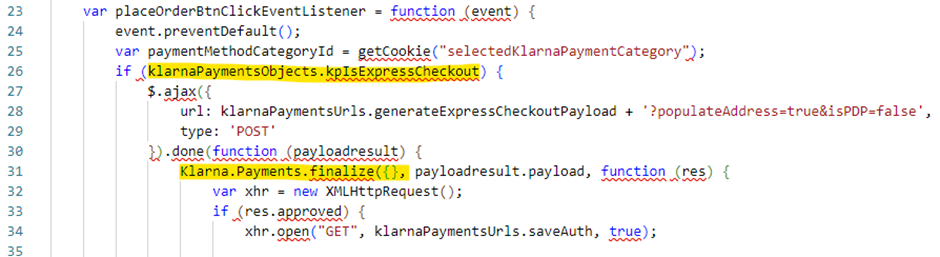
int klarna payments:cartridge:static:default:js:klarna-payments-finalize 2
default/account/login/oauthlogininclude.isml
Add following code on line 15:
<isif condition="${pdict.CurrentSession.customer.anonymous || (pdict.CurrentSession.customer.externallyAuthenticated && ('Klarna' == pdict.CurrentSession.customer.profile.credentials.authenticationProviderID))}">
<isinclude template="klarnapayments/modules.isml" />
<isklarnasignin oauthreentryendpoint="${pdict.scope}"/>
</isif>

Modifications in oauthlogininclude.isml
Controller modification
If using a controller based SiteGenesis integration, additionally follow the instructions in this chapter.
COBilling.js
In the returnToForm() method, add the following code block after the pageMeta.update() function:
try {
require('int_klarna_payments_controllers/cartridge/controllers/KlarnaPayments.js').CreateOrUpdateSession();
} catch (e) {
require('dw/system/Logger').getLogger('COBilling.js').error('Klarna Create Session Error: {0}', e);
}
This code attempts to create or update a Klarna session and logs an error if it fails.
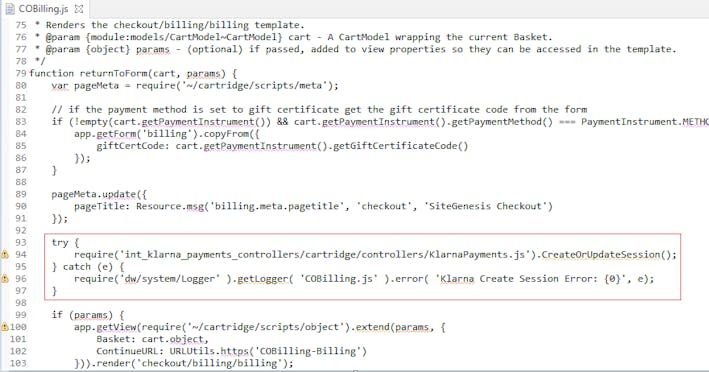
Modifications in COBilling.js
In the resetPaymentForms() method, add the command to remove Klarna payment instruments for the three conditions:
cart.removePaymentInstruments(cart.getPaymentInstruments('Klarna'));
This ensures that any Klarna payment instruments are removed when resetting the payment forms.
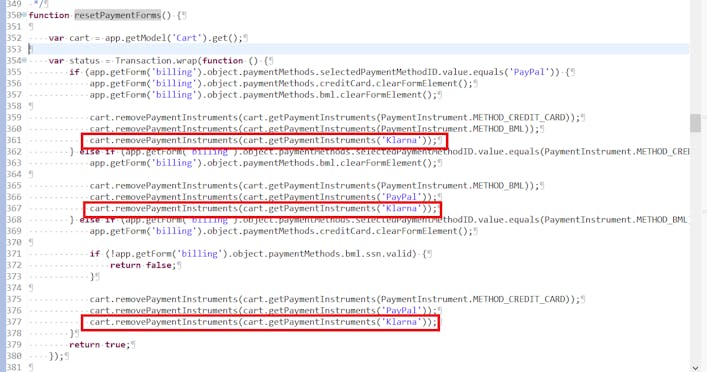
Modifications in COBilling.js (cont.)
In the handlePaymentSelection(cart) method, go to line 441 and add the following code block:
if (app.getForm('billing').object.paymentMethods.selectedPaymentMethodID.value !== 'Klarna') {
require('int_klarna_payments_controllers/cartridge/controllers/KlarnaPayments.js').CancelAuthorization();
}
This cancels any Klarna authorizations if the selected payment method is not Klarna.
Modifications in COBilling.js (cont.)
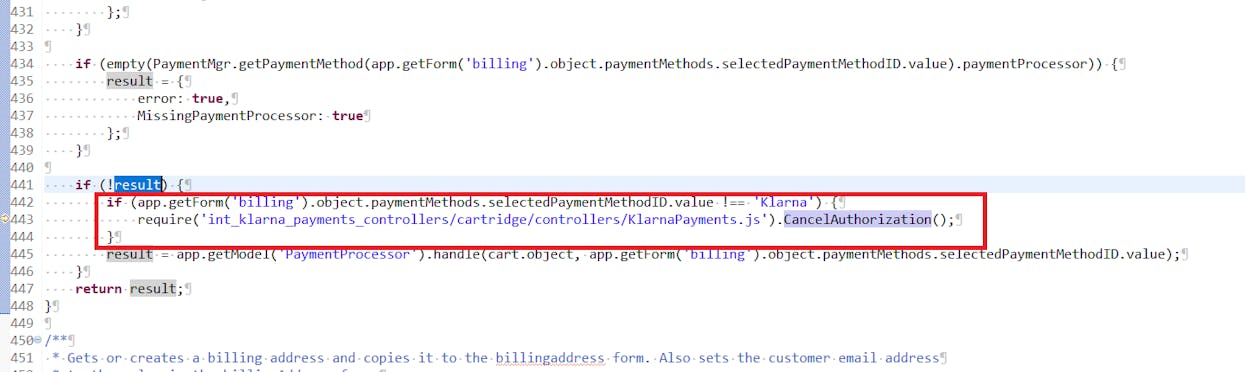
COSummary.js
In the submit() method, add the following code block before the showConfirmation(placeOrderResult.Order) function:
try {
require('int_klarna_payments_controllers/cartridge/controllers/KlarnaPayments.js').Redirect();
} catch (e) {
require('dw/system/Logger').getLogger('COSummary.js').error('Klarna Redirect Error: {0}', e);
}
This code attempts to handle the Klarna redirect and logs an error if it fails.
Modifications in COSummary.js
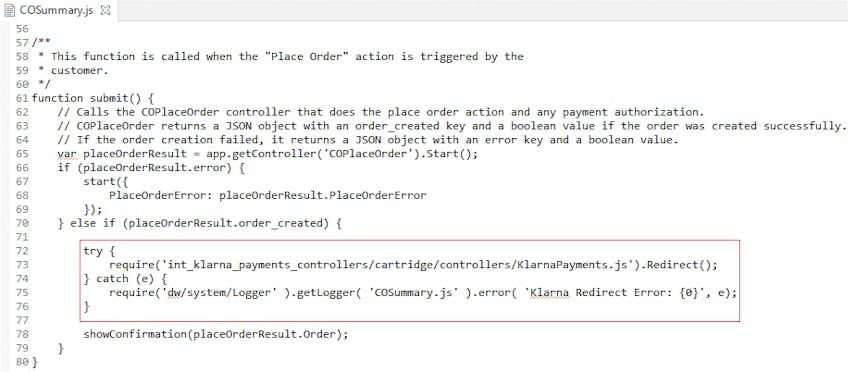
OrderModel.js
In the placeOrder method, add the following code block before the var placeOrderStatus = OrderMgr.placeOrder(order); line:
if (session.privacy.KlarnaPaymentsFraudStatus === 'PENDING') {
try {
require('int_klarna_payments_controllers/cartridge/controllers/KlarnaPayments.js').PendingOrder(order);
} catch (e) {
require('dw/system/Logger').getLogger('OrderModel.js').error('Klarna Payments Pending Order Error: {0}', e);
}
return;
}
This code handles orders with a pending Klarna fraud status by calling the PendingOrder method and logs an error if it fails.
Modifications in OrderModel.js
In the placeOrder method, add the following code at the end:
if (session.privacy.customer_token) {
var SubscriptionHelper = require('*/cartridge/scripts/subscription/subscriptionHelper');
SubscriptionHelper.updateCustomerSubscriptionData(order);
}
This code updates the customer subscription data if a customer token is present in the session.
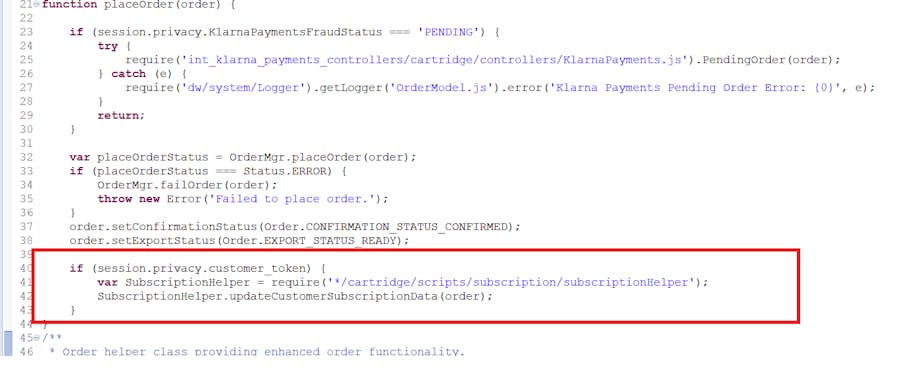
Modifications in OrderModel.js (cont.)
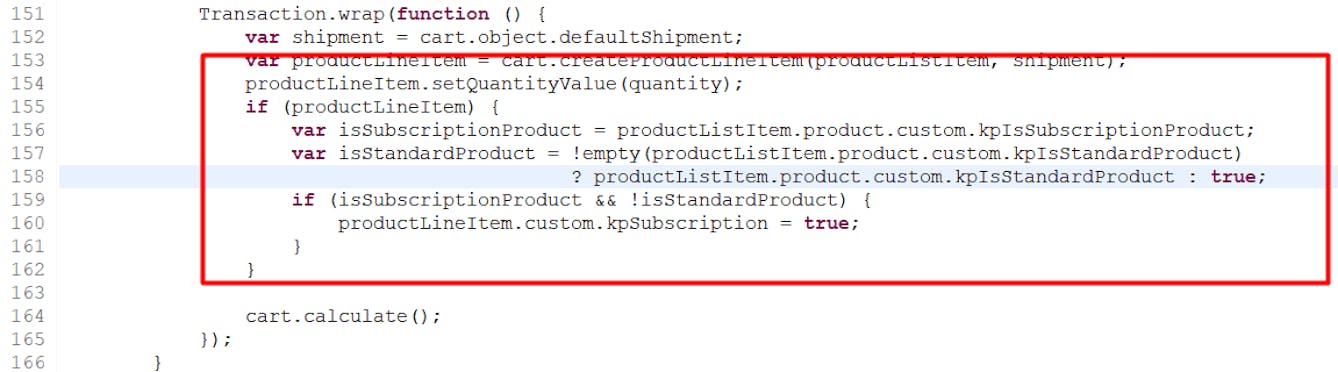
var productLineItem = cart.createProductLineItem(productListItem, shipment);
productLineItem.setQuantityValue(quantity);
if (productLineItem) {
var isSubscriptionProduct = productListItem.product.custom.kpIsSubscriptionProduct;
var isStandardProduct = !empty(productListItem.product.custom.kpIsStandardProduct) ? productListItem.product.custom.kpIsStandardProduct : true;
if (isSubscriptionProduct && !isStandardProduct) {
productLineItem.custom.kpSubscription = true;
}
}
This code checks if the product is a subscription product and updates the product line item accordingly.

In the addProductItem function, add the following code block on line 220:
var isSubscriptionProduct = product.custom.kpIsSubscriptionProduct;
var isStandardProduct = !empty(product.custom.kpIsStandardProduct) ? product.custom.kpIsStandardProduct : true;
if (isSubscriptionProduct && !isStandardProduct) {
productLineItem.custom.kpSubscription = true;
}
Modifications in footer.isml
This code checks if the product is a subscription product and updates the product line item accordingly.
Modifications in Cartmodel.js (cont.)
Cart.js
Add the following code before the module exports section:
function updateSubscriptionAjax() {
var productId = request.httpParameterMap.pid.stringValue;
var subscription = request.httpParameterMap.subscription.stringValue === 'true';
var uuid = request.httpParameterMap.uuid.stringValue;
var SubscriptionHelper = require('*/cartridge/scripts/subscription/subscriptionHelper');
let r = require('~/cartridge/scripts/util/Response');

var cart = app.getModel('Cart').goc();

if (!cart) {
r.renderJSON({
status: 'error',This function handles AJAX requests to update the subscription status of a product in the cart.
Add the following code before the module exports section:
function updateSubscriptionDetailsAjax() {
var SubscriptionHelper = require('*/cartridge/scripts/subscription/subscriptionHelper');

var selectedValue = request.httpParameterMap.selectedValue.stringValue;
var subscriptionField = request.httpParameterMap.subscriptionField.stringValue;
let r = require('~/cartridge/scripts/util/Response');

var cart = app.getModel('Cart').goc();

if (!cart) {
r.renderJSON({
status: 'error',This function handles AJAX requests to update subscription details in the cart.
Add the following code at the end of the exposed methods section:
/** update subscription status
* @see {@link module:controllers/Cart~updateSubscriptionAjax} */
exports.UpdateSubscription = guard.ensure(['https'], updateSubscriptionAjax);
/** update subscription details
* @see {@link module:controllers/Cart~updateSubscriptionDetailsAjax} */
exports.UpdateSubscriptionDetails = guard.ensure(['https'], updateSubscriptionDetailsAjax);
This exposes the newly added methods to handle subscription updates.
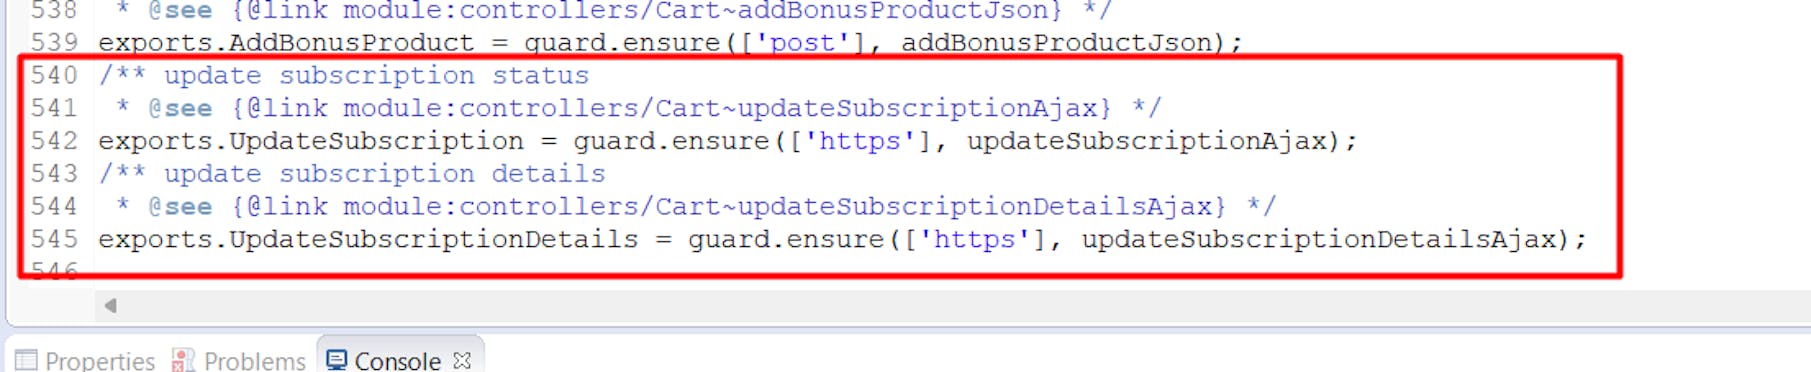
Modifications in Cart.js
COShipping.js
Add the following code after the cart calculation on line 100:
var isSubscriptionBasket = require('*/cartridge/scripts/subscription/subscriptionHelper').isSubscriptionBasket(cart.object);
if (isSubscriptionBasket && !customer.authenticated) {
session.privacy.guest_subscription_error = true;
response.redirect(URLUtils.https('Cart-Show'));
return;
}

COShipping.js modifications (cont.)
Order.js
Add the following subscriptions function at the end of the controller:
/**
* Renders a page with all customer's subscriptions
*/
function subscriptions() {
var subscriptions = [];
var profile = customer.profile;
if (profile.custom.kpSubscriptions) {
subscriptions = JSON.parse(profile.custom.kpSubscriptions);
}
app.getView({
subscriptions: subscriptions
}).render('klarnapayments/subscription/account/subscriptionHistory');This function retrieves the customer's subscriptions from their profile and renders the subscription history page.
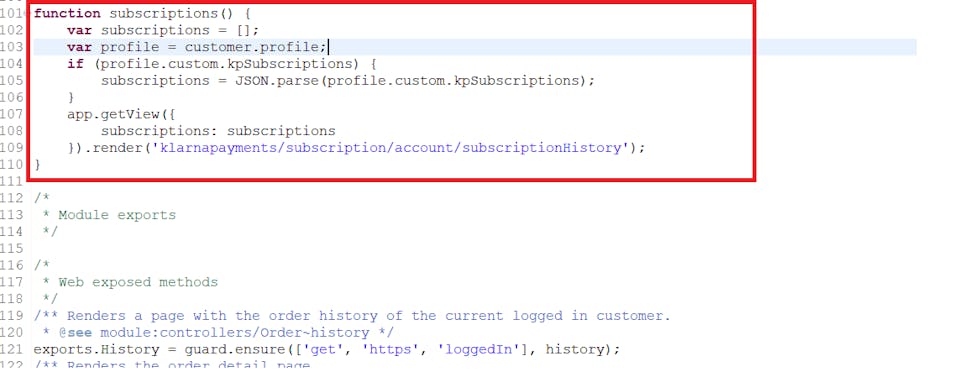
Order.js modifications
Add the following module export for the subscriptions function:
/** Renders a page with the subscriptions history of the current logged in customer.
* @see module:controllers/Order~subscriptions */
exports.Subscriptions = guard.ensure(['get', 'https', 'loggedIn'], subscriptions);
This ensures that the subscriptions function is accessible and secured.
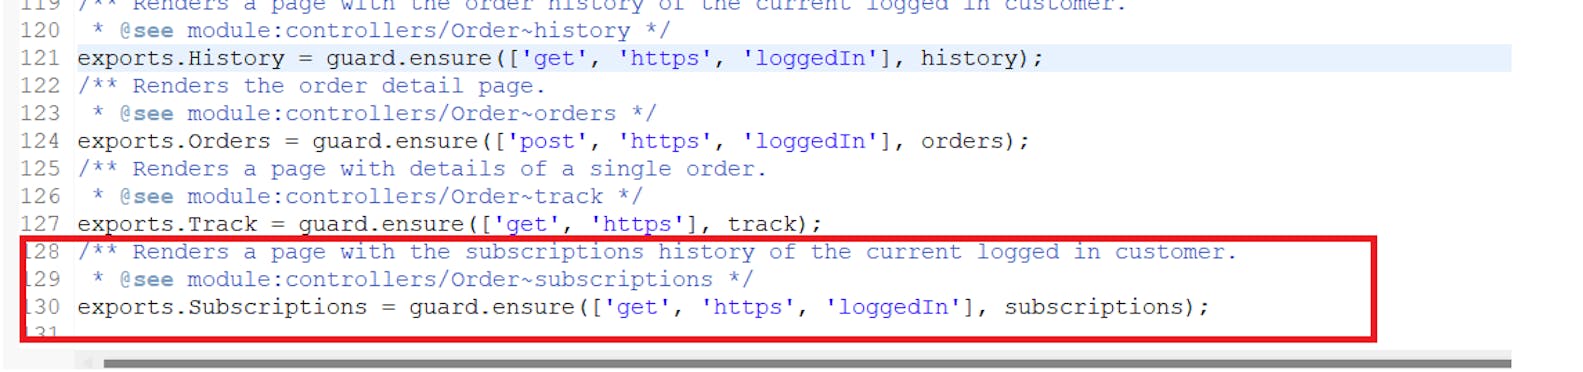
Order.js modifications (cont.)
COCustomer.js
Add the following code on line 38, after the removeAllPayments() call:
var SubscriptionHelper = require('*/cartridge/scripts/subscription/subscriptionHelper');

var subValidation = SubscriptionHelper.validateCartProducts(Cart.goc().object);
if (subValidation && subValidation.error) {
response.redirect(URLUtils.https('Cart-Show'));
return;
}

SubscriptionHelper.updateCartSubscriptionDetails(Cart.goc().object);
This code validates the subscription products in the cart and updates the cart subscription details. If there's an error, it redirects to the cart page.
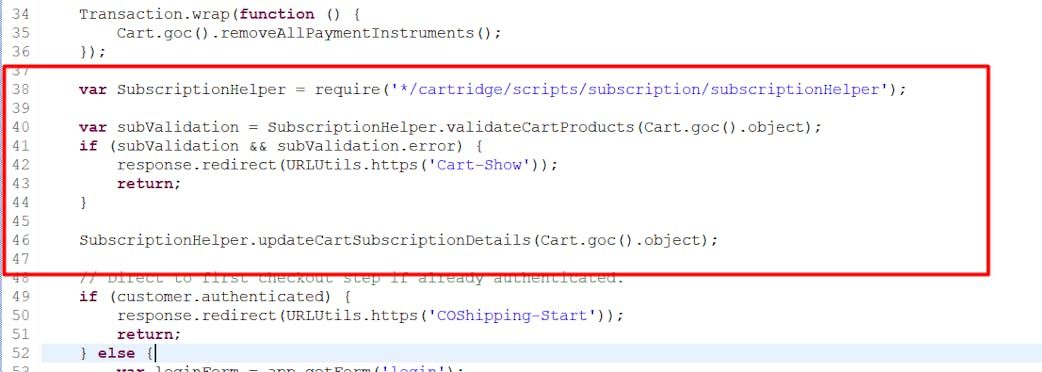
Modifications in COCustomer.js
Update app.getView on line 68 by adding following code:
app.getView({
ContinueURL: URLUtils.https('COCustomer-LoginForm').append('scope', 'checkout'),
scope: 'checkout'
}).render('checkout/checkoutlogin');
The code passes a scope parameter to the view.

Modifications in COCustomer.js (cont.)
COPlaceOrder.js
Update the start() function with a parameter in attributes and pass it to the cart model:
function start(param) {
var cart = Cart.get(param);
if (!cart) {
app.getController('Cart').Show();
return {};
}
var COShipping = app.getController('COShipping');
// Clean shipments.
COShipping.PrepareShipments();
}
This modification ensures that the start() function accepts a parameter and uses it to get the cart.

COPlaceOrder.js modifications
KlarnaPayments.js
HandleExpressCheckoutRedirect()
Remove highlighted code from handleExpressCheckoutRedirect() function:
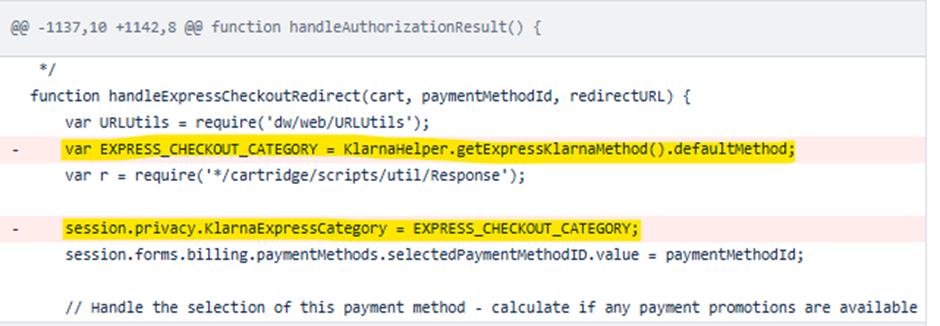
KlarnaPayments.js modifications
createOrUpdateSession()
Remove highlighted code from createOrUpdateSession() function:
.png)
KlarnaPayments.js modifications (cont.)
handleAuthorizationResult()
Insert the following code into the handleAuthorizationResult() function, before the line var klarnaSessionId = null;
session.privacy.KlarnaPaymentMethods = expressKlarnaMethod.paymentMethods;
var EXPRESS_CHECKOUT_CATEGORY = expressKlarnaMethod.defaultMethod;2.png)
KlarnaPayments.js modifications (cont.)
Insert the following code into the handleAuthorizationResult() function, before the line handleExpressCheckoutRedirect(cart, PAYMENT_METHOD, redirectURL);
%203.png)
KlarnaPayments.js modifications (cont.)
Login.js
Add klarnaSignIn function after Logout() function:
/**
* Logs the customer in using Klarna SignIn functionality.
* Calls the {@link module:controllers/Account~Show|Account controller Show function}.
*/
function klarnaSignIn() {
var signInHelper = require('*/cartridge/scripts/signin/klarnaSignIn');
var r = require('*/cartridge/scripts/util/Response');
var Resource = require('dw/web/Resource');
var klarnaSignInErrorMsg = Resource.msg('klarna.signin.loginerror', 'klarnaSignIn', null);


var httpParameterMap = request.httpParameterMap;Export function at the end:
/** Execute OAuth login with Klarna sign.
* @see module:controllers/Login~klarnaSignIn */
exports.KlarnaSignIn = guard.ensure(['https', 'post'], klarnaSignIn);
Account.js
Add following code on line 390 to validate if the user already exists as externally authenticated Klarna user:
var signInHelper = require('*/cartridge/scripts/signin/klarnaSignIn');
var customerExists = signInHelper.checkKlarnaCustomerExists(email);
if (customerExists) {
app.getForm('profile.customer.email').invalidate();
profileValidation = false;
}
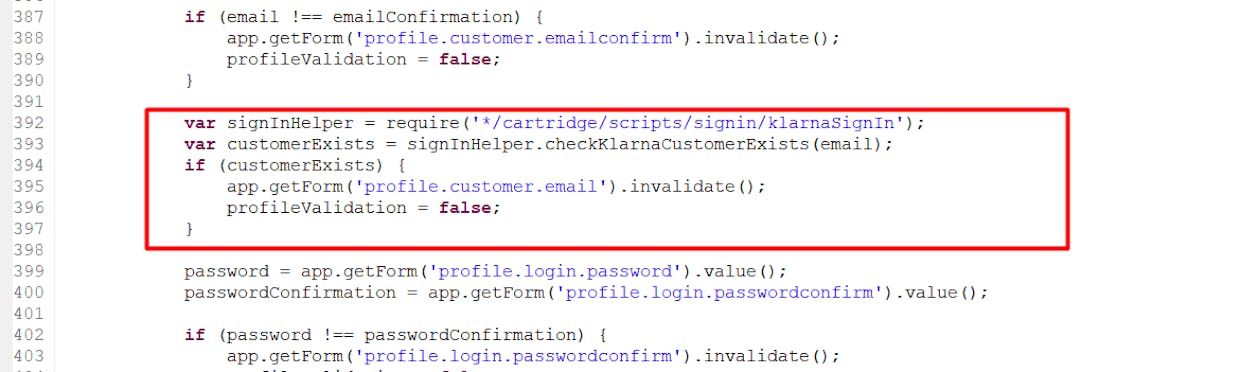
Account.js modifications
External interfaces
All requests to Klarna are performed through Klarna’s REST API and are encrypted using SHA-256 with the shared secret provided by Klarna. To ensure security, only HTTPS is allowed for these communications. JSON is the format used for all requests and responses, facilitating consistent and structured data exchange.
For detailed information, including the resource structure for requests and responses, please refer to Klarna Payments API![]()