

Klarna Express Checkout integration
Learn how to integrate Klarna Express Checkout with Paytrail in your store.
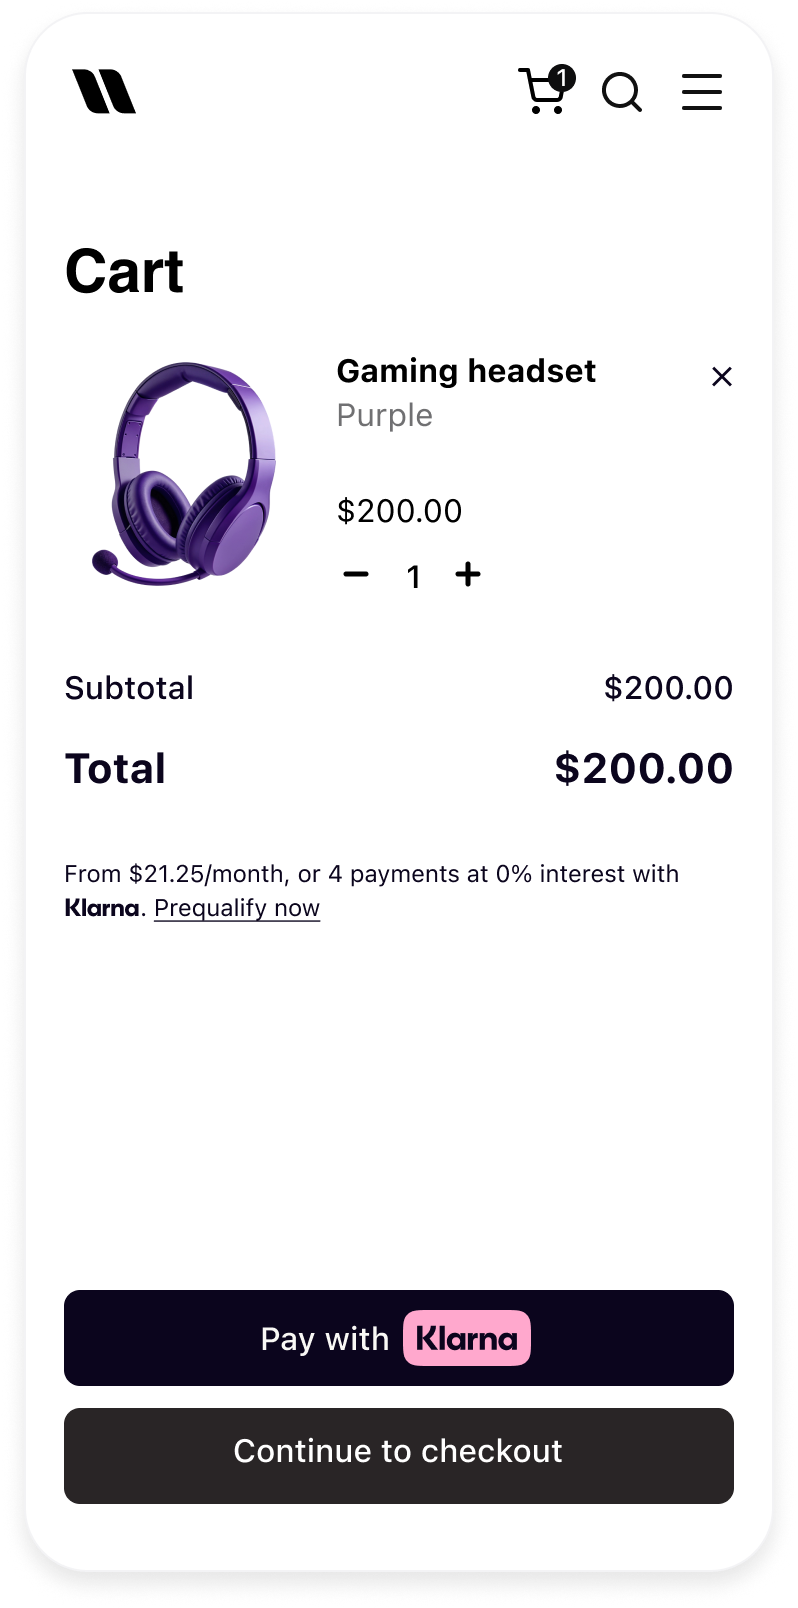
Offer Klarna Express Checkout by displaying the Klarna payment button on your product or cart page.
 | 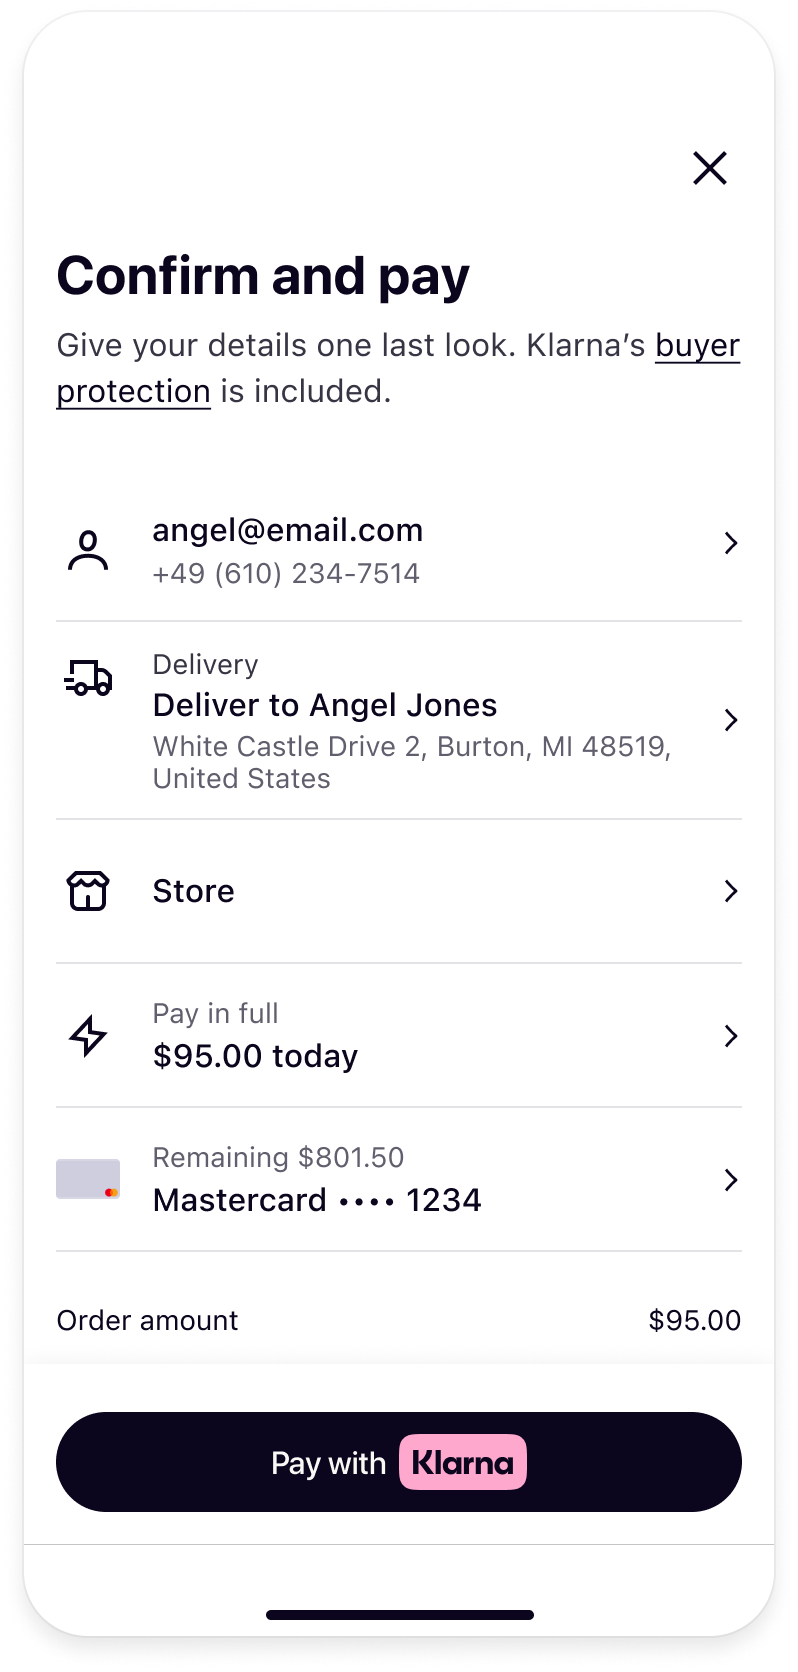 | 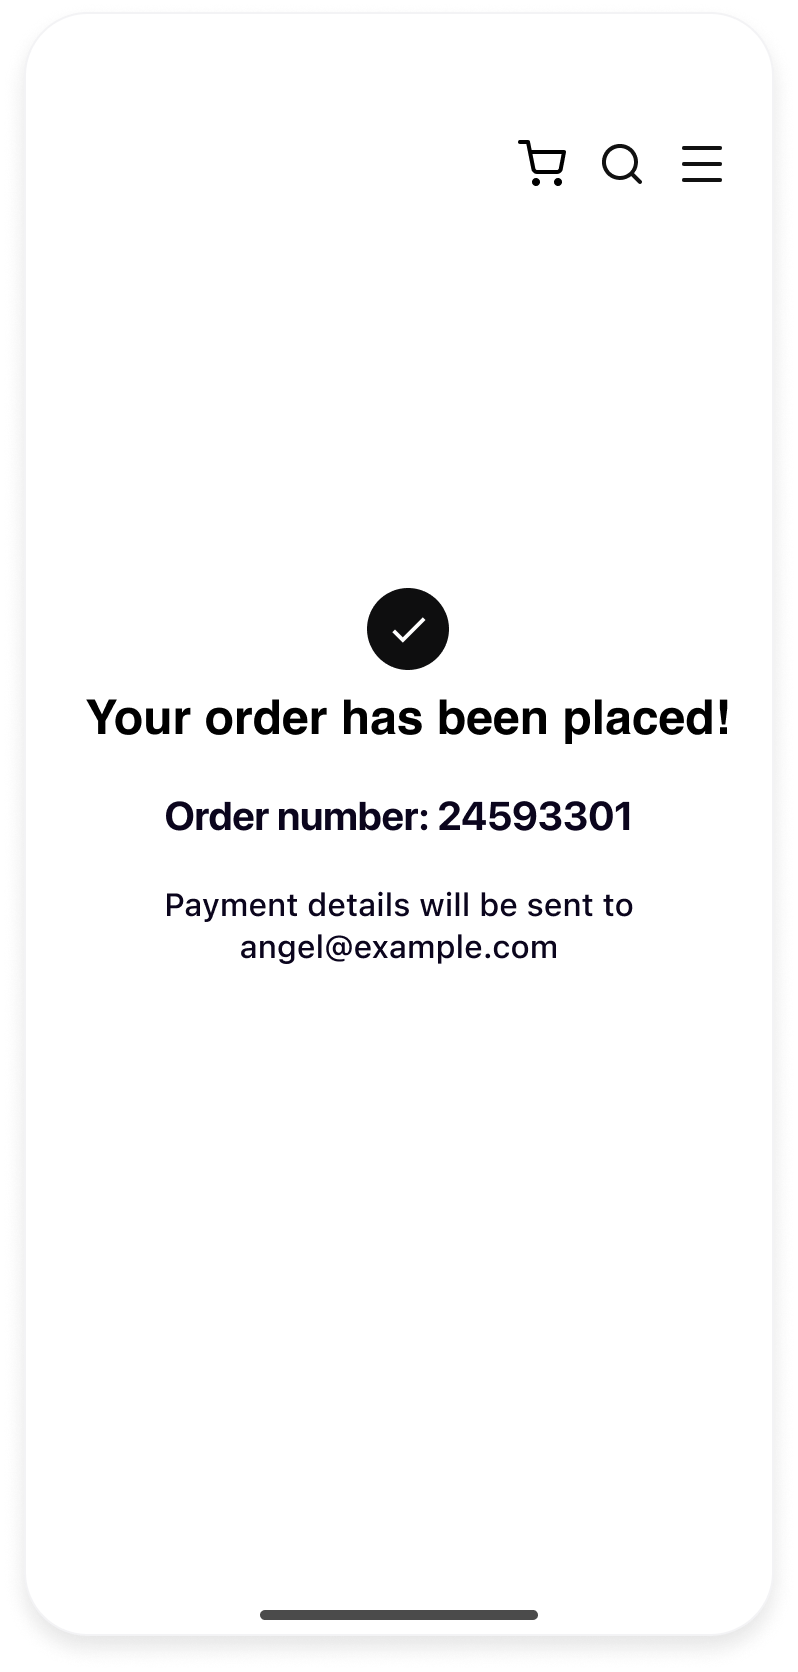 |
| Klarna payment button featured in the Product detail page | Consumer confirms their payment and shipping details in one step | Consumer is redirected to merchant confirmation page after successful payment |
This integration guide is only for implementation one-click purchase flow, which ensures the lowest friction to customers.
Support for multi-step checkout will be added in a future release.
Prerequisites recap
Before you integrate Express checkout, check that you meet the following prerequisites:
- Ensure that you have Klarna enabled with your Acquiring Partner.
- Confirm you have access to the Klarna Portal.
- Inside Klarna Portal:
- Confirm that you have generated a client identifier with your domain URL allowlisted.
- Confirm that you have generated an API key.
- Confirm that you have registered webhooks for
payment.request.state-change.completedevents following Webhooks guidelines. - Disclose Web SDK tracking in your site’s notices.
For a comprehensive, step-by-step walkthrough of these prerequisites, refer to the detailed integration guide.
Integration overview
Here's an overview of all the steps to add Klarna Express Checkout into your website:
- Initialize Klarna Web SDK using
https://js.klarna.com/web-sdk/v2/klarna.mjs. - Display Klarna payment button on relevant pages especially product and cart pages.
- Initiate the purchase flow by implementing the
initiatecallback to submit payment request data. - Handle shipping details (optional): Use
shippingConfigand handle shipping events (shippingaddresschange,shippingoptionselect). - Use Klarna Webhooks to track payment status and retrieve the
klarna_network_session_token. - Authorize the payment with the Acquiring Partner by forwarding the
klarna_network_session_tokenand purchase details.
The following diagram outlines the interactions among different components:
Integration details
Initialize the Web SDK
| Parameter | Presence | Description |
|---|---|---|
| required | A credential used to identify the Partner, which can be obtained from the Klarna Portal. To ensure the credential functions properly, make sure to register all domains where the Web SDK will be used. |
| optional | An array used to specify which products should be loaded to optimize performance by limiting the amount of data downloaded. If the PAYMENT product is included, only the Klarna.Payment package will be loaded. If the products array is omitted, all available packages will be loaded by default. |
| optional | Language and region code (e.g., en-US). If omitted, Klarna may default based on the customer’s browser settings. |
| optional | The short-lived token exchanged from the klarna_network_session_token. Enables restoring the customer's session state securely on the client. |
For the full API specifications, refer to Klarna Web SDK.
SDK initialization sample
<script type="module">
  const { KlarnaSDK } = await import("https://js.klarna.com/web-sdk/v2/klarna.mjs")

  const Klarna = await KlarnaSDK({
    clientId: "[client-id]",
    products: ["PAYMENT"],
    locale: "en-US", // optional
  })

  // Klarna SDK ready to be utilized
  // Klarna.Payment.button().mount('#payment_container')
</script>If the domain is not registered, subsequent method calls will result in an error.
- Load the Web SDK from https://js.klarna.com/web-sdk/v2/klarna.mjs to remain compliant.
- Keep the SDK in the top‑level (1st‑party) browsing context.
- Specify products for performance.
- Disclose Web SDK tracking in your site’s notices. Learn more here.
- Don’t include the Web SDK in a bundle or host it yourself.
- Don't load the Web SDK inside an iframe.
- Don't omit products.
- Don't use the Web SDK without disclosing tracking technologies.
Display the Klarna payment button
Display Klarna payment button early in the shopping journey and provide customers with the option to skip ahead when they’re ready to purchase. High impact placements include the product detail page, cart page and checkout page.
 |  | 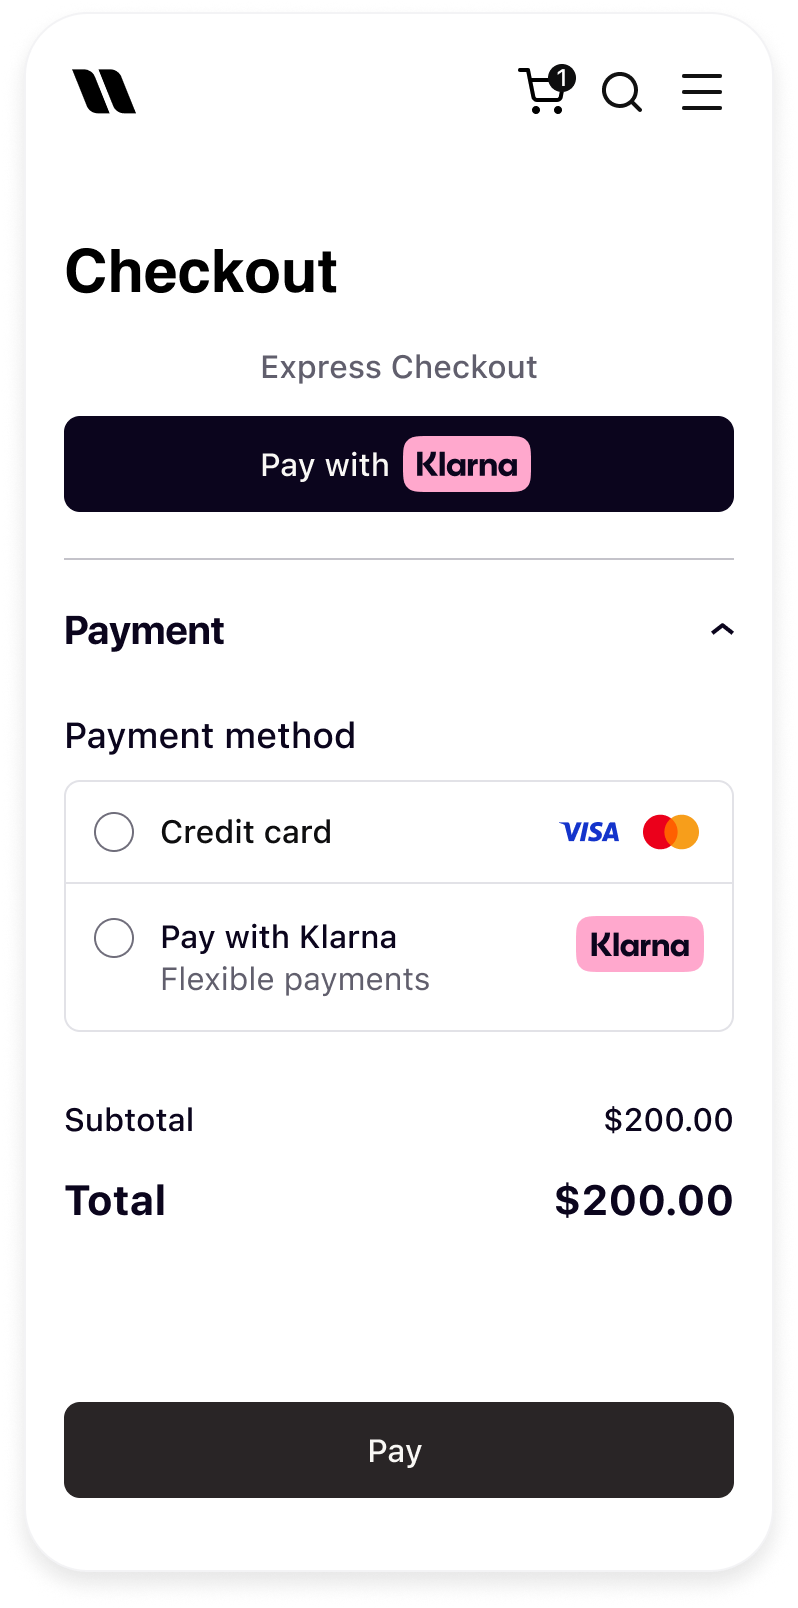 |
| Klarna payment button in product detail page | Klarna payment button in cart | Klarna payment button in checkout |
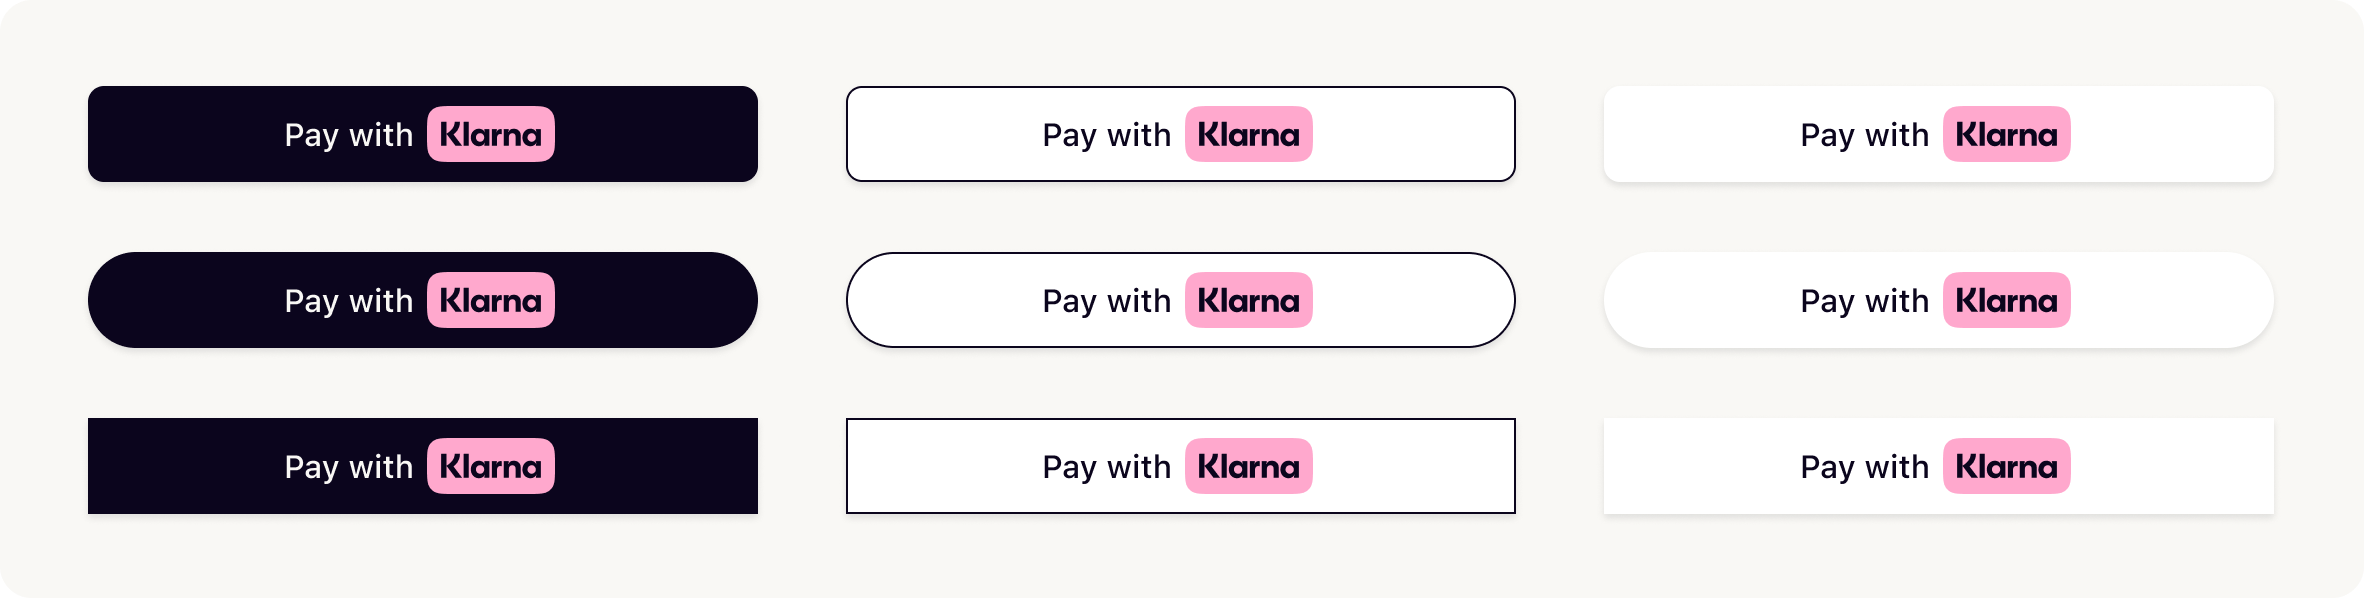
Klarna payment button variants
Choose the theme and shape of the payment button to best fit into your online store in a way that complements your brand and encourages user engagement. More details on the button styling can be found here.
Create a button configuration object
The button() method can be configured with the following set of parameters:
| Parameter | Description |
|---|---|
| Sets a custom DOM ID on the rendered button. Useful for testing or styling. |
| Defines the button’s shape. Possible values are:default, pill, rect |
| Sets the visual theme of the button. Possible values are: default, light, dark, outlined |
| Sets the language and region (e.g., en-US). If you don’t set this, it will automatically use the value chosen when you first set up the Web SDK. If that’s not available, it will use your browser’s settings instead. |
| Disables the button when set to true. Useful during form validation or async operations. |
| Forces the button into a loading state. Useful when awaiting async setup or validation. |
| Sets the purpose of the payment. Used to personalize the button and flow if not set when creating the PaymentPresentation instance. |
| Function that returns a Promise resolving to either a PaymentRequestData, a paymentRequestId, or a returnUrl. This will be handled differently depending on the integration path. |
| Defines how Klarna launches the purchase journey. |
Sample code
const buttonConfig = {
  id: "klarna-payment-button",
  shape: "pill", // "default" || "rect"
  theme: "default", // "dark" || "light" || "outlined"
  intents: ["PAY"],
  initiationMode: "DEVICE_BEST", // "ON_PAGE" || "REDIRECT"
  initiate: () => { /** Implement the initiate method **/ }
};
Mount Klarna payment button
Finally, mount the button inside the appropriate container:
klarna.Payment.button(buttonConfig).mount("#klarna-button-container");
The button will automatically handle customer interaction and trigger the Klarna purchase flow via the initiate function.
Initiate the purchase flow
In order to launch the purchase flow, you need to implement the initiate callback on the Klarna payment button interface. The initiate callback is triggered when the customer clicks on the Klarna payment button, upon which, the payment request data such as amount and currency must be submitted to Klarna server.
You can choose to either submit the data on the client side or creating a payment request on the backend side.
Important
Submitting payment request data on the client side introduces security risks, as updates originating from the client can be tampered with or spoofed. If you choose to use it, ensure robust safeguards are in place—such as validating the payment request data on the server before authorizing the payment.
For industries that require supplementary purchase data beyond standard fields (e.g., airlines, lodging), a server-side submission approach is mandatory to ensure data integrity and compliance.
| Parameter | Presence |
|---|---|
| required Currency in ISO 4217 format. Supported currencies: AUD, EUR, CAD, CZK, DKK, HUF, MXN, NZD, NOK, PLN, RON, SEK, CHF, GBP, USD. |
| required Total amount of a one-off purchase, including tax and any available discounts. The value should be in non-negative minor units. Eg: 25 Dollars should be 2500. This is the amount that Klarna will charge the customer for a one-off purchase. Should not include any amounts for subscriptions. |
| optional Additional details about the transaction can help reduce the risk of fraud and enhance transparency. Client side availability:
Server side availability:
|
For the full API specifications, refer to Klarna Web SDK.
Create Klarna payment request on the server side
Create a payment request on the server side is the recommended approach to create the payment request, then share the payment request ID as response to the initiate callback.
Client code
const klarnaPaymentButton = klarna.Payment.button({
  initiate: () => {
      // Collect any data you want to send to your server here:
      // const postData = { ... };
      // const resp = await fetch('/create-klarna-payment-request', {
      //   method: 'POST',
      //   headers: { 'Content-Type': 'application/json' },
      //   body: JSON.stringify(postData)
      // });
      // const data = await resp.json();
      return { paymentRequestId: data.paymentRequestId };
}For the full API specifications, refer to Klarna Web SDK.
Server code
// server.js
const express = require('express');
const axios = require('axios');
const bodyParser = require('body-parser');

// Klarna credentials (replace with your own, preferably load from env!)
const KLARNA_API_KEY = 'YOUR_API_KEY';
const KLARNA_BASE_URL = 'https://global-api.klarna.com'; // According to docs

const app = express();
app.use(bodyParser.json());
For the full API specifications, refer to the createPaymentRequest endpoint.
Create a new payment request on every button click instead of reusing payment requests.
ALTERNATIVE: Create Klarna payment request on the client side
This approach allows you to conveniently send data to Klarna directly from the client. Return the payment request payload as follows:
const klarnaPaymentButton = klarna.Payment.button({
  initiate: () => {
    return {
      currency: "USD",
      amount: 1000,
      paymentRequestReference: "pay-ref-123",
      supplementaryPurchaseData: {
        purchaseReference: "pay-ref-123",
        lineItems: [],
        shipping: [],
        customer: {}
},For the full API specifications, refer to Klarna Web SDK.
OPTIONAL: Collect shipping details
If you're selling digital goods, you can ignore this section.
Klarna Express Checkout allows customers to complete their purchase within Klarna’s interface, where they can select a payment method, enter their shipping address, and choose from available shipping options. This reduces the need for address collection on the merchant’s side and enables a more streamlined checkout experience, especially on mobile. Shipping methods can be dynamically calculated and returned based on the customer’s input, allowing for flexibility in delivery pricing and timing. This setup helps simplify integration while improving the overall user flow.
 |  |
| Display shipping banner | Display shipping options |
Display shipping banner and collect shipping details
To enable the shipping banner and collect shipping details, include "shipping_config": { "mode": "EDITABLE" } in the payment request. The collected shipping details will be available under state_context.shipping after the customer approves the purchase.
If you need to restrict the countries to which you ship, include the supported_countries attribute with a list of permitted countries. By default, all Klarna-supported countries are available unless specified otherwise.
Update the server code as followed:
async function createKlarnaPaymentRequest(data) {
  const url = `${KLARNA_BASE_URL}/v2/payment/requests`;
  const payload = {
    currency: "USD",
    amount: 1000,
    payment_request_reference: "pay-ref-123",
    supplementary_purchase_data: {
      purchase_reference: "pay-ref-123",
      line_items: [],
      shipping: [],
      customer: {},
},In case the payment request was created on the client side, update the client code as followed:
const klarnaPaymentButton = klarna.Payment.button({
  initiate: () => {
    return {
      currency: "USD",
      amount: 1000,
      paymentRequestReference: "pay-ref-123",
      supplementaryPurchaseData: {
        purchaseReference: "pay-ref-123",
        lineItems: [],
        shipping: [],
        customer: {}
},The collected shipping data will be available when the payment request is completed.
See Monitor payment status section on this page for more information.
| Parameter | Presence | Description |
|---|---|---|
| required | ("EDITABLE" Values: ("EDITABLE", "READ_ONLY") Configure if the shipping details should be collected from the customer. If mode is set to EDITABLE then the shipping details will be collected from the customer and will be available under stateContext.shipping when the payment request is in state COMPLETED.If mode is set to READ_ONLY (future-release) then the customer can only see the shipping details that are provided in the supplementaryPurchaseData.shipping[0] object without the ability to change them. |
| optional | Partner's supported shipping countries (ISO 3166-1 alpha-2) |
For the full API specifications, refer to Klarna Web SDK.
The READ_ONLY mode will be supported in a future release.
Validate shipping address and handle multiple shipping options
Customers easily select their shipping address and preferred shipping method directly within the Klarna review page, enabling the customer to checkout with one click.
To enable proper functionality of the shipping options integration, you, as the integrator, need to handle two event callbacks: shippingaddresschange and shippingoptionselect. These events allow you to communicate available shipping options after an address is selected, enabling the customer to choose from the provided options.
Handle shipping address change events
| Parameter | Presence | Description |
|---|---|---|
| required | City/town |
| required Postal code formatted according to country. | |
| required | State/county/province/region formatted according to country. Mandatory for US and AU market. Validations according to ISO 3166-2 format, e.g. US-OH, US-NJ, AU-ACT, etc. |
| required | Country in ISO 3166-1 alpha-2 format. |
The shipping address changed event handler is triggered when the consumer changes their shipping address during the payment flow.
The shipping address returned has the following format:
{
  "city": "San Francisco",
  "postalCode": "94107",
  "region": "CA",
  "country": "US"
}
The shipping address returned at this stage does not have specific address lines. It's only meant to ensure you can run your validation logic. Detailed information will be returned after the customer approves the purchase.
When the shippingaddresschange event is triggered, you are given the opportunity to accept or reject the shipping address. If you are able to deliver to the address, you should return the shipping options. It's recommended that you preselect a default shipping option for the provided address, you can do so by returning the shipping option in the selectedShippingOptionReference property. You should also update the amount and lineItems properties to reflect the selected shipping cost. Preselecting a shipping option skips the screen where the customer needs to select a shipping option and goes directly to the review screen. This will reduce the friction of the payment flow.
The shippingaddresschange event is triggered immediately after the customer logs in to their account given they have an existing shipping address, and every time the customer updates the shipping address. You should return the shipping options and updated order data here. If nothing was returned in 5 seconds, the purchase flow will end in an error state.
Handle shipping option selection events
| Parameter | Presence | Description |
|---|---|---|
| required | Total amount of the shipping method selected by the customer. The value should be in non-negative minor units. Eg: 25 Euros should be 2500. |
| required | Description of the type of shipping the customer has selected at the checkout. E.g: "1 - 3 working days", "1 working day". |
| required | The shipping option as selected by the customer at the Partner website. |
| required | Unique reference to this shipping option. Required if the payment request contains multiple shipping objects. This can be any string, and does not have to correspond to a delivery or tracking number. |
| optional | The type of shipping option the customer selected. This can be:
|
When the customer selects a different shipping option, you will receive a shippingoptionselect event. Here you are supposed to return the updated the amount and lineItems properties to reflect the selected shipping cost. In some rare cases, if the shipping option is no longer available, you can reject the selection.
For the full API specifications, refer to Klarna Web SDK.
The shippingoptionselect event is triggered every time a customer selects a different shipping option. You should return an updated order data here. If nothing was returned in 5 seconds, the purchase flow will end in an error state.
OPTIONAL: Request customer profile data to fulfill the purchase transaction
The SDK allows you to request necessary customer profile data to fulfill the purchase transaction such as email and phone number.
Legal notice
Requesting and processing a customer’s identity information is strictly regulated under the General Data Protection Regulation (European Union) as well as other applicable data protection and privacy laws in the jurisdictions where you operate. You must ensure you have a lawful basis for collecting such data, which may only be used for the explicit purpose of fulfilling the current purchase transaction.
Any use of this information beyond what is necessary for order fulfillment—such as creating a customer account, marketing, or profiling—is strictly prohibited and may result in significant legal liabilities, including fines and sanctions, under relevant privacy legislation.
It is your responsibility to fully comply with all applicable data protection and privacy requirements at all times and to safeguard customer information in accordance with the highest legal standards.
- Request only what you need for the purpose of transaction fulfillment:
- Billing address: Request only if required for payment authorization, fraud prevention (e.g., AVS), tax, or legal compliance.
- Email/Phone: Use for sending order confirmation, digital receipts, and delivery updates.
- Country/Locale: Use to show relevant taxes, shipping methods, and language/currency options.
- Protect customer data:
- Store and transmit personal data securely; comply with privacy laws (GDPR, CCPA, PCI DSS).
- Minimize data retention—keep personal info only as long as necessary.
- Honor customer preferences and local laws:
- Respect opt-outs and use local data minimization rules (e.g., GDPR: only collect necessary data).
- Don’t collect extra data “just in case” or for other purposes:
- Avoid asking for customer data if not required for your business use case.
- Customer data must not be used for unsolicited marketing, creating account, or profiling unless the customer explicitly consents.
- Don’t store sensitive info longer than necessary:
- Purge data when it is no longer needed for fulfillment, compliance, or accounting.
- Don’t ignore local regulations:
- Do not request or process customer data if it would contravene privacy laws in your customer’s market.
To enable this feature, include the collect_customer_profile with the list of required customer data values. The table below described the data that will be returned for following parameters:
| Parameter | Presence | Description |
|---|---|---|
| optional | Customer email address. |
| optional | Full name of the customer. |
| optional | Phone number in E.164 international format. If a local format is received it is assumed to be within the country as specified in the address object. |
| optional | Domicile address of the customer. |
| optional | The locale follows the format of IETF BCP 47. |
Update the server code as followed:
async function createKlarnaPaymentRequest(data) {
  const url = `${KLARNA_BASE_URL}/v2/payment/requests`;
  const payload = {
    currency: "USD",
    amount: 1000,
    payment_request_reference: "pay-ref-123",
    supplementary_purchase_data: {
      purchase_reference: "pay-ref-123",
      line_items: [],
      shipping: [],
      customer: {},
},In case the payment request was created on the client side, update the client code as followed:
const klarnaPaymentButton = klarna.Payment.button({
  initiate: () => {
    return {
      currency: "USD",
      amount: 1000,
      paymentRequestReference: "pay-ref-123",
      supplementaryPurchaseData: {
        purchaseReference: "pay-ref-123",
        lineItems: [],
        shipping: [],
        customer: {}
},For the full API specifications, refer to Klarna Web SDK.
The collected customer profile data will be available when the payment request is completed. See next section, Monitor payment status, for more information.
Monitor payment status
Once the customer approves the request, the payment request will enter the COMPLETED state and you’ll receive an klarna_network_session_token which can be used to authorize the payment and complete the process. There are different ways to obtain the klarna_network_session_token. The recommended approach is to subscribe to Klarna Webhooks.
Subscribe to webhooks
Every successful approval will trigger the payment request to enter the COMPLETED state. Klarna will then trigger a payment request state change webhook to which you have to subscribe to:
| Event name | When |
|---|---|
| To track when payment requests get to the COMPLETED state. |
From this request you will be able to retrieve the klarna_network_session_token which is needed to authorize the payment and complete the Express Checkout flow.
Once your webhooks are set up, you can manage them through API requests. Use these updateWebhook, deleteWebhook, and getWebhookById to update, delete, or retrieve details about your configurations.
Subscribing to webhooks in the Klarna Portal will be available in a future release.
The field shipping and klarna_customer in the webhook payload will be available in a future release.
Webhook payload sample
{
  "metadata": {
    "event_type": "payment.request.state-change.completed",
    "event_id": "d9f9b1a0-5b1a-4b0e-9b0a-9e9b1a0d5b1a",
    "event_version": "v2",
    "occurred_at": "2024-01-01T12:00:00Z",
    "correlation_id": "2d1557e8-17c3-466c-924a-bbc3e91c2a02",
    "subject_account_id": "krn:partner:global:account:live:HGBY07TR",
    "recipient_account_id": "krn:partner:global:account:live:LWT2XJSE",
    "product_instance_id": "krn:partner:product:payment:ad71bc48-8a07-4919-a2c1-103dba3fc918",
    "webhook_id": "krn:partner:global:notification:webhook:120e5b7e-abcd-4def-8a90-dca726e639b5",
"live": trueOPTIONAL: Listen to Web SDK events
On the frontend, you can listen for the complete event. When the customer successfully completes the purchase flow, the payment request’s status will change to COMPLETED, and y and you can then retrieve the interoperability token.
klarna.Payment.on("complete", async (paymentRequest) => {
  // The customer has successfully completed the payment flow and
  // the payment request can be confirmed using the interoperability token.
});
Sample paymentRequest callback
{
  "paymentRequestId": "krn:payment:eu1:request:64be490f...",
  "state": "COMPLETED",
  "stateContext": {
    "interoperabilityToken": "krn:network:eu1:klarna-network-session-token:e15432a5-ebcc-45bc-934c-e61399db597b",
    "shipping": {
      "recipient": {
        "givenName": "Klara",
        "familyName": "Test",
        "email": "recipient@email.us",
        "phone": "+18445527622"
},For the full API specifications, refer to Klarna Web SDK.
Important
Relying on Web SDK events solely will lead to a high number of abandoned payment requests. Always use this approach in combination with the Webhooks to ensure the best conversion rate.
Authorize the payment
Make sure to add the klarna_network_session_token to the providerDetails.klarna.networkSessionToken field of Paytrail's /payments call.
In rare cases where there's discrepancy between the amount and purchase details submitted in the original payment request and the information submitted to Paytrail, Klarna may reject and ask the customer to approve the purchase again.
As an alternative to the /payments endpoint, Paytrail also offers two dedicated endpoints for Klarna: /payments/klarna/charge (for auto-capture) and /payments/klarna/authorization-hold (for manual capture). With these endpoints, you can use the same request body as you would with the /payments endpoint.
If you prefer to use /payments/klarna/authorization-hold;
- to capture the authorization, you need to call
/payments/{transactionId}/klarna/commit - to void (cancel) the authorization, you need to call
/payments/{transactionId}/klarna/revert
For more details, check Paytrail's API documentation for Klarna.