

Installation of SAP Commerce Cloud Add-on
This guide will help you install Klarna add-ons for SAP Commerce Suite to enable Klarna payment solutions. Follow the steps outlined below to ensure a successful installation.
10 min read
Installation steps
Step 1: Download and unpack the add-on
- 1.Download the add-on archive: Obtain it from Klarna’s GitHub repository.
- 2.Unpack the archive: Extract the contents and move these folders to
<HYBRIS_:HOME>/ bin/ custom - 2.1.
klarnapaymentaddon - 2.2.
klarnapayment - 2.3.
klarnapaymentapi - 2.4.
klarnapaymentbackoffice - 2.5.For B2B implementations, also include
klarnapaymentb2baddon.
Step 2: Update localextensions.xml
- 1.Verify existing extensions: Ensure
addonsupportis present:
XML
1
2
<extension name="addonsupport" />
- 1.Add Klarna extensions:
XML
1
2
3
4
5
<extension name="klarnapaymentaddon" />
<extension name="klarnapayment" />
<extension name="klarnapaymentbackoffice" />
<extension name="klarnapaymentapi" />
For B2B, add:
XML
1
2
<extension name="klarnapaymentb2baddon" />
Step 3: Stop the server and prepare the environment
- 1.Stop the server:
- 1.1.Embedded mode: Press
Ctrl+C. - 1.2.Service mode:
- 1.2.1.Windows:
hybrisserver.bat stop - 1.2.2.Unix:
./hybrisserver. sh stop
- 2.Set up the environment: Navigate to
<HYBRIS_and run:HOME>/ bin/ platform - 2.1.Windows:
setantenv.bat - 2.2.Unix:
./setantenv. sh
Step 4: Install the add-on
- For general installation:
XML
1
2
ant addoninstall -Daddonnames="klarnapaymentaddon" -DaddonStorefront.yacceleratorstorefront="yacceleratorstorefront"
- For B2B installation:
XML
1
2
ant addoninstall -Daddonnames="klarnapaymentb2baddon" -DaddonStorefront.yacceleratorstorefront="yb2bacceleratorstorefront"
Recommended for integration
Note: Depending on your SAP Commerce version, you might need to install
liveeditaddon and b2ccheckoutaddon. Verify the storefront name for your project.Verification
Confirm extensions in localextensions.xml
Verify these extensions are present:
addonsupportklarnapaymentaddonklarnapaymentklarnapaymentapiklarnapaymentbackoffice- For B2B:
klarnapaymentb2baddonVerify storefront integration: Confirm the target storefront extension is listed.
Configuration
Callback URLs
Add the following configurations to
project. in the klarnapayment extension:klarnapayment.merchant. url. confirmation=https:/ /<your_ host>/ klarna/ order/ confirmation klarnapayment.merchant. url. notification=https:/ /<your_ host>/ klarna/ payment/ checkout/ pending-update klarnacheckout.merchant. url. authorization=https:/ /<your_ host>/ klarna/ payment/ auth-callback
For site-specific configurations:
klarnapayment.merchant. url. confirmation. <site*uid>=https:/ /<your_ host>/ klarna/ order/ confirmation* klarnapayment.merchant. url. notification. <site*uid>=https:/ /<your_ host>/ klarna/ payment/ checkout/ pending-update* klarnacheckout.merchant. url. authorization. <site_ uid>=https:/ /<your_ host>/ klarna/ payment/ auth-callback
Skipping CSRF verification
Add this to
local.:JAVA
1
2
csrf.allowed.url.patterns=/[^/]+(/[^?]*)+(sop/response)$,/[^/]+(/[^?]*)+(merchant_callback)$,/[^/]+(/[^?]*)+(hop/response)$,/[^/]+(/[^?]*)+(language)$,/[^/]+(/[^?]*)+(currency)$,/[^/]+(/[^?]*)+(push)$,/[^/]+(/[^?]*)+(pending-update)$,/[^/]+(/[^?]*)+(confirmation)$,/[^/]+(/[^?]*)+(auth-callback)$
Email server settings
Configure email settings in
local.:JAVA
1
2
3
4
5
6
7
8
mail.from=<your_email>
mail.replyto=<your_email>
mail.smtp.server=<your_mail_server>
mail.smtp.port=<your_mail_port>
mail.smtp.user=<your_email>
mail.smtp.password=<your_password>
mail.use.tls=true
User agent configuration
For efficient support and issue identification we highly recommend to set user-agent and region-specific settings:
shoporplatform=<your_platform> # Example: SAP_Comm
platformversion=<your_platform_version> # Example: 1905
modulename=<your_module> # Example: KP
moduleversion=<your_module_version> # Example: 9.0
Klarna Market and Klarna Region Configuration for site
Configure the Market and the Region specific to each site:
klarna.market.country.<site_id>=<market_code>
# E.g. klarna.market.country.apparel-uk=GB

klarna.market.region.<site_id>=<region_code>
# E.g. klarna.market.region.apparel-uk=EU
Currency Conversion
If multiple currencies are applicable on the merchant site, ensure that the out-of-box settings for the conversion factor and delivery cost are properly configured. These values are used to send the cost in the purchased currency converted value to Klarna.
Adjust these configurations based on your specific project requirements to ensure smooth operation and support from Klarna.
Order Failed Notification
When an order is successfully processed by Klarna but the placement fails in SAP, an email notification is sent to the merchant. The recipient's email address is configured in the Klarna settings within the back office. The email content for this notification is managed using the
FailedOrder_ file, located in \klarnapayment\resources\klarnapayment\email_. This impex file must be loaded after the server starts. Merchants have the flexibility to modify the email content, specifically the CMS component OrderFailedEmailBody, either by editing the impex file or through the back office at a later time.Mandatory Code Changes
Adding Klarna Payment Tag
Add this tag to the Merchant Payment JSP (e.g.,
silentOrderPostPage.):JSP
1
2
3
4
<%@ taglib prefix="klarnapayment" tagdir="/WEB-INF/tags/addons/klarnapaymentaddon/responsive/" %>
...
<klarnapayment:selectpayment/>
Modifying CheckoutOrderSummary Tag
Update the
checkoutOrderSummary. file to include:JSP
1
2
3
<%@ taglib prefix="klarnacheckout" tagdir="/WEB-INF/tags/addons/klarnapaymentaddon/responsive/checkout" %>
<klarnacheckout:paymentInfo cartData="${cartData}" paymentInfo="${cartData.paymentInfo}" showPaymentInfo="${showPaymentInfo}" />
Customizing Payment Info Tag
If using a customized
paymentInfo., include hidden parameters from the add-on.Adding Date of Birth field
Include the following in
kpBillingAddressFormElements.:JSP
1
2
3
4
5
6
<div class="form-element-icon datepicker date_of_birth" id="js-dateofbirth" data-date-format-for-date-picker="${dateFormatForDatePicker}">
    <formElement:formInputBox idKey="dateOfBirth" labelKey="address.dateOfBirth" inputCSS="text" mandatory="false" path="dateOfBirth" placeholder="${dateFormatHint}"/>
    <i class="glyphicon glyphicon-calendar js-open-datepicker-quote-expiration-time"></i>

</div>
Updating JavaScript
- Form names: Modify
acc.to match the form name on your page. Example:klarnapayment. js
JAVASCRIPT
1
2
3
4
5
6
7
8
9
10
checkPaymentSelected: function () {
klarnaData = {};
$("form input:radio[name='paymentMethod']").click(function () {
var paymentMethod = $('input[type=radio][name=paymentMethod]:checked').val();
if (paymentMethod == 'card') {
$('.submit_silentOrderPostForm').bind('click');
$('#klarna_container').empty();
$('#klarna_billing').hide();
$('#silentOrderPostForm').show();
ACC.silentorderpost.bindSubmitSilentOrderPostForm();Example form name in s
ilentOrderPostPage.:JSP
1
2
<form:form id="silentOrderPostForm" name="silentOrderPostForm" commandName="sopPaymentDetailsForm" action="${paymentFormUrl}" method="POST">
- Submit Button Class: Update the submit button class if it differs in your implementation.
JAVASCRIPT
1
2
3
4
5
6
bindPaymentsubmit: function () {
$('.submit_silentOrderPostForm').click(function () {
// your logic here
});
}
Updating Default Checkout URL
Modify the constant in
KlarnaPaymentActiveFilter:JAVA
1
2
public final static String DEFAULT_CHECKOUT_URL = "/checkout/multi/summary/placeOrder";
B2B Implementation - Payment Type Selection
For B2B implementations using b2bacceleratoraddon, modify the paymentTypeForm.tag file to display Klarna Payment Type by replacing:
JSP
1
2
<form:radiobutton path="paymentType" id="PaymentTypeSelection_${paymentType.code}" value="${paymentType.code}" label="${paymentType.displayName}" />
With:
JSP
1
2
3
4
5
6
7
8
9
<c:choose>
    <c:when test="${(paymentType.code eq 'CARD') && ('TRUE' eq isKlarnaActive)}">
        <form:radiobutton path="paymentType" id="PaymentTypeSelection_${paymentType.code}" value="${paymentType.code}" label="Card payment or Klarna Pay" />
    </c:when>
    <c:otherwise>
        <form:radiobutton path="paymentType" id="PaymentTypeSelection_${paymentType.code}" value="${paymentType.code}" label="${paymentType.displayName}" />
    </c:otherwise>
</c:choose>
Rebuild and update the system
- 1.Rebuild the system: Navigate to
<HYBRIS_and run:HOME>/ bin/ platform ant clean all - 2.Update the system:
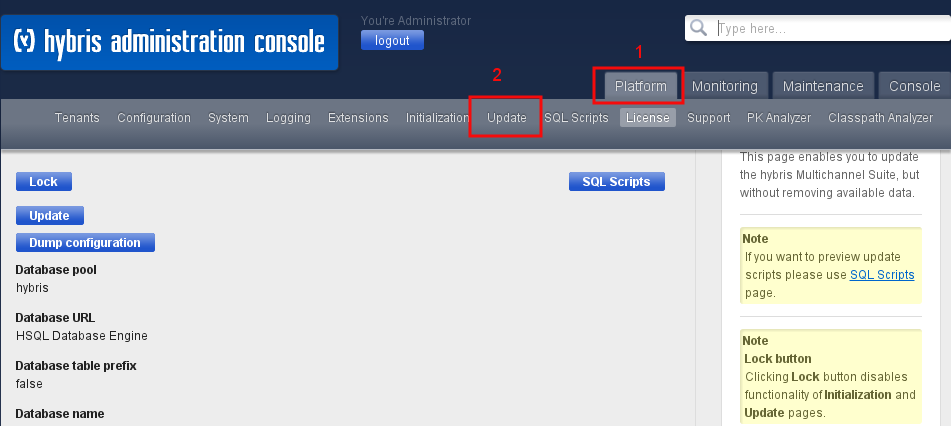
- Open the Hybris Administration Console (HAC).
- Go to Platform > Update.
- Under General Settings, select:
- Update running system
- Clear HMC configuration (for versions < 5.7)
- Create essential data
- Localize types
- Under Project Data Settings, check all Klarna extensions.
- Click Update to apply changes.
Unit Test Implementation
JUnit Tests
JUnit test classes are located in the
testsrc folder of both the klarnapayment and klarnapayment extensions. Mock test classes for all supported Klarna API calls are available in the klarnapaymentapi extension.Integration Test
The
KlarnaClientConnectionTest integration test class is implemented in the klarnapaymentapi extension. This class is used to test the connection to the Klarna server after initial tests.Steps:
- 1.Update Credentials: Modify the
KlarnaClientConnectionTestclass with valid merchant test (playground) credentials. This helps identify any issues with authentication or payment session creation during server startup. - 2.Verify Connection: Upon starting the server, look for the log message:
Klarna Integration Connection Test Successful. This confirms that SAP Commerce has successfully connected to Klarna. - 3.Production Use: If using this feature in production, ensure to remove the Klarna production API credentials from the test class to maintain security.
Uninstalling the add-on
Step 1: Stop the SAP Commerce Server
If the server is running, stop it using one of the following methods:
- Windows: Run
hybrisserver.bat stop - Unix/Linux: Run
./hybrisserver. sh stop
Refer to the Installation section for additional details if needed.
Step 2: Set Up the Environment
Navigate to
<HYBRIS_ and run the appropriate environment setup script:- Windows:
setantenv.bat - Unix/Linux:
./setantenv. sh
Apply environment setup if needed
Note: This step is necessary only if the environment setup has not already been applied in the current terminal session.
Step 3: Uninstall the Add-on
Run the following command in
<HYBRIS_ to remove the add-on:Step 4: Remove Extensions
- 1.Open
<HYBRIS_.HOME>/ config/ localextensions. xml - 2.Delete the following lines:
XML
1
2
3
4
5
<extension name="klarnapaymentaddon" />
<extension name="klarnapayment" />
<extension name="klarnapaymentapi" />
<extension name="klarnapaymentbackoffice" />
Step 5: Delete Extension Folders
Remove the corresponding extension folders from
<HYBRIS_:klarnapaymentaddonklarnapaymentklarnapaymentapiklarnapaymentbackoffice
Step 6: Remove Payment Page References
- 1.Open your payment page files.
- 2.Locate and delete the following lines:
JSP
1
2
3
<%@ taglib prefix="klarnapayment" tagdir="/WEB-INF/tags/addons/klarnapaymentaddon/responsive/" %>
<klarnapayment:selectpayment/>
Step 7: Rebuild and Restart the System
- 1.Rebuild the system using the following command:
ant clean build - 2.Restart the SAP Commerce server.
Step 8: Update SAP Commerce
- 1.Open a web browser and navigate to
HAC → Platform → Update. - 2.Under General Settings, check the following boxes:
- 2.1.Update running system
- 2.2.Clear the hMC configuration from the database
- 2.3.Create essential data
- 2.4.Localize types
- 3.Click the Update button to complete the process.
Appendix
Troubleshooting
Verify Klarna configuration
Ensure the Klarna configuration is correctly set up for the current base store:
- Base Store Configuration:
- Verify that the Klarna configuration is correctly assigned to the active base store.
- Confirm that the configuration is marked as active.
- Regional Settings:
- Check that the purchase country, language, and currency settings are valid for the selected base store.
- Ensure these settings align with Klarna's supported regions.
Resolve ItemType conflicts
Conflicts with
ItemType definitions may occur in the latest versions of SAP Commerce (2005 and 2011), particularly based on the installation recipe.It is advised to review and adjust the ItemType definitions to resolve any conflicts.
Klarna markets and regions table
| Market | Country Code | Region |
| Australia | AU | OC |
| Austria | AT | EU |
| Belgium | BE | EU |
| Canada | CA | NA |
| Czech Republic | CZ | EU |
| Denmark | DK | EU |
| Finland | FI | EU |
| France | FR | EU |
| Germany | DE | EU |
| Greece | GR | EU |
| Hungary | HU | EU |
| Ireland | IE | EU |
| Italy | IT | EU |
| Mexico | MX | NA |
| Netherlands | NL | EU |
| New Zealand | NZ | OC |
| Norway | NO | EU |
| Poland | PL | EU |
| Portugal | PT | EU |
| Romania | RO | EU |
| Slovakia | SK | EU |
| Spain | ES | EU |
| Sweden | SE | EU |
| Switzerland | CH | EU |
| United Kingdom | GB | EU |
| United States | US | NA |
Modifying the order confirmation email
SAP Commerce sends an order confirmation email to customers once an order is placed. However, since Klarna handles payment instructions and notifications directly with the customer, it is recommended to customize the Payment Details section of the confirmation email to clarify the following points:
- 1.Payment has not been taken yet (except for Pay Now methods).
- 2.Customers will receive updates directly from Klarna.
- 3.Purchases and payments can be tracked via the Klarna App.
Additionally, you can configure the payment method to display as "Purchased with Klarna" in the order confirmation email. To achieve this, follow these steps:
Step 1: Modify Email Template Message Properties
- Locate sample message properties in the following folder:
/klarnapaymentaddon/resources/ klarnapaymentaddon/ messages - Modify existing properties or add new ones as needed.
- Ensure the updated property file is included in the EmailTemplate.
Step 2: Edit the Email Template
Using Backoffice:
- 1.Log in to Backoffice: Use an administrator account to log in to Backoffice.
- 2.Navigate to the Email Template:
- 2.1.Go to WCMS → Page Templates.
- 2.2.Find and select the email template to modify.
- 2.3.Optionally, right-click and select Edit in new window.
- 3.Edit the HTML Email Template:
- 3.1.Select the Email tab.
- 3.2.Double-click on Html Email Template.
- 4.Update HTML Content: Modify the Template Script with the required Klarna-specific updates.
Using HMC:
- 1.Log in to HMC: Use an administrator account to log in to HMC.
- 2.Navigate to the Email Template:
- 2.1.Go to WCMS → Page Templates.
- 2.2.Find and select the email template to modify.
- 2.3.Optionally, right-click and select Edit in new window.
- 3.Edit the HTML Email Template:
- 3.1.Select the Email tab.
- 3.2.Right-click on Html Email Template and choose Edit in new window.
- 4.Update HTML Content: Modify the Template Script with the required changes to reflect the Klarna-specific instructions.
- 5.Synchronize Changes:
- 5.1.Navigate to Catalog → Catalog Management Tools → Synchronization.
- 5.2.Select the catalog version to synchronize.
- 5.3.Click Next and then Start to complete synchronization.
Jump to section...