

Hosted Payment Page - Android
If the recommended integration approach of Klarna Mobile SDK is not possible, the guide below will guide you through how to integrate the Hosted Payment Page in your mobile app without the Mobile SDK.
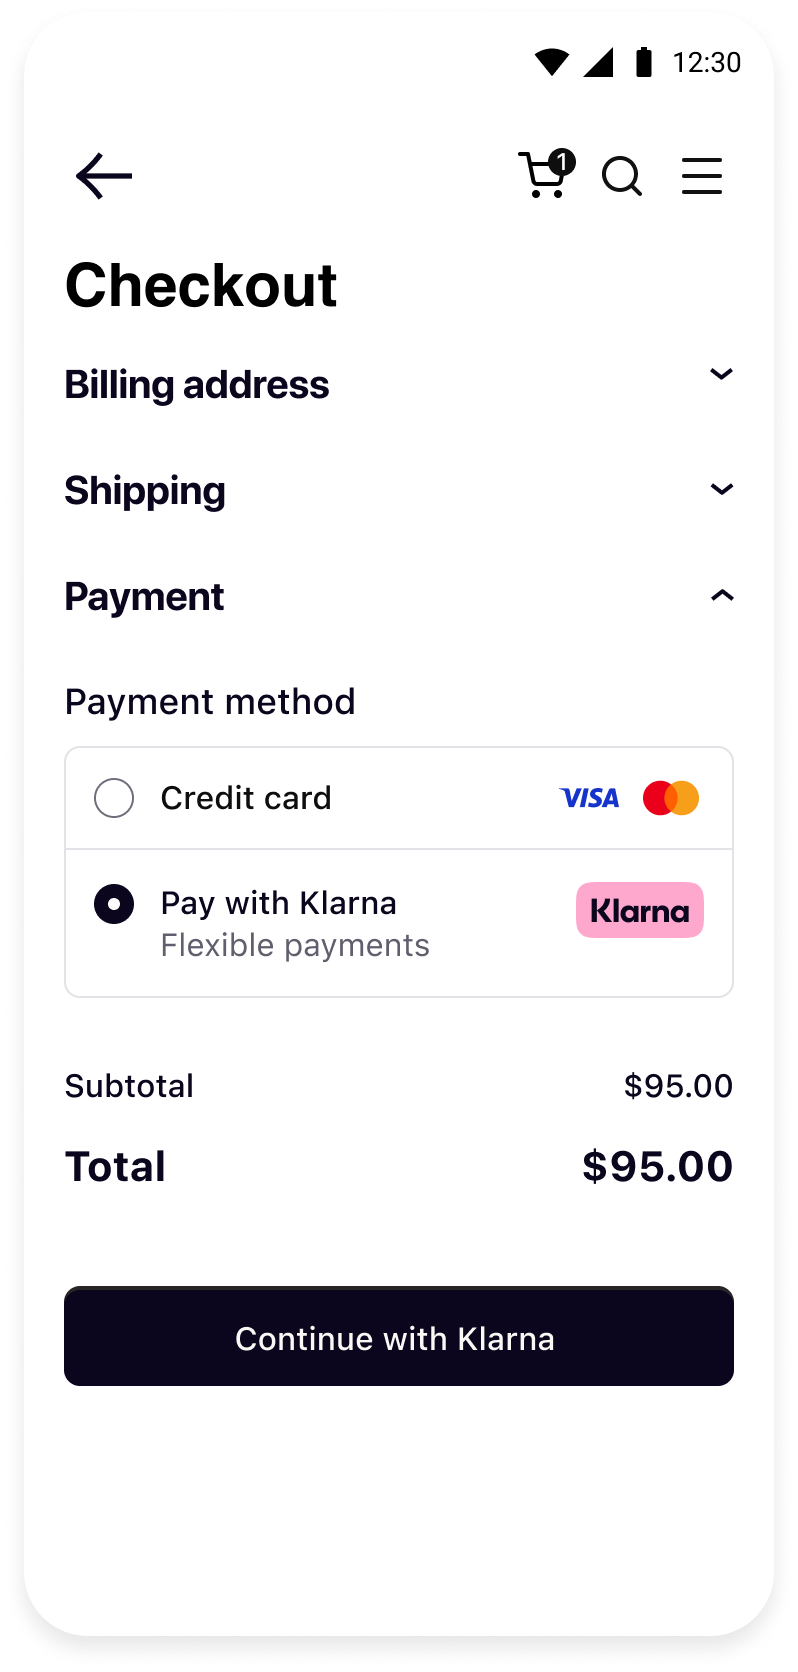 |  | 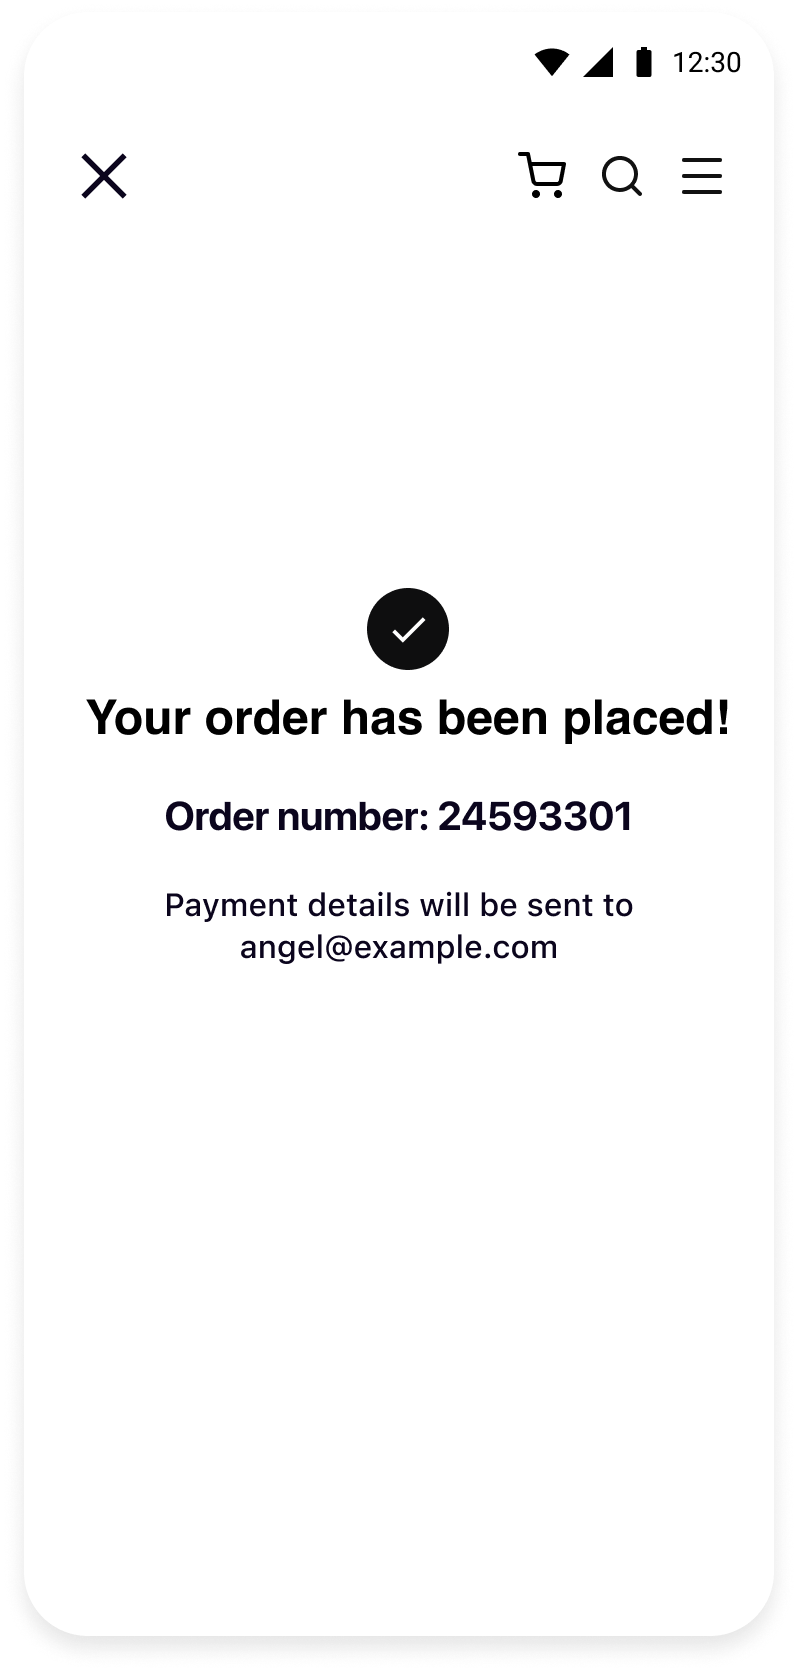 |
| Your native checkout screen when Klarna is selected as payment method. | Hosted Payment Page flow starts when customer confirms to Continue with Klarna. | Your native order confirmation screen after a successful payment. |
Integration Steps
- Prepare: Make sure you have the credentials for Klarna Payments and get to know how the flow works
- Create session (Server-side): Create Payments and Hosted Payment Page session from your backend and pass
redirect_urlto your app. - Set up your app: (Mobile App): Set up return URL to your application.
- Present Hosted Payment Page (Mobile App): Present Klarna Hosted Payment Page using System WebView.
- Retrieve session result (Server-side or Redirect): Receive session result by reading session status from API or redirection to your URLs.
- Create an order (Server-side): Create an order with Klarna Payments API
Prepare
This guide will lead you through all the steps required to accept payments with Klarna Payments using the Hosted Payment Page. At the end, you will be able to accept payments with Klarna without hosting any web component in your app.
Klarna still recommends Klarna Mobile SDK as first choice for Hosted Payment Page integrations.
Prerequisites
Before you start integrating Klarna payments, there are a few things you need to prepare in advance:
- Access to the Merchant portal
- To access the test Merchant portal, you can sign up to create a new test account or log in with a test existing account.
- API keys for the Klarna Payments API
- To test your Klarna API integration, you need a set of test credentials.
- The API reference

- Sample customer data and sample payment data
How it works
You will find here the usual integration flow of the Hosted Payment Page using a Klarna Payments session. In this flow, actors are defined as follow:
- Consumer: a physical person that wants to buy something.
- Browser: the browser that the Consumer is able to control, for example on a desktop or a mobile.
- Merchant Backend: your backend that will do the API calls to HPP, KP and Order Management.
- HPP: the Hosted Payment Page API
- Klarna Payments: the Klarna Payments API
Sequence where you host a part of the Consumer flow
- Your consumer wants to proceed to a payment using one of Klarna’s payment methods: depending on the integration, this interaction can be on a website when the Consumer choose to pay with Klarna, with a telesales by phone…
- Create sessions on Klarna Payments and Hosted Payment Page
a. Create a Payment session on Klarna Payments: After receiving this consumer intent, create a Payment session with Klarna Payments API.
b. Associate the Payment session to an Hosted Page session: Using the session identifier provided by Klarna Payments API, create the corresponding HPP session.
- Distribution of the Payment session to your consumer
- a. Distribution can be done by yourself, using a redirection URL given by HPP.
- b. Request that HPP distribute the Payment session directly to your Consumer.
- [Invisible step for you] Consumer gets to Hosted Payment Page: Consumer goes to the Payment page using the received link, either by you or by SMS/Email received from Klarna.
- [Invisible step for you] Authorization of payment: When the Consumer presses the buy button on the Payment page, payment authorization will be given to the Consumer. HPP will proceed to the redirection of the Consumer to your Backend using the URL given in the session creation.
- Confirmation and Authorization Token
- a. Redirection of the Consumer after a successful authorization: The Consumer’s browser is redirected to the success URL you defined.
- b. Validation of the HPP Session outcome: Depending on your HPP Session, you will be able to retrieve an authorization_token or an order_id from the URL parameters, but you can also checks the HPP Session status using our endpoint. The authorization_token will let you place the order manually, whereas the order_id will let you do the post-purchase experience.
- Place the order: By not defining any place_order_mode when creating the HPP Session, you will need to place an order using the Authorization Token you just got. This will let you check that everything is still correct before validating the payment. This returns you an order_id that will let you do the post-purchase experience.
- Confirmation of the order: You should show the customer that the payment authorization is successful and that the order has been validated.
- [This step can be asynchronous] Capture payment: When you want the payment to actually happen, usually when goods are shipped, use the Order Management API to capture the amount on the order. When creating the KP Session, you can also ask the capture to be automatic.
Success flow
After a successful authorization, the Consumer’s browser will be redirected to your success URL defined when you created the HPP session (see Step 3).
HPP will use merchant_urls.success to generate the URL, it should contain the authorization_token or order_id depending on your place_order_mode, but can also use some additional parameters. Please see HPP Create Session Parameters and Options for dynamic parameters.
Rejection and cancellation flows
When the Consumer decides to abort the process or gets rejected by Klarna for payment authorization, the Consumer’s browser is redirected to one of the URLs defined when you created the HPP session (see Step 3).
- merchant_urls.failure: Consumer is redirected there after being refused by Klarna.
- merchant_urls.cancel: Consumer is redirected there after clicking on the Cancel button.
Please see HPP Create Session Parameters and Options for dynamic parameters.
Alternative Sequence: no hosting of the Consumer flow
This alternative sequence is almost the same except that you don’t need to host any page that should be shown to the Consumer. As you can’t rely on any redirection to get the status of the session, your backend needs to poll the HPP API to get it.
You can decide whether you want to host these pages by yourself or rely on HPP ones by defining the merchant_urls. You can give HPP a success url but not a cancellation one.
6. b. Confirmation and Authorization Token
Polling to get the successful outcome: The Consumer’s browser is shown a simple payment confirmation page, your Backend will need to get the Authorization Token using HPP API. that you will need to use to place the order if the order is still valid.
Success flow
After a successful authorization, the read session endpoint will give you the status of the Session and the Authorization Token to place the order with.
Rejection and cancellation flows
When the Consumer decides to abort the process or gets rejected by Klarna for payment authorization, the status of the session will also be updated. The Consumer will see a simple cancel or rejection page.
Create Session
Klarna Payments Session
The first step is to create a KP Session with the Klarna Payment API in order to be able to host it using the Hosted Payment Page API. This is where you are going to define all you know already about your Consumer, what is the content of the order and the metadata associated to the purchase.
This call corresponds to Step 2a in the sequence diagram.
| Description | Creates a session with KP-API |
|---|---|
| Reference | For a full list of accepted (optional) parameters, possible returns and error codes you can reference the KP-API documentation |
| Url structure | https://{endpoint}/payments/v1/sessions |
| Example | curl -X POST https://<endpoint>/payments/v1/sessions --header "Authorization: Basic <token> " --header "Content-Type: application/json" --header “Cache-Control: no-cache” --data “<parameters>” |
Create a session KP: Request
{
"purchase_country": "us",
"purchase_currency": "usd",
"locale": "en-US",
"order_amount": 20000,
"order_tax_amount": 0,
"order_lines": [
{
"image_url": "https://www.exampleobjects.com/logo.png",
"type": "physical",
"reference": "Could be a Product Id or SKU #",
"name": "Cool Bike",Create a session KP: Response
{
"session_id" : "<kp_session_id>",
"client_token" : "<JWT>", // Ignore this field when using KP with HPP
"payment_method_categories": [
{
"identifier": "pay_later",
"name": "Pay later.",
"asset_urls": {
"descriptive": "https://x.klarnacdn.net/payment-method/assets/badges/generic/klarna.svg",
"standard": "https://x.klarnacdn.net/payment-method/assets/badges/generic/klarna.svg"
}
}How to create the Request
Please read the session creation guide of Klarna Payments API to get all details on fields and how you can use them. As you will use the Hosted Payment Page API to host your KP Session, you don’t need to read the step after.
As you won’t own and host the page that displays Klarna Payments’ Client, you have to respect additional guidelines that will depend on the use case of your integration see see special rules .
Depending on your integration use case (ie eCommerce, In Store orTelesales), you may have to respect some guidelines when creating the KP Session, see [ special rules].
How to interpret the Response
The KP Session is created on a successful response. On the fields present in it, only the session_id is useful when KP is used with Hosted Payment Page API. You will have to use it to build HPP’s payment_session_url.
https://api.klarna.com/payments/v1/sessions/<kp_session_id>
Hosted Payment Page Session
The second step is to create the HPP Session using the KP Session you have just created. Sessions will have a tied lifecycle meaning that the HPP Session will expire 1 hour before the KP Session, see session lifetimes. Multiple HPP Sessions can be linked to the same KP Session if you need to have multiple customization at the same time, although it is considered as a bad practice.
This call corresponds to Step 2b in the sequence diagram.
How to create the Request
Please read the session creation call reference of HPPsession creation call reference of HPP to get all details on fields and how you can use them. As you will use the Hosted Payment Page API to host a KP Session, you have additional options that you can use.
Specific Klarna Payments parameters when creating an HPP Session
A successful HPP Session can lead to three different outcomes for the KP Session, depending on your use-case and the flexibility needed by your integration upon Customer’s authorization. Use this to speed up your integration and let HPP do the work for you:
- Authorized Payment (default): the Consumer selected a payment method and was authorized by Klarna for the order amount of the KP Session. Your service will get an authorization_token back and will need to use it to Place an Order with KP API. One of the reason for you to choose this mode is if you want to make additional validation after the consumer was authorized and before actually placing the order (for example, stock management). In some cases, you may use the token to place an order on a lower amount. This could also let you create customer token for recurring payments.
- Placed Order: the Consumer selected a payment method, was authorized by Klarna and HPP automatically placed the corresponding order. Your service will get an order_id back, you will then need to Capture Order with the Order Management API. Capturing order should happen when goods are sent to the customer. Klarna creates the order even in case of failed redirection to merchant_urls.success. Keep track of the HPP session status using by polling HPP's read endpoint or via callback mechanism.
- Captured Order: the Consumer selected a payment method, was authorized by Klarna and HPP automatically placed the corresponding order and captured it. Your service will get an order_id back, you won’t need any additional call. This option should be used when goods are directly given to the Consumer (Digital goods, In-store…). Klarna creates the order even in case of failed redirection to merchant_urls.success. Keep track of the HPP session status using by polling HPP's read endpoint or via callback mechanism.
The call corresponding to Step 7 in the sequence diagram becomes obsolete when using PLACE_ORDER or CAPTURE_ORDER as a values for place_order_mode.
| Key | place_order_mode |
|---|---|
| Description | Defines the outcome of the KP Session when the HPP Session is successful. |
| Type | List values from an Enum |
| Default Value | NONE |
| Accepted Values | NONE, PLACE_ORDER, CAPTURE_ORDER |
{
"options": {
"place_order_mode": "CAPTURE_ORDER"
}
}
Payment Methods and Categories
NOTE: We're introducing a new customer purchase flow where we handle everything related to the payment widget, so you don't have to worry about it. If you're using the new purchase flow, skip this section. Otherwise, if you still handle the widget, read more about it in this section.
HPP lets you define what Payment Method Categories should be made available to the Consumer when seeing the Klarna Payment Widget on HPP. Payment Categories are Pay Now, Pay Later or Slice It (Pay over time), and will differ depending on what Products are available for you at Klarna. When you create a KP Session in Step 2a, Klarna Payments API sends you back as a result all available payment categories for the KP Session. You have to use this values to configure the HPP Session.
This parameter will define what the Consumer will when first loading the Payment Page.
- Display only one Payment Method Category using the field payment_method_category
- Display a defined list of Payment Method Categories using the field payment_method_categories
- Display all available Payment Method Categories by omitting both parameters
Defining both fields payment_method_category and payment_method_categories at the same time will end up in a refused request.
1. Display only one Payment Method Category
| Key | payment_method_category |
|---|---|
| Description | Consumer will be able to select a Payment Method from a single Category. The value has to be one of the payment categories sent back by KP API when creating theKP Session. |
| Type | Enum |
| Accepted Values | PAY_NOW, PAY_LATER, PAY_OVER_TIME, DIRECT_DEBIT, DIRECT_BANK_TRANSFER |
{
"options": {
"payment_method_category": "pay_later"
}
}
2. Display a list of Payment Method Categories
| Key | payment_method_categories |
|---|---|
| Description | Consumer will be able to select a Payment Method from a list of Categories. Values have to be one of the payment categories sent back by KP API when creating theKP Session. |
| Type | List values from an Enum |
| Accepted Values | PAY_NOW, PAY_LATER, PAY_OVER_TIME, DIRECT_DEBIT, DIRECT_BANK_TRANSFER |
{
"options": {
"payment_method_categories": [
"pay_later",
"pay_now"
]
}
}
3. Display all available Payment Method Categories
When none of the above parameters are given on the create call, all the available payment categories will be made available to the consumer.
When activated, the Fallback flow will make sure that the Consumer is declined for all payment categories of the KP Session before going through the Rejection flow. In combination with the two first initial display options, it is possible to activate a fallback flow that will happen only when the Consumer is declined for the payment categories that were defined. This fallback works as follow:
- The KP Session is created and Pay Now, Pay Later and Slice It are all available
- The HPP Session is created with the Slice It category because the Consumer’s choice has been made before going to HPP
- The Consumer arrives on the Payment Page and sees only Slice It options. The Consumer applies for one of the Slice It options and for some reason gets declined
- The fallback flow isn’t activated (default behavior) or has already happened, the Consumer will go through the Rejection flow.
The fallback flow may be transparent for the Consumer and is not a guarantee of authorization. The Consumer may be declined for additional payment method categories while applying for one.
| Key | payment_fallback |
|---|---|
| Description | When true, the Fallback flow will make sure that the Consumer is declined for all payment categories of the KP Session before going through theRejection flow. |
| Type | Boolean |
| Accepted Values | true, false |
{
"options": {
"payment_method_categories": [
"pay_later",
"pay_now"
]
}
}
Set up your app
Return URL
Klarna purchase flows might require authorizations in other applications (e.g. bank apps) or do a handover to the Klarna app. In such cases, a return URL to your application ensures seamless return to the flow in your app, hence setting up a return URL is required. It is expected that redirects to this URL should only open your application without any changes in the UI state, ensuring the customer can continue the flow prior to external navigation.
You can read more about how deep links and intent filters work on the Android Developers site.
You can set up a Return URL app scheme for your application by registering an intent-filter for the Activity you integrated Klarna, in your app’s AndroidManifest.xml:
<application...>
    <activity...>
        <intent-filter>
            <action android:name="android.intent.action.VIEW" />
            <category android:name="android.intent.category.DEFAULT" />
            <category android:name="android.intent.category.BROWSABLE" />
            <data android:scheme="<your-custom-scheme>" />
            <data android:host="<your-custom-host>" />
        </intent-filter>
    </activity>
</application>
Important: Construct the return URL string passed to Klarna by combining the attributes defined in your <intent-filter>'s <data> tags, following the standard URL format: <your-custom-scheme>://<your-custom-host>
override fun onNewIntent(intent: Intent?) {
    super.onNewIntent(intent)
    intent?.data?.let { uri ->
        if (uri.host == Contants.klarnaReturnUrl.host && uri.host == Contants.klarnaReturnUrl.host) {
            // This is a return URL for Klarna – skip deep linking
            return
        }
        // This was not a return URL for Klarna
    }
}
The hosting Activity should be using launchMode of type singleTask or singleTop to prevent a new instance from being created when returning from an external application.
As Android Custom Tabs will be shown to the customer during the flow, we require Activity set up for intent-filter to finish immediately and retain Custom Tabs on top.
class RedirectActivity : AppCompatActivity() {
    override fun onCreate(savedInstanceState: Bundle?) {
        super.onCreate(savedInstanceState)
        handleRedirect(intent)
    }

    override fun onNewIntent(intent: Intent?) {
        super.onNewIntent(intent)
        handleRedirect(intent)
    }

private fun handleRedirect(intent: Intent?) {When creating a payment session, make sure you backend sets merchant_urls.app_return_url to return URL set up for the app.
Present Hosted Payment Page
After you create the sessions and set up your application, you can now present Hosted Payment Page in your application using the redirect_url from API response and System WebViews.
| |
| Your native checkout page before Hosted Payment Page. | Hosted Payment Page in System WebView. |
Present System WebViews
On Android, system WebViews are commonly implemented using Android Custom Tabs. By default, Custom Tabs share cookies and session data with the device’s default browser (e.g., Chrome or Firefox). This shared session capability is essential for Klarna, as it allows us to recognize returning customers across sessions and provide a seamless checkout experience.
While it's possible to disable session sharing using Ephemeral Custom Tabs, we require persistent (non-ephemeral) sessions as this functionality enables Klarna to maintain customer context across the device.
dependencies {
    implementation 'androidx.browser:browser:<latestVersion>'
}
val customTabsIntent = CustomTabsIntent.Builder()
    .setEphemeralBrowsingEnabled(false) // only available in android.browser version 1.9.0
    .build()

customTabsIntent.launchUrl(this, sessionUrl.toUri()) // redirect_url of the Hosted Payment Page session
Redirect back to your app
Redirect from your Merchant URLs
To get the used back to your application from System WebViews, you can redirect to URL configured in your host Activity from the pages you set up as merchant_urls, as those will be loaded in the System WebView.
|  |
| Hosted Payment Page in System WebView. | Your confirmation page in System WebView. |
Redirect directly from Hosted Payment Page
You can also set intent-filter to your merchant_urls set to the Hosted Payment Page session and listen to redirects directly from your native application - preventing those from loading in the System WebView and handling session result natively.
Setting up merchant_urls as an intent-filter would mean any application can open your app with these URLs. In these cases, you will also have to differentiate App Return URL from the merchant_urls.
| |
| Hosted Payment Page in System WebView. | Your native confirmation page. |
Retrieve session result
{{#lst:Accept Klarna Payments using Hosted Payment Page|retrieveSessionResult}}
Create an order
The HPP Session was completed successfully and you need now to act depending on your parameters.
- With
place_order_modeto its default value (NONE), you now need to place an Order with Klarna Payments API. - With
place_order_modeset toPLACE_ORDER, you will need to store the order_id to capture the payment once the goods are shipped. - With
place_order_modeset toCAPTURE_ORDER, you need only to store the order_id to do post-purchase operations such as refunds.
5. a. Place Order with Klarna Payments API
As described in the objects overview, when a Consumer gets a Payment Authorization, your backend will need to use a KP Authorization Token to place the Order.
Now that the Consumer has gotten an Authorization from Klarna for the Payment, you have to use the Authorization Token that you retrieved in the redirection to Place the Order. After this call, Klarna will consider that the Order is actually valid and that you will be able to capture the payment when the goods are being delivered. Please read the place order guide of Klarna Payments to get all details.
Depending on your integration use case (ie eCommerce,In Store or Telesales), you may have to respect some guidelines when placing the order, see special rules.
To ease your integration and depending on your use case, you can count on the auto_capture feature of the KP API to automatically capture the order after its creation. Please read the place order guide of Klarna Payments to get all details.
This call corresponds to Step 7 in the sequence diagram.
Place order request
{
"purchase_country": "GB",
"purchase_currency": "GBP",
"locale": "en-GB",
"order_amount": 57064,
"order_tax_amount": 9511,
"order_lines": [
{
"image_url": "https://www.exampleobjects.com/logo.png",
"type": "physical",
"reference": "Could be a Product Id or SKU #",
"name": "Cool Bike",Place order response
{
"order_id": "41c001ca-f6d4-4240-bbc5-5d2c036a2de4",
"fraud_status": "ACCEPTED"
}
5. b. Capture Payment with Order Management API
Orders that are created without auto_capture will need to be captured using the Order Management API. This can happen when you create the Order by yourself (see previous step) or when you use CAPTURE_ORDER as place_order_mode value.
No payment will occur until the order has been captured. This is for use in transactions where the purchased goods are not immediately delivered but are made available at a later time.
Please read the capture guide of Order Management to get all details.
What's next
Klarna Mobile SDK provides a full suite of mobile-first integrations, including Klarna products like:
.png) | .png) | .png) |
| Sign in with Klarna | On-site Messaging | Express Checkout |
- On-site Messaging: Show contextual messaging let your customers know about the available payment options in pre-checkout: click here to learn more.
- Sign in with Klarna: Seamlessly identify and let users login via their Klarna account: click here to learn more.
- Express Checkout: Accelerate your checkout process and boost conversion by offering a one-click checkout, click here to learn more.
Complete your integration with