

Native View - iOS
Adding Klarna Payments to your application is as easy as adding a view and performing the payment operations on it.
Klarna’s Mobile SDK is the official toolkit for integrating Klarna products into native iOS apps. It enables you to offer Klarna’s payment methods with a seamless in-app user experience. The SDK is designed to provide the optimal integration and, under the hood, the SDK handles web-based flows in a mobile-friendly way to reduce friction and ensures that all the features listed below are fully supported for a superior customer experience across all mobile platforms.
Feature support with Klarna’s Mobile SDK:
- Remember Returning Customers: improve conversion by enabling faster checkouts for returning users.
- Device-Wide Login Experience: customers remain logged in to Klarna across merchant apps on the same device.
- Passkey Support: offer biometric-based login for enhanced security and a frictionless user authentication experience.
- Application Redirects: seamlessly redirect users to external apps (e.g. bank or identity verification apps) and ensure a smooth return back into your app.
- Camera Access for ID Verification: enable secure and instant identity verification within the app.
- Secure Browser Context: secure, embedded browser environment for displaying Klarna-hosted content (payment pages or terms).
- File Sharing and Download for T&Cs: Let customers download or share terms and conditions directly from the app.
iOS native checkout view
How it works
For a Mobile SDK integration your Payment Server and Mobile App must work together to complete the purchase flow:
- Prepare: Make sure you have the credentials for Klarna Payments.
- Initiate payment (Server-side): Create a payment session from your backend and pass
client_tokento your app. - Set up your app (Mobile App): Install the Klarna SDK using your package manager.
- Render payment view (Mobile App): Present Klarna’s native view to display Klarna in your checkout.
- Authorize the session (Mobile App): Trigger the authorization through the SDK and handle the callback.
- Create an order (Server-side): Pass the resulting authToken to your backend to finalize the payment and create an order.
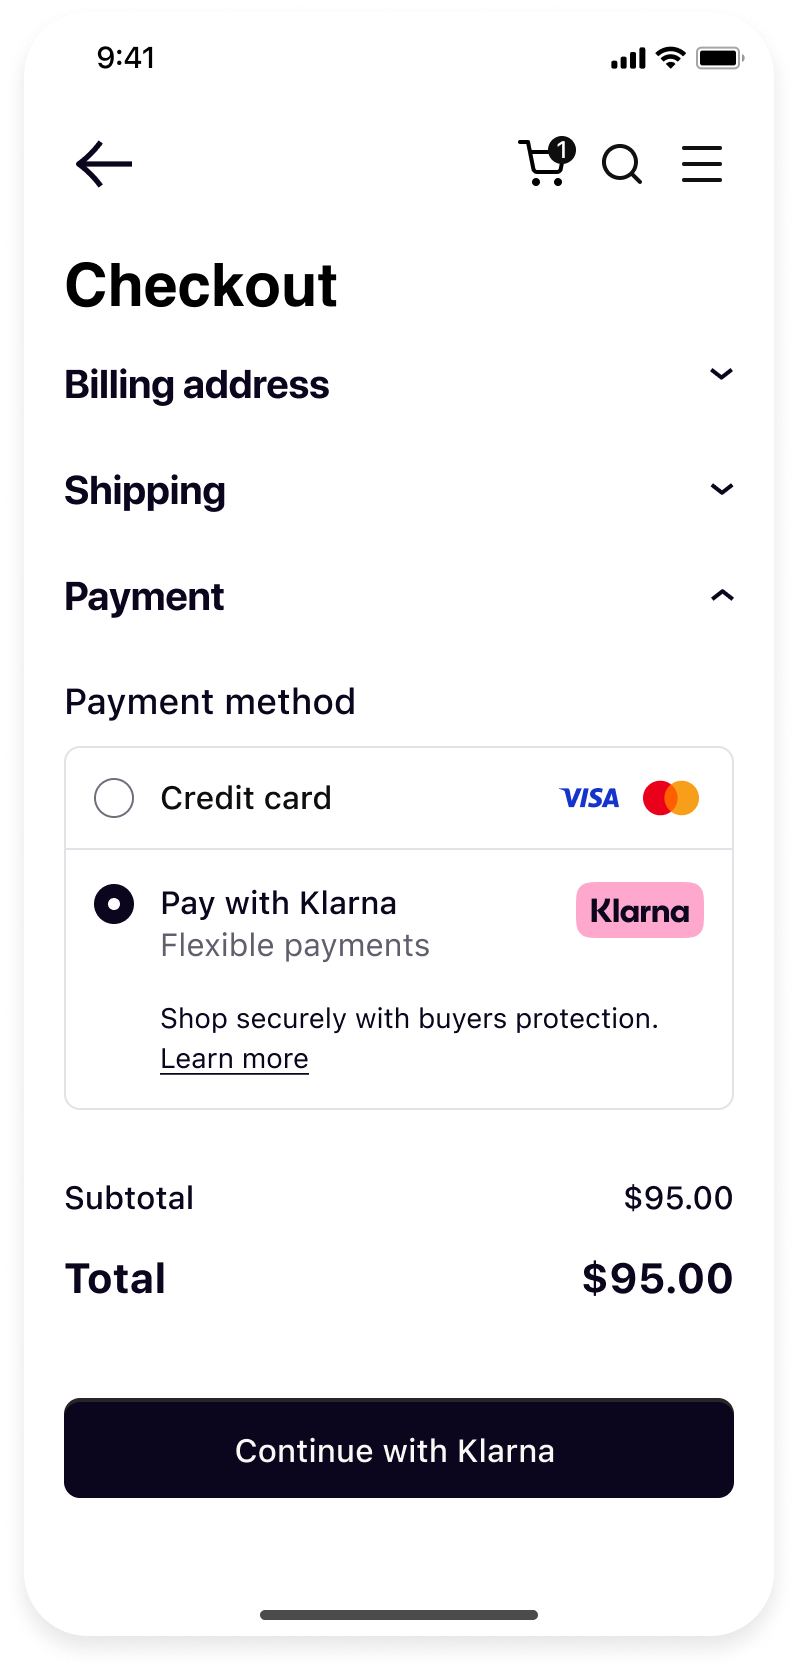
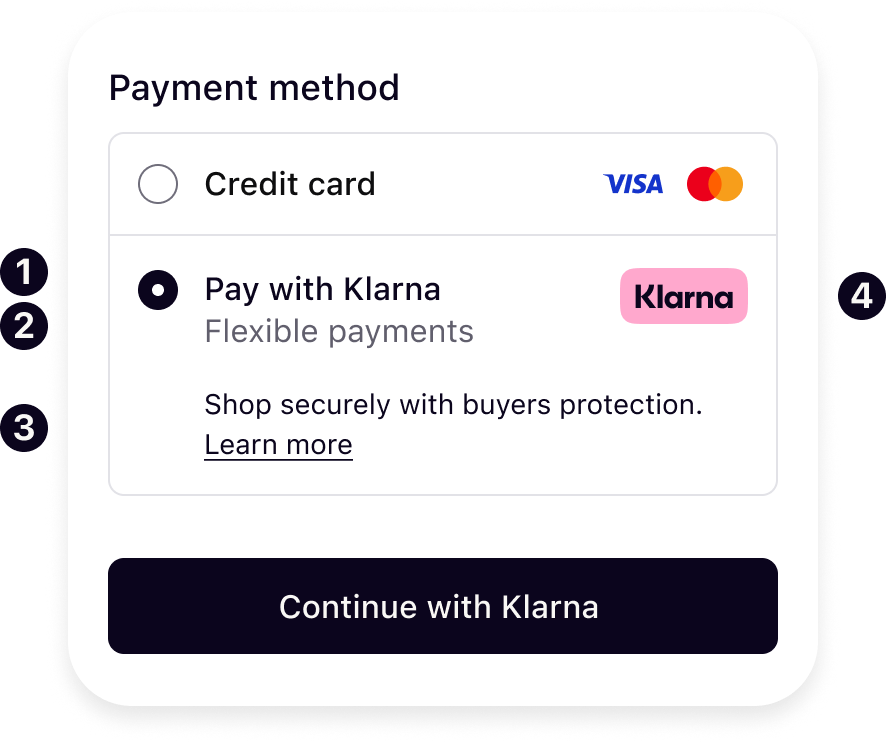
Presenting Klarna in your mobile checkout
To maximize conversion and usability, you must dynamically retrieve Klarna’s branding, payment descriptors, and payment widget via Klarna’s API and SDK to present accurate, localized, and up-to-date payment options.
- Payment Descriptor: Dynamically populated in Klarna Payment session response, in the
payment_method_categories.namefield. - Payment Sub header: Added by merchant.
- Widget: Provided with the
KlarnaPaymentViewfrom the Mobile SDK. - Klarna Badge: Dynamically populated in Klarna Payment session response, in the
payment_method_categories.asset_urls.standardfield.
Prepare
When you integrate Klarna payments into your online store, your customers see Klarna as an option when they select a payment method for their purchases. If your customers select Klarna for their purchase, they are redirected to log into their Klarna account.
Your customers select their preferred Klarna payment option (pay now, pay later, pay in parts) once they're logged into their Klarna account. We handle the Klarna account user flow, so you don't have to worry about it.
Prerequisites
Before you start integrating Klarna payments, there are a few things you need to prepare in advance:
- Access to the Merchant portal
- To access the test Merchant portal, you can sign up to create a new test account or log in with a test existing account.
- API keys for the Klarna Payments API
- To test your Klarna API integration, you need a set of test credentials.
- The API reference

- Sample customer data and sample payment data
Initiate payment (Server-side)
When your customer wants to pay with Klarna, you have to open a payment session and share the shopping cart details in a POST request to the {apiURL}/payments/v1/sessions endpoint. In that request, you also specify if the payment is one-time or recurring.
Once you start a payment session, it stays open for 48 hours or until you place an order. You can also send a separate POST request to cancel the session.
Request
Authentication
Klarna payments API uses HTTP basic authentication. To authenticate, use your API credentials that consist of:
- A username linked to your Klarna merchant ID (MID)
- A password associated with your username
If you're using an API platform that lets you store your credentials, you can add them in relevant fields. Otherwise, make sure to include the Base64-encoded username:password in the Authorization header field of each API request, as shown below.
Authorization: Basic pwhcueUff0MmwLShJiBE9JHA==
A sample authorization request header with Base64-encoded credentials.
Common Parameters
To get a success response, include the following required parameters in your POST {apiURL}/payments/v1/sessions request.
| Parameter | Description |
|---|---|
| The language of information presented on the Klarna widget. Learn more about using locale in API calls. |
| The country where the purchase is made. Learn more about supported countries. |
| The currency in which the customer is charged. Learn more about supported currencies. |
| The total price of the order, including tax and discounts. |
| The details of order lines in the purchase. |
| The purpose of the payment session. |
| Get a callback once the customer has completed the flow and you can create an order. |
To open a one-time payment session, include all common parameters in the request body and set intent to buy.
{
"acquiring_channel": "ECOMMERCE",
"intent": "buy",
"purchase_country": "SE",
"purchase_currency": "SEK",
"locale": "en-SE",
"order_amount": 9500,
"order_tax_amount": 1900,
"order_lines": [
{
"type": "physical",
"reference": "19-402",A sample POST request to create a one-time payment session.
Response
Success Response
In response to a create session call, you receive:
session_id, a payment session identifier you can use to [ update the session] and [ retrieve session] detailsclient_token, a token you pass to the JavaScript SDK or Mobile SDK(Android, iOS and React Native) to launch the Klarna widgetpayment_method_categories, an array that lists the grouped Klarna payment methods available for the session. We can respond with one or more categories depending on the market and account configuration.
{
"session_id": "068df369-13a7-4d47-a564-62f8408bb760",
"client_token": "eyJhbGciOiJIUzI1NiIsInR5cCI6IkpXVCJ9.eyJpZCI6IjAwMDAwMDAwMDAtMDAwMDAtMDAwMC0wMDAwMDAwMC0wMDAwIiwidXJsIjoiaHR0cHM6Ly9jcmVkaXQtZXUua2xhcm5hLmNvbSJ9.A_rHWMSXQN2NRNGYTREBTkGwYwtm-sulkSDMvlJL87M",
"payment_method_categories": [
{
"identifier": "klarna"
"name" : "Pay with Klarna",
"asset_urls" : {
"descriptive" : "https://x.klarnacdn.net/payment-method/assets/badges/generic/klarna.svg",
"standard" : "https://x.klarnacdn.net/payment-method/assets/badges/generic/klarna.svg"
}
}A sample success response to the create session call.
Error Response
If your request doesn't pass our validation, you'll receive an error response.
{
"correlation_id": "6a9b1cb1-73a3-4936-a030-481ba4bb203b",
"error_code": "BAD_VALUE",
"error_messages": [
"Bad value: order_lines"
]
}
A sample error response caused by incorrect order line details.
Go to Error Handling to learn more about common errors and troubleshooting suggestions. You can use the value in correlation_id to find entries related to the request under Logs in the Merchant portal.
Set up your app
Import the SDK
Swift Package Manager
In Xcode, navigate to File → Swift Packages → Add Package Dependency and enter the repository URL: https://github.com/klarna/klarna-mobile-sdk-spm
In Version, Select Up to Next Major and take the default option. Then choose KlarnaMobileSDK in the Package Product column.
Cocoapods
If you’re using Cocoapods, you can add the SDK by adding the dependency to your Podfile:
pod "KlarnaMobileSDK"
Followed by performing:
pod install
You should then be able to import the KlarnaMobileSDK module in your workspace.
To read more about Mobile SDK versioning policy, check out this section.
Set up your app
Return URL
Klarna purchase flows might require authorizations in other applications (e.g. bank apps) or do a handover to the Klarna app. In such cases, a return URL to your application ensures seamless return to the flow in your app, hence setting up a return URL is required. It is expected that redirects to this URL should only open your application without any changes in the UI state, ensuring the customer can continue the flow prior to external navigation.
You can set up a Return URL app scheme to your application by configuring a custom URL scheme.
Important: The return URL string passed to Klarna must include :// after the scheme name. For example, if you defined myApp as the scheme, you must use "myApp://" as the return URL argument to Klarna.
To avoid a Klarna specific app scheme, you can use a host in a common scheme for Klarna redirects, e.g. myApp://klarna-redirect , this can allow you to differentiate and handle these redirect in your handler.
Considering the return URL is a constant value in Constants.klarnaReturnUrl, you can handle redirects to your return URL as such:
Klarna App Queries
Klarna flows on mobile utilize Application Queries for Klarna app schemes to offer seamless app handover experience to customers. In order for the SDK to check availability of the Klarna app, we need you to enable querying Klarna app on the device by adding Klarna app schemes to LSApplicationQueriesSchemes.
This can be configured easily in XCode by going to your project setting and under "Info"(alternatively this is also available in your Info.plist file) you should see an entry list for Queried URL Schemes, this list should contain the klarna and klarnaconsent schemes:

Render payment view (Mobile App)
Payment View is an instance of KlarnaPaymentView, which is a native view intended to be used natively in your checkout screen.
Create the view
You can initialize the KlarnaPaymentView by providing a category, return URL and the event listener.
// Create the view
let paymentView = KlarnaPaymentView.init(category: "klarna", returnUrl: Constants.klarnaReturnUrl, eventListener: self)

// Add as subview
paymentView.translatesAutoresizingMaskIntoConstraints = false
view.addSubview(paymentView)

// Create a height constraint that we'll update as its height changes.
self.paymentViewHeightConstraint = paymentView.heightAnchor.constraint(equalToConstant: 0)
paymentViewHeightConstraint.isActive = true
| Param | Type | Description |
|---|---|---|
| String | Should always be set to "klarna" as it's the preferred payment category. |
| URL | App scheme URL as defined in set up to return from external applications. |
| KlarnaPaymentEventListener | Listener that receives events during the payment process. It acts like a conventional delegate on iOS, however, unlike a delegate, it’s not optional. |
Handle height changes
The payment view does not define any height internally as we want to allow you to handle height changes in whichever way is most convenient to you.
The payment view instead notifies you through KlarnaPaymentEventListener for you to update it accordingly via klarnaResized method:
func klarnaResized(paymentView: KlarnaPaymentView, to newHeight: CGFloat) {
    self.paymentViewHeightConstraint.constant = newHeight
}
Initialize the session
Before content is rendered into a payment view or an authorization, payment session with it's client token needs to be initialized. This can be done by calling initialize and handling result in klarnaInitialized.
// initilize with clientToken for session created from server-side
paymentView.initialize(clientToken: clientToken)
If successful, klarnaInitialized from KlarnaPaymentEventListener will be called in the listener you supplied. If it’s not successful, klarnaFailed will be called instead.
func klarnaInitialized(paymentView: KlarnaPaymentView) {
    paymentView.load() // optionally load payment widget upon initialize
}
Load payment widget
To maximize conversion and usability, you must dynamically retrieve Klarna’s branding, payment descriptors, and payment widget via Klarna’s API and SDK to present accurate, localized, and up-to-date payment options.
- Payment Descriptor: Dynamically populated in Klarna Payment session response, in the
payment_method_categories.namefield. - Payment Sub header: Added by merchant.
- Widget: Provided with the
KlarnaPaymentViewfrom the Mobile SDK. - Klarna Badge: Dynamically populated in Klarna Payment session response, in the
payment_method_categories.asset_urls.standardfield.
Once you’ve initialized the view and you’re ready to display the payment widget, simply by calling load.
Displaying the payment widget is optional. If you choose to display it, make sure to it is inline with the payment method and not in a separate screen. If you choose to skip, then continue to authorize instead.
// load optional payment widget
paymentView.load()
| Param | Type | Description |
|---|---|---|
| String | An optional string with the order data to update the session. Formatted as JSON. |
Optionally you can provide a string as jsonData parameter to the load method with updated order data to update the session. This string should be formatted as valid JSON.
If successful, klarnaLoaded will be called in KlarnaPaymentEventListener and for errors klarnaFailed will be called instead.
func klarnaLoaded(paymentView: KlarnaPaymentView) {
    // Content has finished loading and if you have any loader you could hide it here.
}
To learn more about Klarna Payments UX guidelines, check out this section.
Authorize the session (Mobile App)
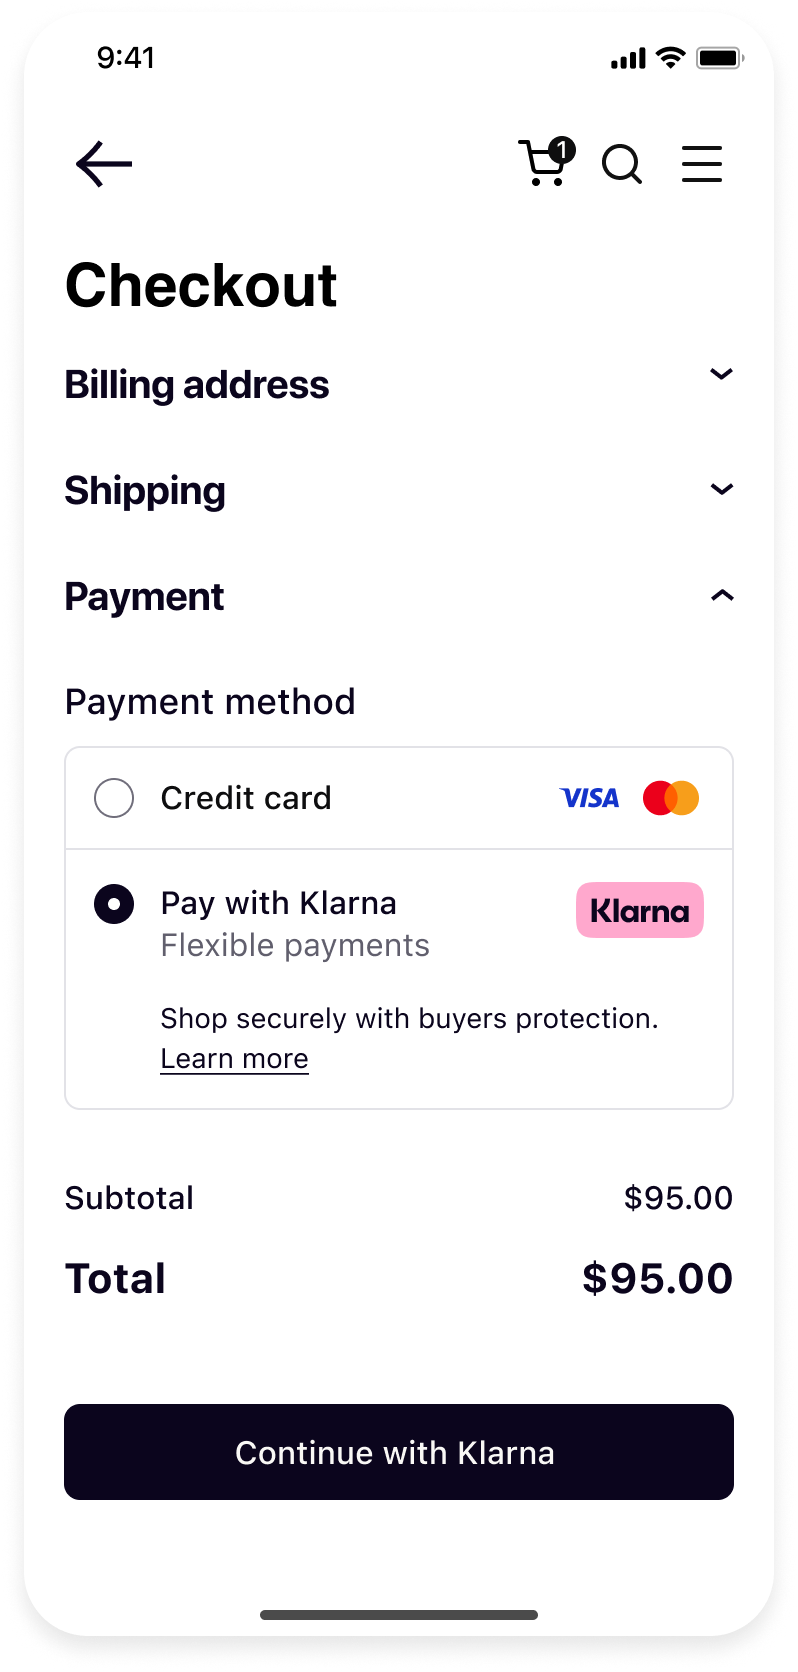 |  |
| Your native checkout screen before the customer chooses to Continue with Klarna. | Klarna purchase flow after the customer clicked your Continue with Klarna button and you called authorize. |
Once the user has confirmed that they want to pay with Klarna, it’s time to authorize the session. This is done by calling authorize, and similar to load, you can supply an optional JSON string with jsonData parameter to update the session. You can also specify whether auto-finalization should be turned off(on by default) and in that case you might be required to finalize the session after.
// authorize the payment session
paymentView.authorize()
| Param | Type | Description |
|---|---|---|
| Boolean? | An optional flag used to turn off auto-finalization for direct bank transfer. |
| String? | An optional string to update the session. Formatted as JSON. |
If successful, klarnaAuthorized will be called in your KlarnaPaymentEventListener and for errors klarnaFailed will be called instead.
func klarnaAuthorized(paymentView: KlarnaPaymentView, approved: Bool, authToken: String?, finalizeRequired: Bool) {
    if let token = authToken, approved {
        // authorization is successful, backend may create order
    }

    if finalizeRequired == true {
        // finalise() call is required
    }
}
| Param | Type | Description |
|---|---|---|
| KlarnaPaymentView | The payment view that was authorized. |
| Bool | Whether the authorization was approved or not. |
| String? The token that allows you to place the order. This is only returned if it's an approved authorization. | |
| Bool | Will be true if autoFinalize was false and this payment method needs a second confirmation step. |
Finalize the session
This is only needed if you set autoFinalize to false in authorize call.
If the session needs to be finalized, you’ll need to perform this last step to get an authorization token, simply call finalise in order to get the authentication token. Similar to authorize you can supply an optional JSON string with jsonData parameter to update the session.
While we tend to name all finalize operations “finalize” with a “z”, all classes subclassing from NSObject already have a a conflicting finalize method. In this specific case, we use the alternative british-english spelling.
paymentView.finalise()
| Param | Type | Description |
|---|---|---|
| KlarnaPaymentView | The payment view that was finalized. |
| Bool | Whether the user was approved on finalize or not. |
| String? | If the finalization went through, the token will not be null. |
Create an order (Server-side)
To continue with the purchase, you have to create an order in Klarna's system. This step takes place in the server side through the Klarna payments API.
Create an order
To create an order for a one-time payment, send a POST request to the {apiUrl}/payments/v1/authorizations/{authorizationToken}/order endpoint and include authorization_token in the path.
For example, if the authorization_token is b4bd3423-24e3, send your request to the {apiUrl}/payments/v1/authorizations/b4bd3423-24e3/order endpoint.
{
"purchase_country": "US",
"purchase_currency": "USD",
"billing_address": {
"given_name": "John",
"family_name": "Doe",
"email": "john@doe.com",
"title": "Mr",
"street_address": "Lombard St 10",
"street_address2": "Apt 214",
"postal_code": "90210",
"city": "Beverly Hills",A POST request to create an order for a one-time payment.
Success response
When you receive a success response, the customer gets charged and the Klarna payments session is closed.
As part of the response, you receive the following details:
order_id, an order identifier that you can later use to capture or refund the order using the Order management APIredirect_url, a URL to which you redirect the customer. This isn't included in the response received if you didn't include the URL when initiating a paymentfraud_status, an indicator of whether the transaction is suspected to be legitimate or fraudulentauthorized_payment_method, the payment method selected by your customer for this purchase
{
"order_id": "3eaeb557-5e30-47f8-b840-b8d987f5945d",
"redirect_url": "https://payments.klarna.com/redirect/...",
"fraud_status": "ACCEPTED",
"authorized_payment_method": "invoice"
}
A success response to the order creation request for a one-time payment.
Send the customer browser to redirect_url provided in the response. Klarna places a cookie in the browser and redirects the customer back to the confirmation URL you provided when creating the session. This makes the checkout faster the next time the customer chooses to pay with Klarna.
Error response
If your request doesn't pass our validation, you'll receive an error response. The most common reasons why creating an order fails are:
- placing the order more than 60 minutes after authorization
- modifying purchase details after authorization without updating the payment session
{
"correlation_id": "6a9b1cb1-73a3-4936-a030-481ba4bb203b",
"error_code": "ERROR_CODE",
"error_messages": [
"ERROR_MESSAGE"
]
}
An error response to the order creation request for a one-time payment.
Here are examples of common errors with troubleshooting suggestions. You can use the value in correlation_id to find entries related to the request under Logs in the Merchant portal.
| Error code | Error message | Description |
|---|---|---|
|
| The authorization token has expired because the order was placed more than 60 minutes after authorization. To fix the error, request a new authorization_token and use it to place the order. |
|
| The data shared with Klarna in a previous step (create_session, load(), or authorize()) have been modified causing the validation to fail. |
|
| The order lines or the cart were updated after the authorize() call. Please ensure that the cart is kept as-is or send a new authorization request. |
|
| This is an edge case reason, but can be triggered in case the merchant is configured with being allowed to update the cart. This could be updated from the authorize to the place order in such a way that a new authorize is triggered. In this case this is rejected. |
Handling Errors
This will handle all the errors from the previous implementations. KlarnaPaymentError will contain the information needed to show to the user and also to handle all the states of the listener.
| Param | Type | Description |
|---|---|---|
| KlarnaPaymentView | The payment view that had the error. |
| KlarnaPaymentError? | lass that contains the information (name, message, isFatal, debugDescription) about the error. |
func klarnaFailed(inPaymentView paymentView: KlarnaPaymentView, withError error: KlarnaPaymentError) {
    if error.name == "InvalidClientTokenError" {
        // Client token used to initialize the SDK is invalid.
        // Merchant should get a valid client token and use it to initialize the SDK again.
    } else if error.name == "ShowFormFalseError" {
        // The selected payment method is invalid.
        // Merchant should set a valid payment method for SDK and initialize the SDK again.
    } else {
        // Handle other errors
    }
}
Optional
Enable logging
The SDK will log events and errors while it’s running, which you can read in XCode console. You can set the logging level for the SDK through the loggingLevel property of integration instance.
klarnaPaymentView.loggingLevel = .verbose
KlarnaLoggingLevel
| Name | Description |
|---|---|
| Nothing will be logged into console. |
| Only errors will be logged into console. |
| Everything will be logged into console. |
What's next
Klarna Mobile SDK provides a full suite of mobile-first integrations, including Klarna products like:
.png) | .png) | .png) |
| Sign in with Klarna | On-site Messaging | Express Checkout |
- On-site Messaging: Show contextual messaging let your customers know about the available payment options in pre-checkout: click here to learn more.
- Sign in with Klarna: Seamlessly identify and let users login via their Klarna account: click here to learn more.
- Express Checkout: Accelerate your checkout process and boost conversion by offering a one-click checkout, click here to learn more (Mobile SDK support available soon).
Complete your integration with