Customize placements with CSS.
This guide provides instructions on how to style the On-site messaging placements that appear on your pages through CSS to align them with the look and feel of your page.
We don't offer support for custom styling the informational modal that appears after a customer clicks a click-to-action button. As this area is dedicated to informing customers about the financial services provided by Klarna, we want to maintain Klarna's own branding.
On-site messaging renders its content within a shadow DOM to prevent the styles from being accidentally applied to the pages that host the placements. This ensures that the styles on the host pages don't interfere with the content of the on-site messaging.
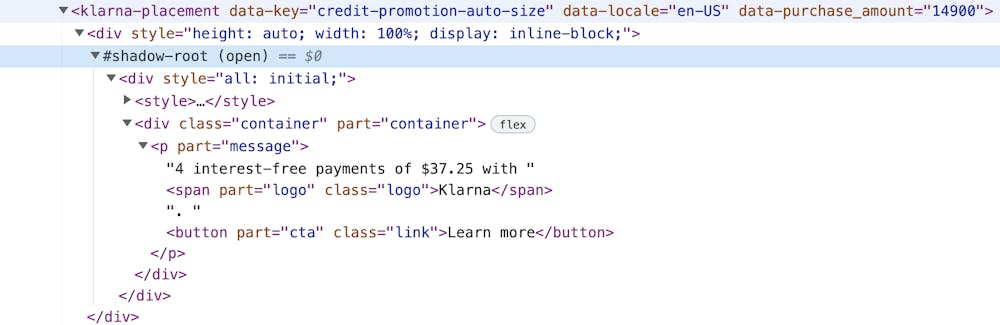
On-site messaging rendered inside a shadow DOM.
- To add the CSS styling, you need access to the source code of your website.
- We recommend adding an
idto theklarna-placementelement to make it easier to target the elements for styling. This will allow you to customize the appearance of the placements without affecting the rest of the page. - You're responsible for ensuring that styling the on-site messaging with CSS doesn't compromise the accessibility of your website. For example, you need to verify that the contrast between the message and the background is sufficient for people with low vision to read the message. You can use Chrome DevTools to help detect any accessibility issues.
When styling the messaging, don't hide any parts of the message provided by Klarna as this may result in compliance issues. The text of the placements should have sufficient contrast with the background, and Klarna's logo can't be hidden. If you don't comply with these rules, we reserve the right to stop your integration.
To enable styling of the placements with CSS from outside the shadow DOM, we use the ::part API to expose certain elements of the placements that can be styled. Only elements of the placement that have the part attribute can be targeted with CSS for styling purposes. This allows you to customize the appearance of the placements without interfering with the content within the shadow DOM.
If you've already styled the placements using the Merchant portal, we recommend resetting those styles if you plan to use CSS. The ::part API CSS styling has a higher specificity than the styles applied through the Merchant portal, so any styles applied with the ::part API will overwrite the styles applied through the Merchant portal. This ensures that your CSS styles will take precedence and will be applied as intended.
The Part API has some limitations you have to keep in mind when using the Part API to style the placements.
- You can't style an element that doesn't have a
::partattribute. - You can't target elements that are nested within an element that has the
::partattribute. For example, the following CSS selector won't work:
klarna-placement::part(osm-container) p { ... }- You can't query the elements that have parts of JavaScript. For example, the following code won't work:
querySelector('::part(osm-cta)')Here's the list of exposed ::part pseudo-elements:
| Pseudo-element | Description | Placement types |
|---|---|---|
::part(osm-container) | The wrapping element of the placements is the container that surrounds the placement. You can style it with the ::part(osm-container) selector. |
|
::part(osm-message) | The main text of a placement is the primary message that is displayed within the placement. You can style it with the ::part(osm-message) selector. |
|
::part(osm-legal) | The legal text that appears under the main message in some markets is an important piece of information that must be clearly visible and readable to the customers. You can style it with the ::part(osm-legal) selector. It's essential that you don't hide or obscure this text in any way, as it's required for compliance reasons. |
|
::part(osm-cta) | The button element that triggers the opening of the informational model is the element that the customer clicks on to view additional information about the product or service being offered. You can style it with the ::part(osm-cta) selector. |
|
::part(osm-badge) | The .svg badge elements inside the placements. You can style them with the ::part(osm-badge) selector. |
|
::part(osm-deal-badge) | The .svg deals badge elements inside the placements. Only visible when there's an active deals campaign. You can style them with the ::part(osm-deal-badge) selector. |
|
::part(osm-link) | Link elements with the <a> tag are the elements on the page that use the <a> tag to create a hyperlink to another location on the web. You can style them with the ::part(osm-link) selector. |
|
::part(osm-logo) | The Klarna logo appearing next to the main message. You can style it with the ::part(osm-logo) selector. |
Don't use CSS to hide Klarna's logo or badge in the placements. We reserve the right to turn off your integration if it abuses this rule as hiding Klarna brand elements goes against maintaining our branding integrity and visibility.
The following example shows how you can use CSS to style the top-strip-promotion-auto-size placement to match the look and feel of your website. The modified elements are: the background of the placement, the color of the message, and the click-to-action button.
<klarna-placement
  id="my-top-strip"
  data-key="top-strip-promotion-auto-size"
  data-locale="en-US">
</klarna-placement>HTML code for a top-strip-promotion-auto-size placment with an id . Adding the id to the source code makes it easier to target the placement.
#my-top-strip::part(osm-container) {
  background-color: #FAEAB1;
}

#my-top-strip::part(osm-message),
#my-top-strip::part(osm-cta) {
  font-size: 15px;
}
#my-top-strip::part(osm-logo) {
font-style: italic;Example of styling of a top-strip-promotion-auto-size placement.

A top-strip-promotion-auto-size placement with custom styling applied.
The following example shows how you can use CSS to style the top-strip-promotion-badge placement. The modified elements are: the font-family of the text to use an externally loaded font, for example, a Google font, and the size of the badge.
<klarna-placement
  id="my-top-strip-badge"
  data-key="top-strip-promotion-badge"
  data-locale="en-US">
</klarna-placement>HTML code for a top-strip-promotion-badge placment with an id . Adding the id to the source code makes it easier to target the placement.
@import url('https://fonts.googleapis.com/css2?family=Lobster&display=swap');

#my-top-strip-badge::part(osm-message),
#my-top-strip-badge::part(osm-cta) {
  font-family: 'Lobster', cursive;
}

#my-top-strip-badge::part(osm-badge) {
  transform: scale(1.1)
}Example of styling of a top-strip-promotion-badge placement.

A top-strip-promotion-badge with custom styling applied.
The following example shows how you can use CSS to style the credit-promotion-badge placement. The modified elements are: the container's border, the color of the message, the size of the badge, and the click-to-action button which is made bold.
<klarna-placement
  id="my-credit-promotion"
  data-key="credit-promotion-badge"
  data-locale="en-US"
  data-purchase_amount="14900">
</klarna-placement>HTML code for a credit-promotion-badge placment with an id . Adding the id to the source code makes it easier to target the placement.
#my-credit-promotion::part(osm-container){
  border-color: firebrick;
  border-style: dashed;
  border-width: 1px;
  background-color: #453C67;
}

#my-credit-promotion::part(osm-message),
#my-credit-promotion::part(osm-cta) {
color: #46C2CB;Example of styling of a credit-promotion-badge placement.

A credit-promotion-badge placement with custom styling applied.
Here's an example of how you can style the credit-promotion-auto-size placement.
<klarna-placement
  data-theme="dark"
  id="my-credit-promotion-auto-size"
  data-key="credit-promotion-auto-size"
  data-locale="en-US"
  data-purchase_amount="14900">
</klarna-placement>HTML code for a credit-promotion-auto-size placment with an id . Adding the id to the source code makes it easier to target the placement.
#my-credit-promotion-auto-size::part(osm-container){
  background-color: #000000;
}

#my-credit-promotion-auto-size::part(osm-message),
#my-credit-promotion-auto-size::part(osm-cta) {
  color: #F49D1A;
  font-weight: bold;
}
#my-credit-promotion-auto-size::part(osm-logo) {Example of styling of a credit-promotion-auto-size placement.

A credit-promotion-auto-size with custom styling applied.
Here's how to style a footer-promotion-auto-size placement.
<klarna-placement
  id="my-footer"
  data-key="footer-promotion-auto-size"
  data-locale="en-US">
</klarna-placement>HTML code for a footer-promotion-auto-size placment with an id . Adding the id to the source code makes it easier to target the placement.
#my-footer::part(osm-container) {
  background-color: #FAEAB1;
}

#my-footer::part(osm-badge) {
  transform: scale(1.1);
}Example of styling of a footer-promotion-auto-size placement.

A footer-promotion-auto-size placement with custom styling applied.
Here's an example of styling an info-page placement. The modified elements are: the font-family of content and headings of the info-page.
<klarna-placement
  id="my-info-page"
  data-key="info-page"
  data-locale="en-US"
>
</klarna-placement>HTML code for an info-page placment with an id . Adding the id to the source code makes it easier to target the placement.
@import url('https://fonts.googleapis.com/css2?family=Lobster&family=Montserrat:ital,wght@1,100&display=swap');

#my-info-page::part(osm-container){
  font-family: 'Montserrat', sans-serif;
}

#my-info-page::part(osm-heading) {
  font-family: 'Lobster', cursive;
}Example of styling of a footer-promotion-auto-size placement.
An info-page placement with custom styling applied.
The following examples demonstrate various scenarios that you may encounter when styling the placements.
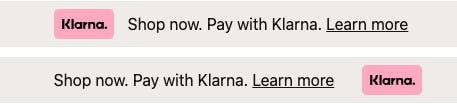
Following is an example on how you can align Klarna's badge left or right on the placement:
/* Left align of the badge */
#my-top-strip-badge-left::part(osm-container) {
  flex-direction: row;
}

#my-top-strip-badge-left::part(osm-message) {
  margin-left: 14px;
  margin-right: 0px;
}
If you want to style the hover state of links or click-to-action buttons to match the look and feel of your website, you can use pseudo-classes as you would normally do for any link.
#my-top-strip::part(osm-cta):hover {
  color: #ffb3c7;
}Example of styling the hover state using the :hover pseudo-class.

Example of styling the hover state.
If you have multiple placements of the same type on a single page, such as multiple credit-promotion-auto-size placements on a product listing page, you can use classes instead of IDs to target all of the placements at once. For example:
<klarna-placement
  class="my-credit-promotion"
  data-key="credit-promotion-auto-size"
  data-locale="en-US"
  data-purchase_amount="14900">
</klarna-placement>

<klarna-placement
  class="my-credit-promotion"
data-key="credit-promotion-auto-size" Example with the use of classes instead of ids.
.my-credit-promotion::part(osm-container){
  background-color: #E8F3D6;
}
Multiple placements on one page styled using classes.
If you want to use the same placement type in different areas of your website, for example, on the checkout page and on the product page, but style it differently in each, use a different id or class for each klarna-placement element to target the element and apply the desired styles to each.
<!-- Product page -->
<klarna-placement
  id="product-placement"
  data-key="credit-promotion-auto-size"
  data-locale="en-US"
  data-purchase_amount="14900">
</klarna-placement>

<!-- Checkout page -->
<klarna-placement #checkout-placement::part(osm-message) {
color: #fff;
}
#checkout-placement::part(osm-cta) {
color: #fff;
background: #007bff;
}
#product-placement::part(osm-message) {You can style the messaging differently based on the viewport size of your website, for example, to render a smaller font size on mobile and bigger on desktop.
/* Mobile styles */
@media (max-width: 480px) {
  #my-top-strip::part(osm-message) {
    font-size: 12px;
  }
}

/* Desktop styles */
@media (min-width: 481px) {
#my-top-strip::part(osm-message) {Styling a placement differently based on the viewport size.