
This guide will show you how to use Klarna Mobile SDK to implement Express Checkout in your Android mobile application, providing a fast and simple shopping experience for your users.
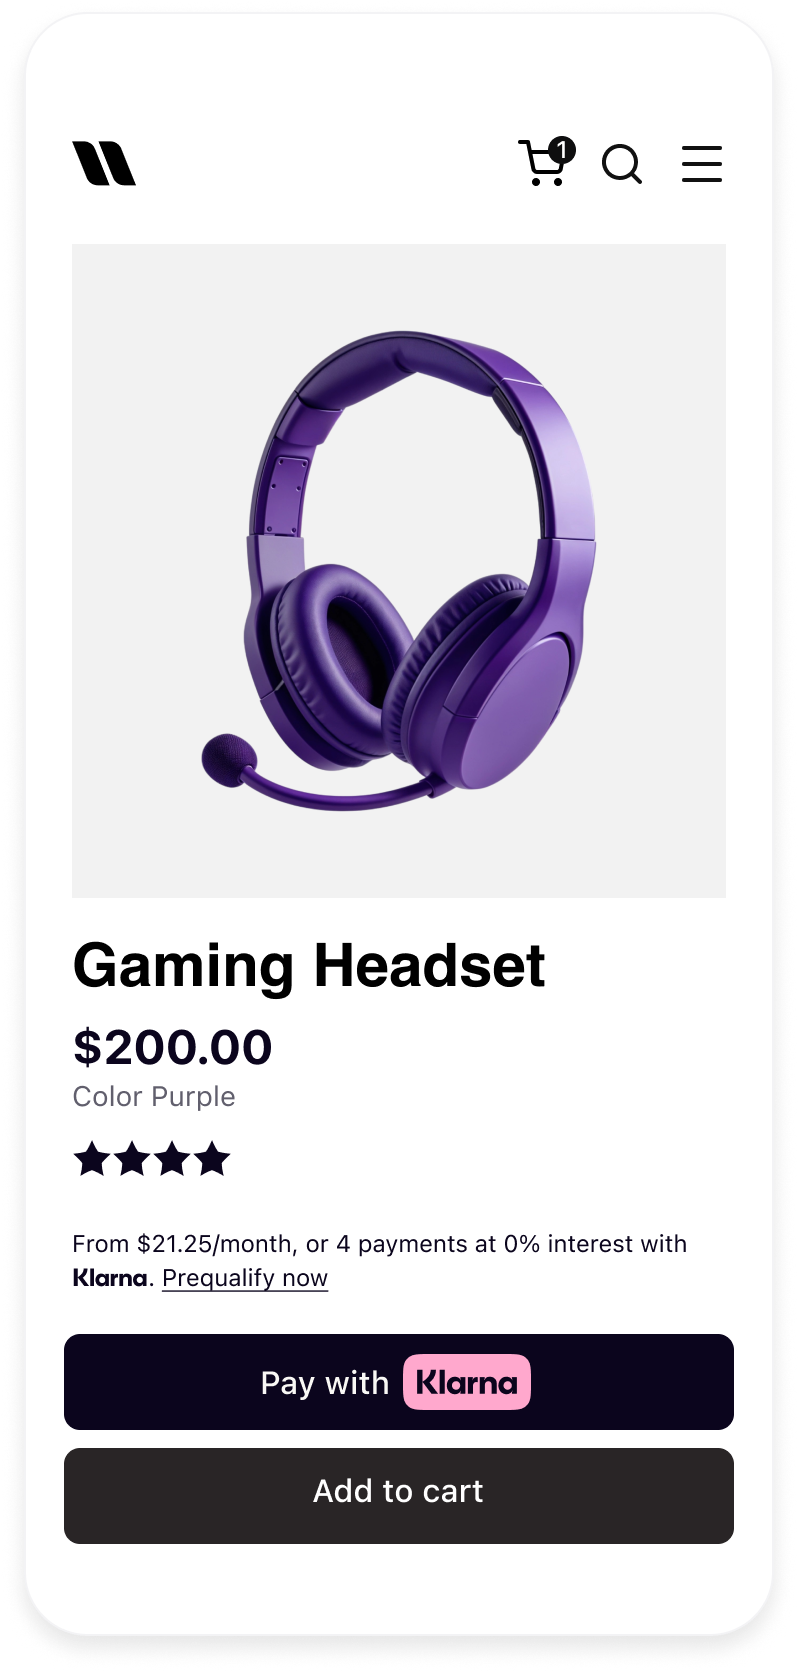
Klarna Express Checkout Button
- Prepare: Make sure you have the credentials and setup for Klarna Express Checkout.
- Present the button: (Mobile App) Create an instance of KlarnaExpressCheckoutButton with session parameters and present in your native app.
- Handle authorization: (Mobile App) Once the customer clicks the button and authorizes the payment, handle response from the SDK.
- Create an order: (Server-side) Once a session is authorized, create an order with authorization token via your backend.
For a Mobile SDK integration your Payment Server and Mobile App must work together to offer one-click checkout experience:
The right placement of the Express button can significantly enhance your user experience, leading to higher conversion rates and increased sales.
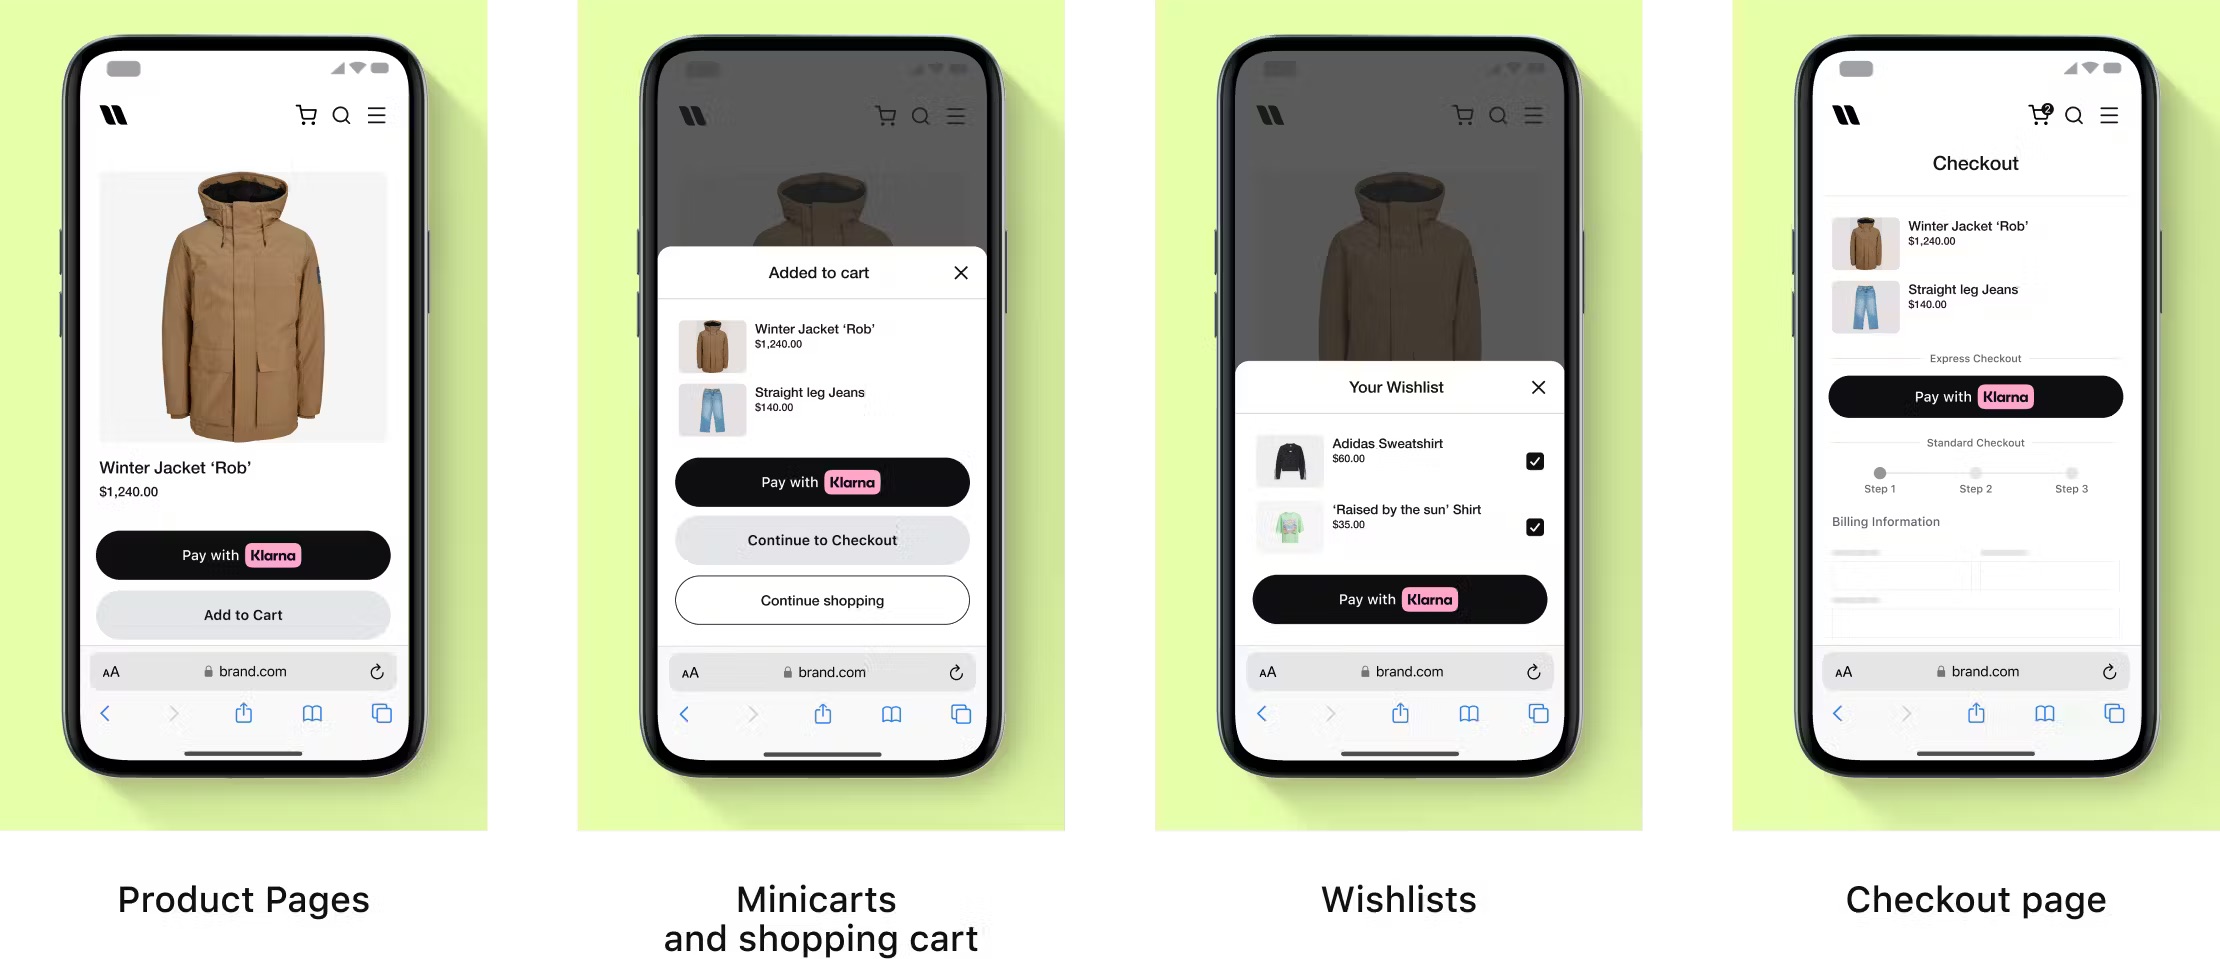
You can place the Express checkout button at multiple stages of the shopping journey.
To learn more about placements, check out this section.
Before you integrate Express checkout, check that you meet the following prerequisites:
- Make sure to have a payment solution with Klarna. Before integrating Express checkout into your website, you need to have a merchant account with Klarna and Klarna payments or Klarna checkout integrated in your checkout.
- Make sure to allowlist the domain of the page on which Express checkout will be integrated. If not all the domains are added to the allowlist, Express checkout will still load, however, the customer will see a "We couldn't load the next screen" error.
To allowlist the domain URLs, follow these steps:
- Log into Klarna Merchant portal. If you want to test Express checkout, log into the playground Merchant portal. If you want to build a live integration, log into the production Merchant portal.
- Once logged in, go to Payment settings > Client Identifiers. In the Allowed Origins for your integrations section, click Manage origins.
- In the Register new origin field, add your domain’s URL. Then, click Register. The registered domain is now listed in Allowed origins.
3. Generate a client identifier that will let you authenticate requests sent to Klarna:
- Log into Klarna Merchant portal.
- Once logged in, go to Payment settings > Client Identifiers.
- To generate a new client identifier, navigate to Client Identifiers for your integrations and click Generate client identifier.
If you’ve previously generated a client identifier for your store, you can use it to build your Express checkout integration.
Add the Repository
Add the Klarna Mobile SDK maven repository:
Add the Dependency
Add the SDK as a dependency to your app:
To read more about Mobile SDK versioning policy, check out this section.
Create an instance of the KlarnaExpressCheckoutButton when your cart page or product detail page is loaded. This ensures that the button is readily available for user interaction. Depending on your integration setup, you can create and initiate the Express Checkout button using either a Client-Side Session or a Server-Side Session:
- Client-Side Session: Use this method if you prefer to set a partner client ID from the Merchant Portal. This approach is typically used when the session management is handled entirely on the client side. You would need to provide the order details in this approach.
- Server-Side Session: Choose this method if you have a client token generated by the backend for the server-side session. This is suitable when you want to manage sensitive session data on the server. You do not need to provide the order details with this approach.
Once the button is created, add it to your screen. This involves adding the button to the appropriate view hierarchy in your application's user interface.
val sessionOptions: KlarnaExpressCheckoutSessionOptions = KlarnaExpressCheckoutSessionOptions.ClientSideSession(
    clientId =”myClientId”,
    autoFinalize = true,
    collectShippingAddress = true,
    sessionData = mySessionData
)
val expressCheckoutButtonOptions = KlarnaExpressCheckoutButtonOptions(
    locale =”en-US”,
    sessionOptions = sessionOptions,
styleConfiguration = styleConfiguration,KlarnaExpressCheckoutButton
| Param | Type | Description |
|---|---|---|
| context | Context | The context of the Activity the button is in. |
| options | KlarnaExpressCheckoutButtonOptions | Contains all the options for the button. |
KlarnaExpressCheckoutButtonOptions
| Param | Type | Description |
|---|---|---|
| sessionOptions | KlarnaExpressCheckoutSessionOptions | Authorization options that will be used for authorization upon a user click. |
| callback | KlarnaExpressCheckoutButtonCallback | Callback that the merchant can use to get notified of the key events happening in the flow. |
| locale | String | Locale of the button text. The default is “en-US”. |
| styleConfiguration | KlarnaExpressCheckoutButtonStyleConfiguration? | Style configuration for the button, including button theme, button shape, and style. |
| environment | KlarnaEnvironment | Operating environment of the button. The default is `PRODUCTION`". |
| region | KlarnaRegion | Geographical region for the button’s API requests. The default is `NA`. |
| theme | KlarnaTheme | Theme of the flow. The default is `LIGHT`. |
| loggingLevel | KlarnaLoggingLevel | Logging level of the integration. The default is `off`. |
KlarnaExpressCheckoutSessionOptions.ClientSideSession
{| class="mw-sticky-header table-mini"
!Param
!Type
!Description
|-
|clientId
|String
|Partner client ID from Merchant Portal.
|-
|sessionData
|String
|JSON string used to update the session.
|-
|autoFinalize
|Boolean
|Whether the authorization should automatically be finalized. The default is true.
|-
|collectShippingAddress
|Boolean
|Whether the merchant needs the customer's shipping address from Klarna. The default is false.
|}
KlarnaExpressCheckoutSessionOptions.ServerSideSession
| Param | Type | Description |
|---|---|---|
| clientToken | String | Client token generated by the backend for the server-side session. |
| sessionData | String | JSON string used to update the session. The default value is null. |
| autoFinalize | Boolean | Whether the authorization should automatically be finalized. The default is true. |
| collectShippingAddress | Boolean | Whether the merchant needs the customer's shipping address from Klarna. The default is false. |
KlarnaExpressCheckoutButtonStyleConfiguration
| Param | Type | Description |
|---|---|---|
| theme | KlarnaButtonTheme? | Color theme of the button. The default is `DARK`. |
| shape | KlarnaButtonShape? | Shape of the button. The default is `ROUNDED_RECT`. |
| style | KlarnaButtonStyle? | Style of the button. The default is `FILLED`. |
Once a customer clicks the Express Checkout button, the Klarna payment authorization process will begin. You must provide a callback object when creating the button, which will handle Klarna's response. This callback is essential for managing the payment flow and updating the UI based on the authorization result.
If the authorization is successful, you will receive an authorization token from the authorization response within the callback object.
override fun onAuthorized(
   view: KlarnaExpressCheckoutButton,
   response: KlarnaExpressCheckoutButtonAuthorizationResponse){
   if (response.approved && !response.authorizationToken.isNullOrBlank()) {
        // authorization is successful, backend may create order
    }

    if (response.finalizeRequired) {
        // finalize call is required, only applicable if you are setting autoFinalize to false
// use response.clientToken to finalizeParameters
KlarnaExpressCheckoutButtonAuthorizationResponse
| Param | Type | Description |
|---|---|---|
| approved | Boolean | Indicates whether the payment was approved. |
| showForm | Boolean | Indicates whether the payment is still available for authorization. |
| finalizeRequired | Boolean | Indicates whether the session requires finalization. |
| authorizationToken | String | The authorization token for the payment, if applicable. |
| clientToken | String | The client token for the session, if applicable, intended to be used for finalization. |
| sessionId | String | The ID of the Klarna Payments session. |
| collectedShippingAddress | String | Shipping address collected during the session, if applicable. |
| merchantReference1 | String | Merchant references provided in the session creation. |
| merchantReference2 | String | Additional merchant reference provided in the session creation. |
Error Callback
In case an error happen in the SDK or technical errors during authorization, SDK will notify you via the onError method:
override fun onError(view: KlarnaExpressCheckoutButton, error: KlarnaExpressCheckoutError) {
    // Handle different failure scenarios by checking the error name
    if (error.name == KlarnaExpressCheckoutError.AuthorizationFailed) {
        // Handle the AuthorizationFailed error
        println("Authorization failed: ${error.message}")
    }
    // ...
}
Parameters
KlarnaExpressCheckoutError
| Param | Type | Description |
|---|---|---|
| name | String | Unique name of the error. |
| message | String | Elaborate description of the error. |
| isFatal | Boolean | Determines whether the error is fatal. If the error is fatal, the button should not be shown any further. |
| sessionId | String | Mobile SDK’s session ID. |
| params | String | A key-value map/dictionary of any additional error parameters. |
The table below lists all the different error names defined as constant values in the KlarnaExpressCheckoutError:
| Error Name | Description |
|---|---|
| InvalidClientID | Indicates that the client ID is not valid; for example, it is null or blank. |
| InvalidClientToken | Indicates that the client ID is not valid. For example it is null or blank. |
| MissingCallbackReference | Indicates that the callback reference is lost. |
| AlreadyInProgress | Indicates that the Klarna Express Checkout flow is already in progress. |
| AuthorizationFailed | Indicates that the authorization has failed. |
| ButtonRenderFailed | Indicates that the button could not be rendered successfully. |
| InvalidAuthorizationResponseParams | Indicates that the authorization response could not be parsed caused by invalid/missing params. |
This is only required of autoFinalize is set to false in session options.
If the session needs to be finalized, you’ll need to perform this last step to get an authorization token from your checkout confirmation screen. This can be done via KlarnaPaymentView, using the clientToken from KlarnaExpressCheckoutButtonAuthorizationResponse to initialize the view and calling finalize method of that view.
Once you have the authorization token, you can create an order. When creating the order, make sure the shipping address provided in the request matches the collected shipping address returned alongside the authorization token.
To continue with the purchase, you have to create an order in Klarna's system. This step takes place in the server side through the Klarna payments API.
To create an order for a one-time payment, send a POST request to the {apiUrl}/payments/v1/authorizations/{authorizationToken}/order endpoint and include authorization_token in the path.
For example, if the authorization_token is b4bd3423-24e3, send your request to the {apiUrl}/payments/v1/authorizations/b4bd3423-24e3/order endpoint.
{
"purchase_country": "US",
"purchase_currency": "USD",
"billing_address": {
"given_name": "John",
"family_name": "Doe",
"email": "john@doe.com",
"title": "Mr",
"street_address": "Lombard St 10",
"street_address2": "Apt 214",A POST request to create an order for a one-time payment.
Success response
When you receive a success response, the customer gets charged and the Klarna payments session is closed.
As part of the response, you receive the following details:
order_id, an order identifier that you can later use to capture or refund the order using the Order management APIredirect_url, a URL to which you redirect the customer. This isn't included in the response received if you didn't include the URL when initiating a paymentfraud_status, an indicator of whether the transaction is suspected to be legitimate or fraudulentauthorized_payment_method, the payment method selected by your customer for this purchase
{
"order_id": "3eaeb557-5e30-47f8-b840-b8d987f5945d",
"redirect_url": "https://payments.klarna.com/redirect/...",
"fraud_status": "ACCEPTED",
"authorized_payment_method": "invoice"
}
A success response to the order creation request for a one-time payment.
Send the customer browser to redirect_url provided in the response. Klarna places a cookie in the browser and redirects the customer back to the confirmation URL you provided when creating the session. This makes the checkout faster the next time the customer chooses to pay with Klarna.
Error response
If your request doesn't pass our validation, you'll receive an error response. The most common reasons why creating an order fails are:
- placing the order more than 60 minutes after authorization
- modifying purchase details after authorization without updating the payment session
{
"correlation_id": "6a9b1cb1-73a3-4936-a030-481ba4bb203b",
"error_code": "ERROR_CODE",
"error_messages": [
"ERROR_MESSAGE"
]
}
An error response to the order creation request for a one-time payment.
Here are examples of common errors with troubleshooting suggestions. You can use the value in correlation_id to find entries related to the request under Logs in the Merchant portal.
| Error code | Error message | Description |
|---|---|---|
NOT_FOUND | Invalid authorization token | The authorization token has expired because the order was placed more than 60 minutes after authorization. To fix the error, request a new authorization_token and use it to place the order. |
BAD_VALUE | Not matching fields: [billing_address.postal_code] | The data shared with Klarna in a previous step (create_session, load(), or authorize()) have been modified causing the validation to fail. |
BAD_VALUE | Not matching fields: [Incorrect number of items in the cart. Expected: 2, Actual: 3] | The order lines or the cart were updated after the authorize() call. Please ensure that the cart is kept as-is or send a new authorization request. |
REJECTED | Rejected | This is an edge case reason, but can be triggered in case the merchant is configured with being allowed to update the cart. This could be updated from the authorize to the place order in such a way that a new authorize is triggered. In this case this is rejected. |
This section will help you customize the Express checkout button to ensure a seamless and trustworthy checkout experience, while leveraging Klarna’s strong brand to boost your conversions.
Styling the Express checkout button is crucial for integrating it into your application in a way that complements your brand and encourages user engagement. To modify the style of the button, edit the source code as explained in this guide.
The theme defines the button’s color. You can change the theme by setting the value of the theme attribute.
Apart from the default dark theme, you can apply the light theme to have the button displayed in white or choose auto mode so the theme is selected automatically based on the device’s configuration.
The button’s default theme color is dark. As the theme attribute is optional, the default theme is applied both when you set the attribute to default or if you omit it from the source code altogether.

Dark theme (default)
There are three theme values available, DARK (default), LIGHT and AUTO.

Light theme
val buttonStyleConfiguration = KlarnaExpressCheckoutButtonStyleConfiguration(
    theme = KlarnaButtonTheme.DARK,
    shape = …,
    style = …
)
Customizing the shape of the button to match your application’s look and feel is a key step in creating a visually cohesive and engaging user experience. To control the button's shape, change the value of the shape attribute.
KlarnaButtonShape.ROUNDED_RECT

KlarnaButtonShape.PILL

KlarnaButtonShape.RECTANGLE
There are three shapes available with the Express checkout button: ROUNDED_RECT (default), RECTANGLE and PILL.
val buttonStyleConfiguration = KlarnaExpressCheckoutButtonStyleConfiguration(
    theme = KlarnaButtonShape.ROUNDED_RECT,
    shape = …,
    style = …
)

Outlined style
Use the outlined style to make the button visible on all backgrounds. To apply this style, set the KlarnaButtonStyle attribute to OUTLINED, otherwise default value FILLED will be used instead.
val buttonStyleConfiguration = KlarnaExpressCheckoutButtonStyleConfiguration(
    style = KlarnaButtonStyle.OUTLINED,
    shape = …,
    theme = …
)
The SDK will log events and errors while it’s running, which you can read in logcat console. You can set the logging level for the SDK through the loggingLevel property of integration instance.
klarnaExpressCheckoutButton.loggingLevel = KlarnaLoggingLevel.Verbose
Klarna Mobile SDK provides a full suite of mobile-first integrations, including Klarna products like:
.png) | .png) | 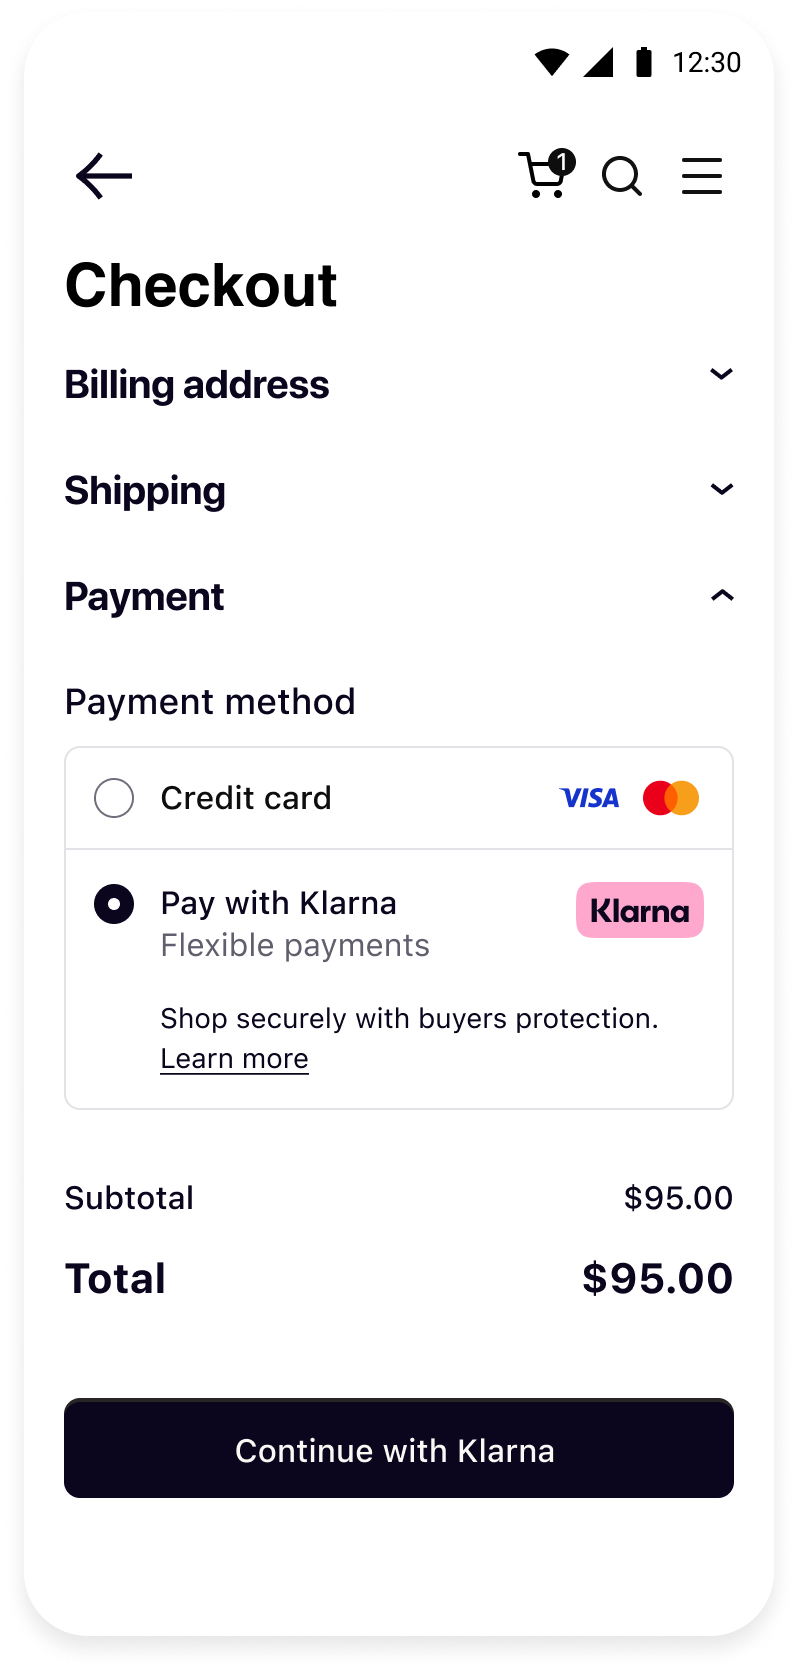 |
| Sign in with Klarna | On-site Messaging | Payments |
- On-site Messaging: Show contextual messaging let your customers know about the available payment options in pre-checkout: click here to learn more.
- Sign in with Klarna: Seamlessly identify and let users login via their Klarna account: click here to learn more.
- Payments: Enhance your mobile app conversion with a seamless payment UX, click here to learn more.
Complete your integration with