Payments
Explore the Payment sections within the Klarna portal!
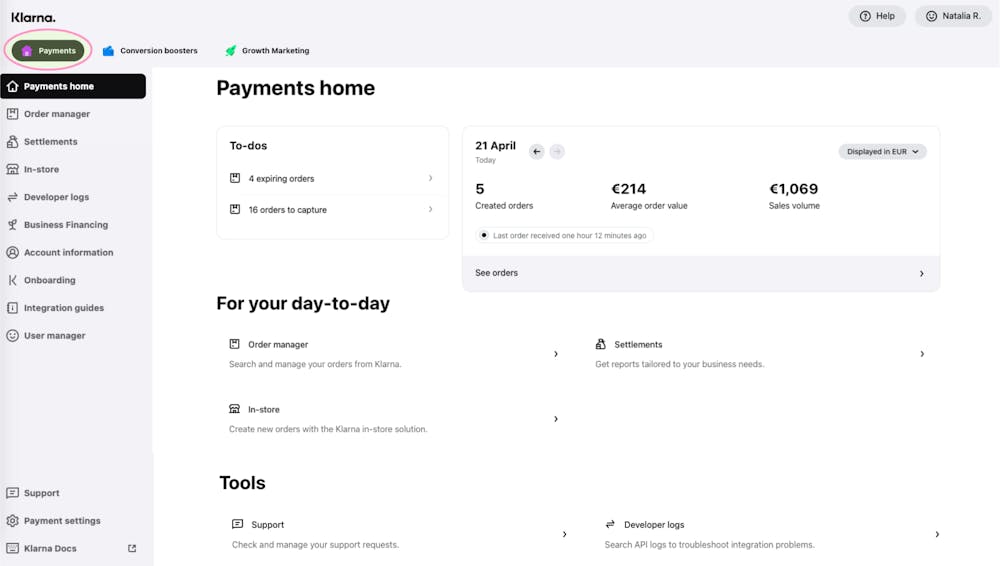
In the home page, you will be able to instantly see a summary of your ‘pending tasks’ (such as orders to capture or disputes to solve) as well as the volume generated on that day and the number of orders created. In the grey column on the left, you will be able to find the different apps available for you in Merchant Portal - orders, settlements, disputes, branding, etc.
In the Orders app, you will be able to see all the orders that have been paid with Klarna.
- All orders: allows you to see all the orders made with Klarna as payment method.
- Order settings: this section gives you the possibility to configure the way you receive email notifications for new orders, orders that are about to expire and unacknowledged orders.
There are 6 types of order status:
- Fully captured: for Klarna, capturing an order means shipping that order.The moment the order is captured (shipped) Klarna starts to initiate payment from the client.". I.e: a client that made an order two days ago choosing ‘pay in 3’, would start paying the first installment the day that the order is captured. Also, it is the moment when Klarna initiates the payment towards your business.
- Uncaptured: the orders that appear as uncaptured are those that have been correctly placed and created but have not yet been shipped. For these orders, it should be taken into account that there is an expiration day that will be shown in the order page. By default, there are 28 days to capture an order before it expires but this may vary from partner to partner.
- Cancelled: the order has been cancelled by you or the client. These orders won’t appear in any settlement report since no payment has been initiated. Only uncaptured orders can be cancelled.
- Partially captured: this indicates that an order has been partially shipped and a payment has been initiated for that part of the order.
- Refunded: a refund of the whole order or part of it has been made to the customer.
- Unacknowledged: this status appears when an order has been correctly placed but it has not been acknowledged in your system. If this was to happen, the order should be manually handled in Merchant Portal, meaning that it should be captured and refunded (if needed) through the order page in Merchant Portal and the integration should be checked to make sure there aren’t any issues with the API and the communication between the platforms.
All Orders
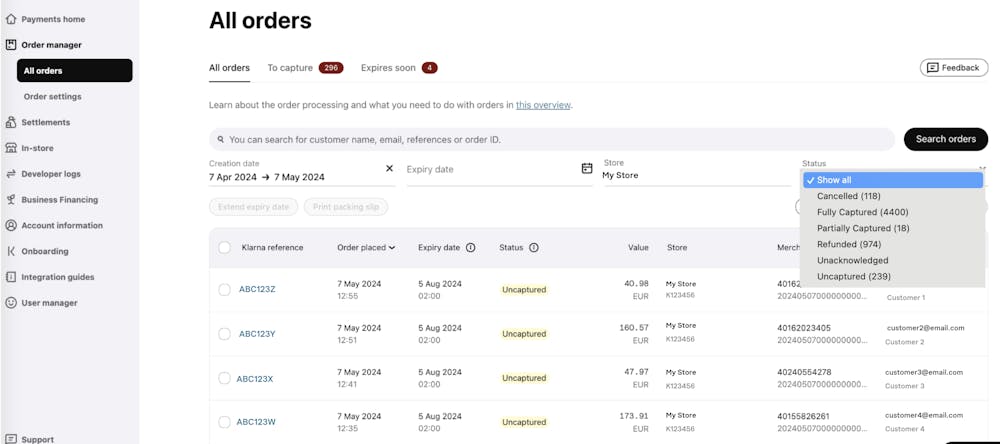
In the home page of the Orders app you will find all the orders created via Klarna.
There are several options to filter to make finding an order easier for you: creation date, expiry date, store (if you have more than one), status.
You can also download a list of the orders shown in the page in the ‘Export all as’ tab.

Extending expiry date
When selecting an order, you will be able to see the option ‘extend expiry date’ which will allow you to extend the expiration day of the order so you have more days to capture it. You can also select multiple orders and select ‘Full capture’ in order to capture all of the order lines for the selected orders at once.
Keep in mind that an expired order won’t be available for capture, modification or extension of expiration day, but if you have Point of Sale active in your account, you will be able to recreate the order with the same details and send a payment authorization to the client so a new order can be created.
The expiration date can be extended up to a maximum of 90 days from the creation date.
This is the general view of an order that has not been captured, you can see the order lines, the total order value, the billing and shipping address as well as the payment method chosen by the client.
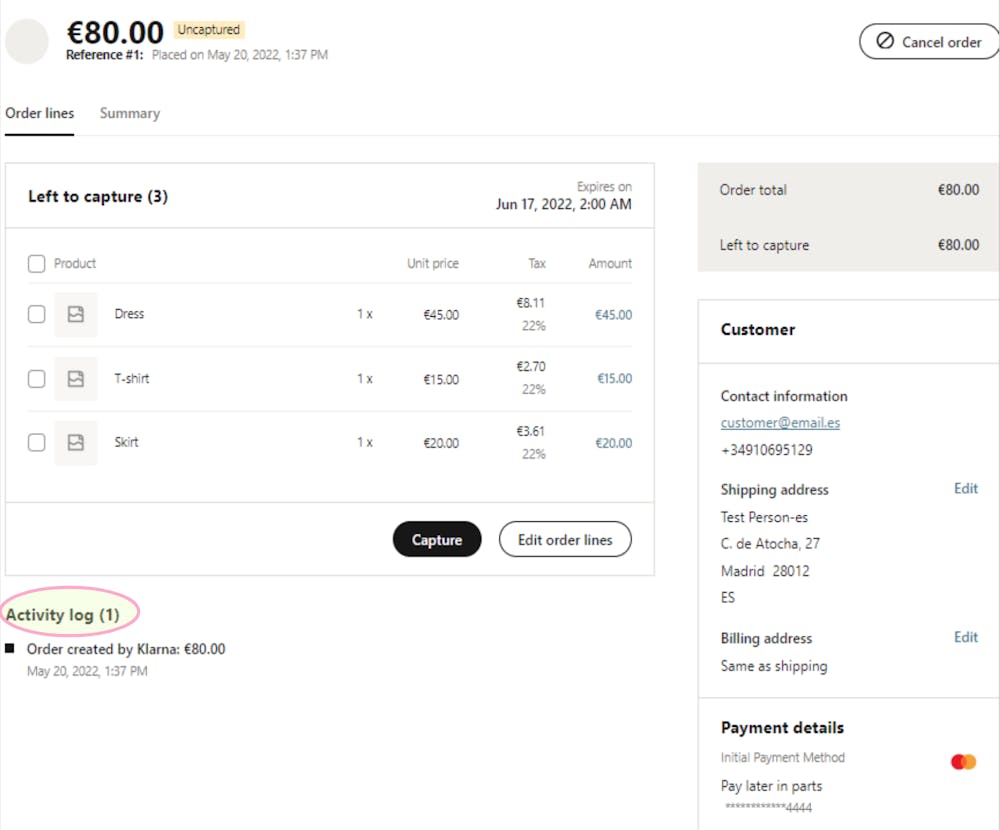
At the bottom of the screen, you will also find an activity log where you will see everything that has happened to the order since it was created (capture, refunds, order updates) including dates as well as who has performed these changes.
Every time there is an update to the order, the whole page will show these changes. The value box will reflect new lines (order total, left to capture, refunded, customer billed, discounts). There will be a detail of what order lines are included in each capture (if there are more than one) and there will also be detail of order lines that have been refunded (if any).
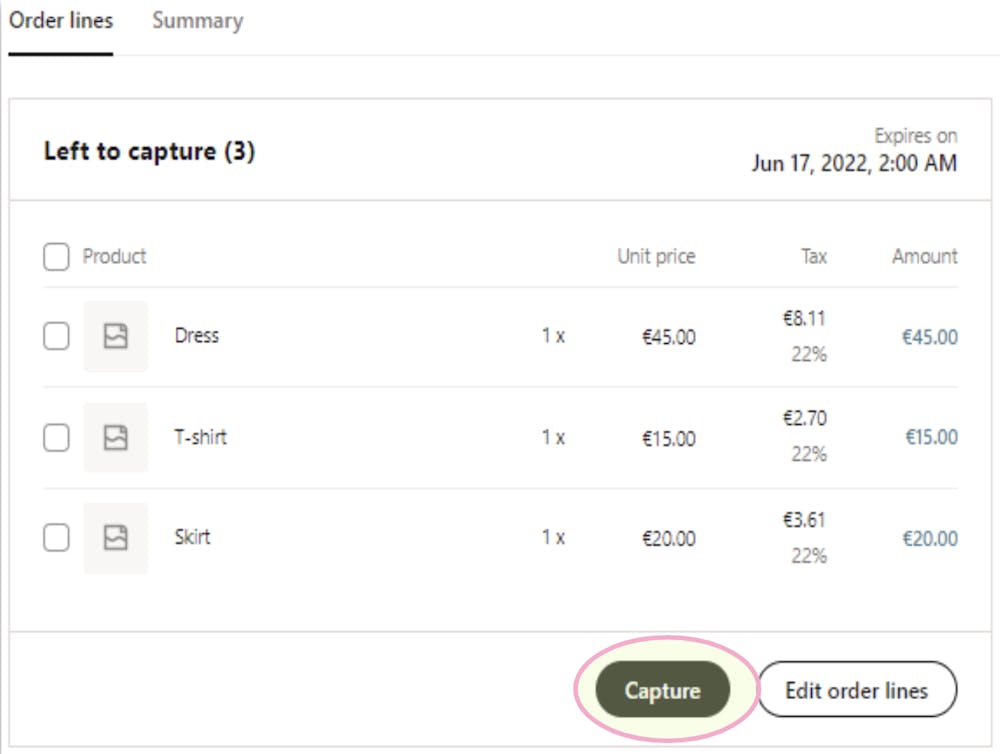
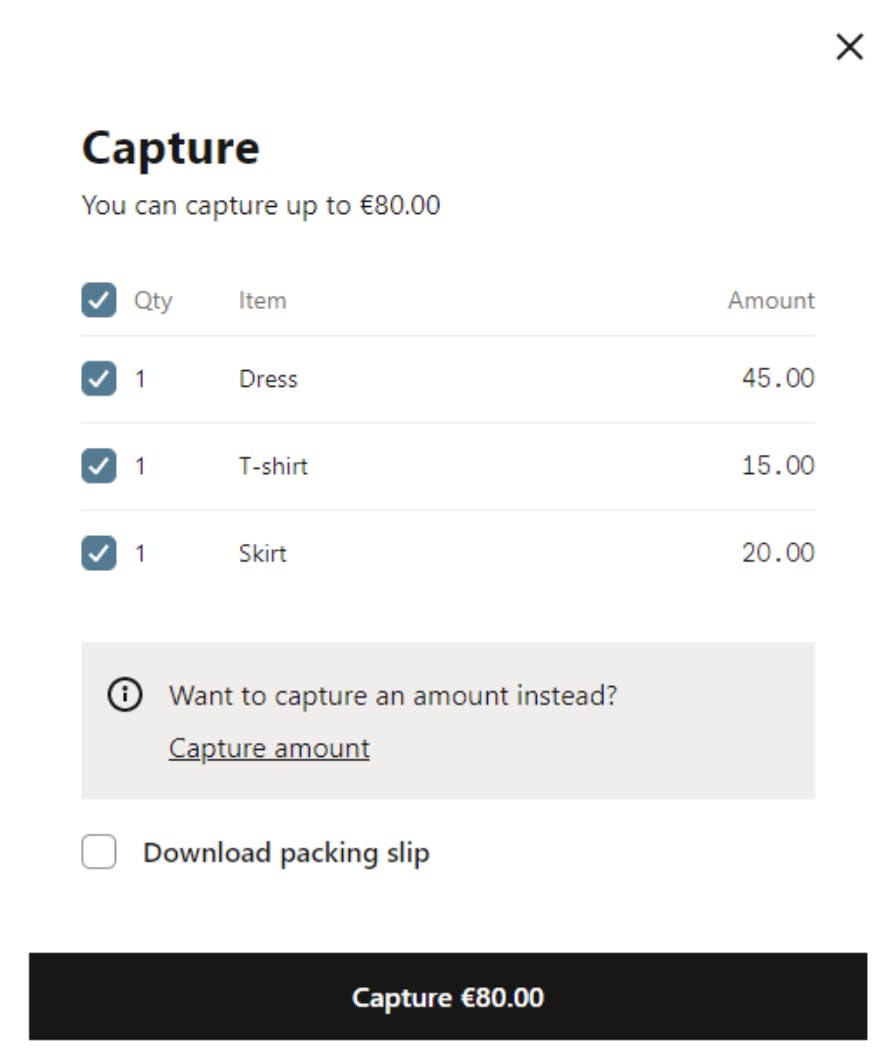
When you click ‘capture’, a small window will open and you will have the option to choose one or several order lines to capture. As you can see, you can choose to capture all of them together or make a partial capture and send just part of the order in that moment. It is advisable to capture the orders by order line and NOT by amount. Inside the order page, you will also be able to print a packing slip to include in each order.

The order has been created in Klarna’s system but has not been acknowledged by your system. If you are experiencing unacknowledged orders, we advise you to investigate potential API issues.

If an order is pending for manual risk assessment, the following banner appears. We advise you to not capture it yet as the order can be of risk for both sides.

If the order is accepted after manual risk assessment, the following banner is displayed. The banner can be dismissed and won’t show up again.

If the order is rejected after manual risk assessment, the following banner is displayed. You can override the decision and accept the risk by capturing the order.

The order has been canceled and no further actions can be taken. It can however be copied and recreated. Cancelled orders will not show up in your settlement files as no payment has been made from the consumer to Klarna.

The order authorisation has been expired and no further actions can be taken. It can however be copied and recreated.

If an order expires soon, the following banner is displayed and allows you to extend the expiration date.

If an order is disputed, the following banner is displayed and allows you to reject by resuming the statement.
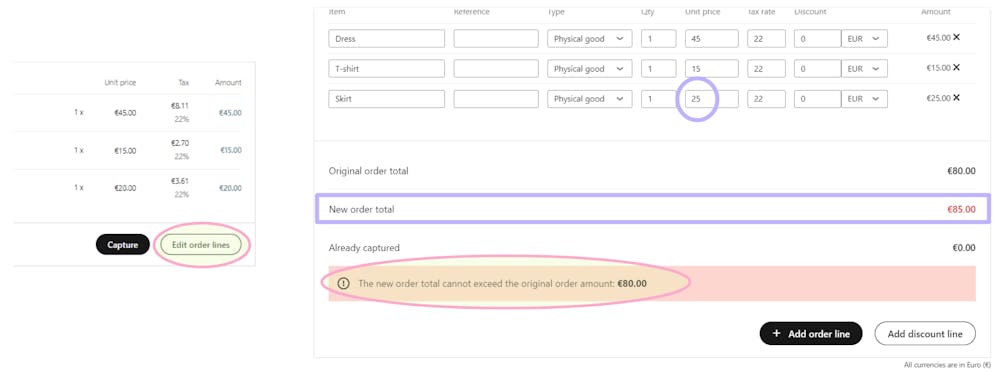
In the order page, you also have the possibility of editing uncaptured order lines.
This could be useful when a client has already placed an order which includes an article that is out of stock or when you want to add a discount to that specific order. When editing the order lines, the total new value should never be higher than the original value but, depending on the payment method, you might be able to increase the value and trigger a new credit lookup towards the customer.
Finally, the number of captures in the order, including order lines in each capture is listed in the activity log in the order details screen and shows every movement performed (and by who) in each order and the value box where there is detailed information on what has been captured, the total of the order, how much the customer has been billed and refunds in case there are any.
In the Settlements app, you will be able to see all payout done by Klarna and generate reports based on your business needs.
There are 4 main sections:
- Settlement reports: In this section you will find all the settlement reports that Klarna has issued towards your account.
- Custom Reports: this section allows you to select a time period and download a .csv file.
- Balance Reports:see reports for the end of the day balances to close books.
- Invoices: allows access to any invoice that Klarna issues towards your account.
By default, Merchant Portal will show the summary of the month, but you can always filter by date to see reports according to your needs. In the first row of the table, there is a list of items that shows a summary overview of some of the information included in the reports: payout date, capture period, payment reference, merchant ID, total sales, total fees, tax, refunds and the final amount that Klarna is going to settle.

You will always have the option to download a batch report for a certain period of time chosen by you with the date filter or download single settlement reports by clicking ‘csv’ or ‘pdf’ in the last column. The pdf version is the document that serves as VAT invoice because it contains Klarna’s tax information as well as your company’s.
Payout status
A settlement payout status shows what’s happening with your payout.
There are 4 possible statuses:
- Paid – payout is completed. Depending on your bank, the payout can take 2-5 business days to reach your account. If you haven’t received the payout by then, you should check with your bank for further help.
- Processing – payout is underway. We have successfully initiated a payout from our side but haven't yet received a success/failed message.
- Failed – payout has failed. Incorrect bank account details, a bank server error, or a technical error on our part could cause the issue. So you should check and update your bank account details.
- N/A – no payout status. This can be due to several reasons, i.e; total settlement amount summing up to 0 payout (where returns exceed sales); Hold of funds due to incorrect bank details could be the issue; Hold due to some other reason, you are integrated via a PSP and, hence, do not receive a payout from Klarna but from the Partner.
Payment Ref.
This is the view that you will obtain when you click one of the settlement reports from the list in the previous page. As you can see, you will get a summary of all the orders included in this settlement as well as the fees applied and returns in case there are any. In addition, you have the option to click the order reference to go directly to that order page and check that the information is correct and the status of the order.
The payment reference is the indicator that will appear in your bank statement when Klarna issues the payment of the settlement. Normally, this a 8 digit payment reference, which starts with an 8 or 9 (8xxxxxxx, 9xxxxxxx). Please ensure that you include the payment reference when making payment for your invoice. Kindly note that each invoice requires a separate payment.
Download
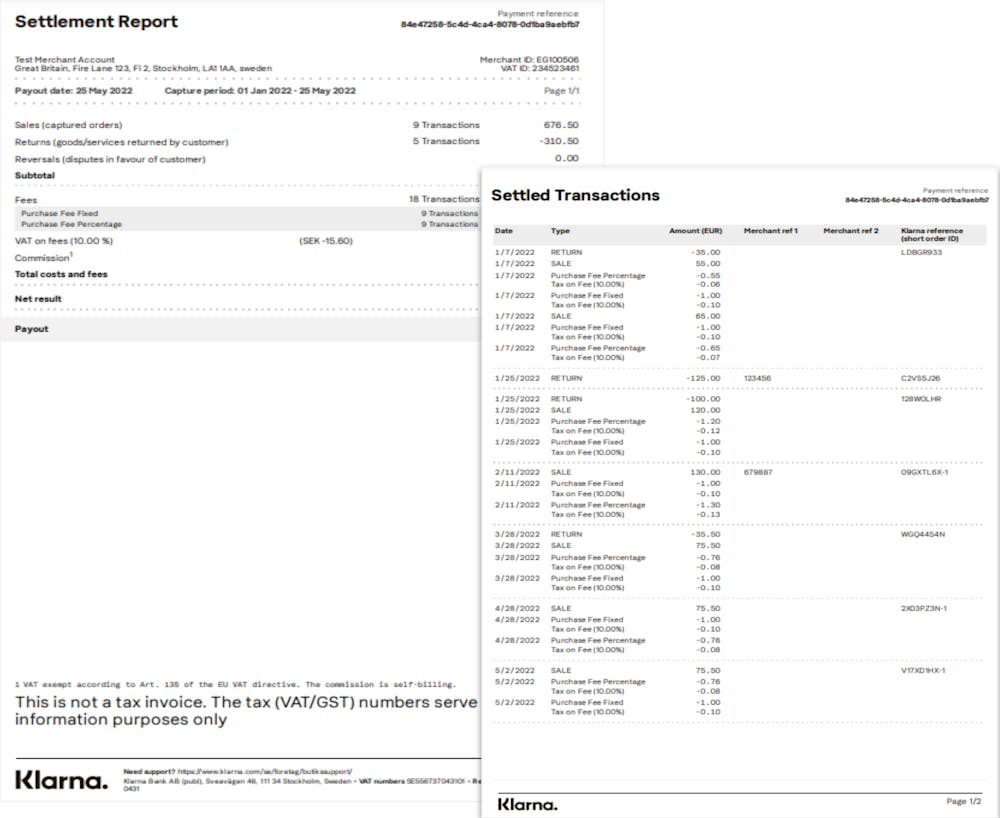
This is the view of a single settlement report when you download it in pdf or csv format. You will get a summary of the transactions for each category (sales, returns, fees) and a payment reference as well as your tax details. This is the document that should be used for your accounting in regards to Klarna transactions.
Configure Report
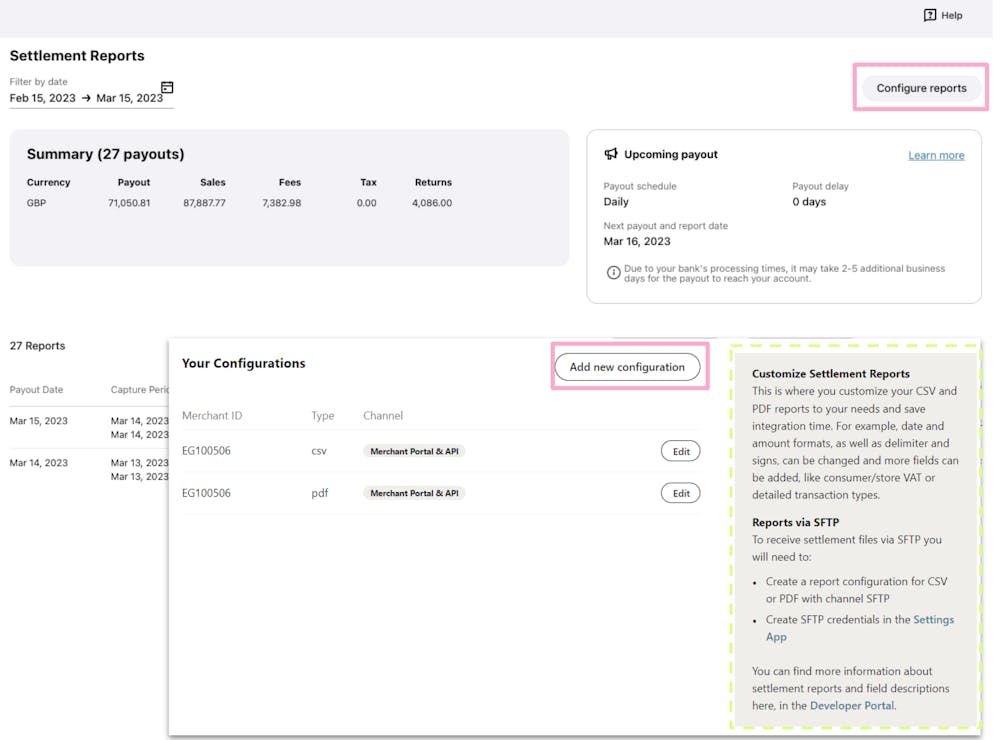
From the home page for settlement reports, you have the option of creating a personalised configuration so you can get the reports with specific information according to your business and needs. Once you have created this configuration, each time you download a report in .csv format, you will get only the information you have chosen to see. You can also configure pdf reports but the configuration won’t be applied retrospectively to these kind of reports.
In this section, you will also be able to configure SFTP (Secure File Transfer Protocol) reports so that you can automatically receive them via this protocol. In the grey box to the right you will find more information on how to customise Settlement Reports and Reports via SFTP.
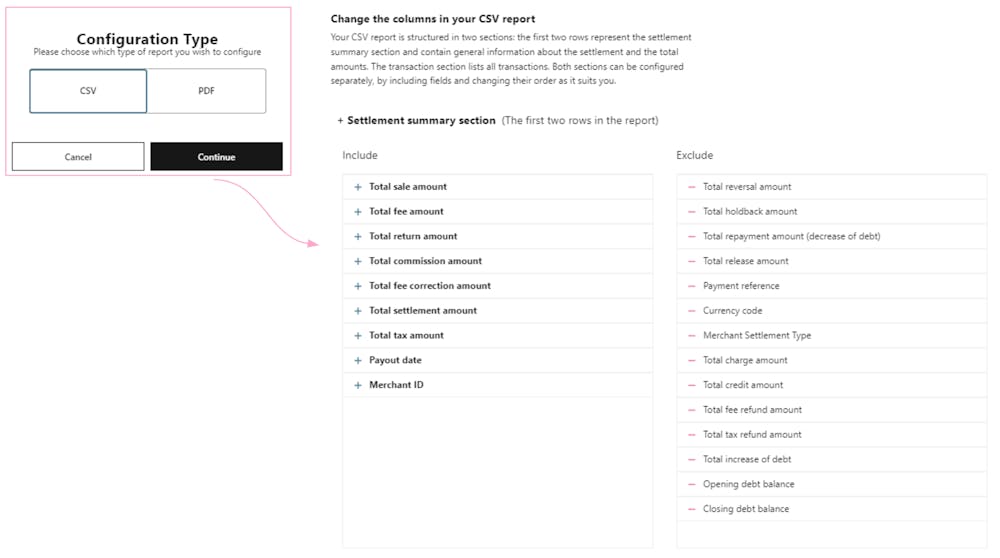
When clicking in the ‘configure reports’ tab, you will get a screen in which you can select different options such as: how to download the report (csv or pdf), what format you want for date and currency, type of design for the report and, lastly, you will find two columns. The one on the left shows the information that is going to appear on the report and the one on the right is the information that will not appear. You can move the data from one column to another to establish what information you want to see in the reports.
If you have successfully updated your Bank Account details, the payment will automatically re-initiate towards the new account. Depending on your bank's processing times, it may take 2-5 business days for you to receive your payment.
This section allows you to select a time period and download a .csv report that includes all transactions that occurred within that time period. It includes captured and refunded orders as well as transactions that were captured but not settled at the moment of report generation.
In this section of the settlements app, you can view what amount Klarna is due to pay you. Under Event Date you can choose the time range of the report you want to generate. By clicking the button Generate you will create the report for the chosen time range.
You are then able to download reports that include all transactions within the time range chosen. It can also include orders that have been captured but not settled at the moment of report generation. This report is not configurable.
With the balance report the merchant can view the end of the day balances to close its books. It has been broken down into individual types of transactions that were captured but not yet settled towards the merchant as of the balance date.
Balance reports helps merchants track their performance and monitor cash inflows and outflows closely for reconciliation purposes or to maintain good accounting practices. With the balance report you can view the end of the day balances to close your books.
It has been broken down into individual types of transactions that were captured but not yet settled towards the merchant. The sum of these is what makes up the total balance.
To generate a report, select the Date of Balance and a Store for which the balance should be generated. Then press Show Balance.
This section contains any invoice that Klarna issues towards your account. This could happen if refunds are not covered by sales for a period of time and Klarna is not able to deduct the charges from any of your settlement reports so you have to settle the outstanding balance. If you have a GROSS settlement setup, meaning that Klarna doesn’t discount fees from your sales, you will receive a monthly invoice to pay said fees.
Klarna Invoice or K-invoice is a merchant-specific invoice. These invoices are sent to merchants via mail or email to invoice them for fees or debts that they need to pay Klarna. The K-invoice could, for example, contain fees for using Klarna, corrections from consumer invoices or returns that have been higher than their sales.
Above the list of invoices you will see the amount of Klarna invoices that you have. In this example the merchant has 3 Invoices.
You are able to Download these Klarna invoices by clicking PDF to the right.
Invoice status
An invoice status shows what’s happening with your invoices / debt statements (debt invoices).
There are 5 possible statuses:
- Paid - invoice is paid. We have successfully received the payment and the invoice is fully paid or written off by Klarna.
- Partially Paid - invoice is partially paid. We have received a partial payment for the invoice. Note that there is still a remaining outstanding balance that needs to be paid.
- Unpaid - invoice is unpaid. The invoice has not yet been paid and there are no overdue payments. The invoice is still outstanding and awaiting payment. It might take 3-5 business days for us to receive and allocate the payment toward the invoice. You should allow some time for the status change after making a payment.
- Overdue - invoice is overdue. The payment for the invoice is past due and has not been received. You should make the payment as soon as possible.
- N/A – no invoice status. The invoice status is currently unavailable due to an error or other unforeseen issue.
Notifications
The invoice notification banner provides a helpful nudge by displaying a temporary text-box in Merchant Portal, when you have outstanding invoices. With the Invoice Notification Banner, you can easily stay on top of your invoices and take necessary actions in a timely manner.
There are 2 possible banners:
- "You have a new invoice that requires your attention. Please head over to the invoice section to review any new invoices." - When there are new invoices in the last 7 days, the banner will show this message.
- "It looks like you have some outstanding invoices that require your attention. Please head over to the invoice section to review any new or unpaid invoices." - If you have unpaid invoices in your last 50 invoices and no new invoice is less than a week old, the banner will display this message.
The In-Store app will allow you to offer Klarna in your physical store as well as recreate online orders that have expired. Once you have created the order, you will be able to send a link by email, sms or create a QR code so that the client can authorize the transaction as they would normally do online.
The first thing you need to do is setup your store in the ‘My store’ tab. With this configuration, you will be able to add information that will appear by default when creating a new order. You can choose, for example, what references you want to include in each transaction (if you want to include any) and the default tax rate for your goods so that all of this information is automatically applied to any order at the moment of creation. You can also import a list of products that will be used for auto-completion when you write line items on the New order page. Remember to activate auto-capture so newly created orders will be automatically captured. If not activated, you will have to manually capture them from the orders app once created.
Once you have configured your store, creating an order is very easy. First, go to the ‘New order’ tab in the left column and enter all the necessary order lines, the prices, the payment method you want to offer and your own references for the order.
The item name is optional, so you can create an order with just an amount and no article description.
In the ‘Order history’ tab you will be able to see a complete list of all the orders created through the Point of Sale app. The different order statuses that can appear are:
- Completed: the client has completed the payment. This order will also appear in the general Orders app so you have visibility of all the orders together and you can manage it in the same way as the rest.
- Pending: the link to the order has been sent but the client hasn’t yet completed the payment.
- Expired: the link has expired, more than 48h have gone by since it was created and no action has been performed by the client. At this point, if you or the client want to continue with the purchase, a new order should be created.
- Canceled: the order has been canceled by you or the client before it was completed.
- Failed: the order has proved unsuccessful or not approved by Klarna.
The Logs section allows you to inspect the technical communication (API calls) between your back office and Klarna, and vice versa in some cases. This is stored for a given time period of 7 days in order to troubleshoot order-related challenges. You cannot check logs older than 7 days. The Logs section can be used to investigate any order-related technical disturbance or integration issues. The Logs section is not suitable for inspecting API authorization/authentication issues.
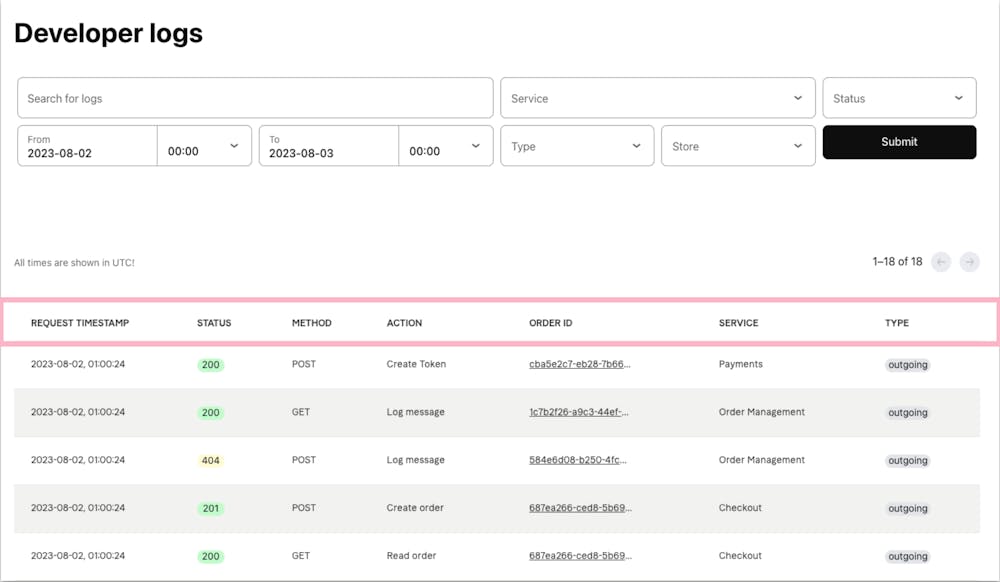
Here you can easily find the search bar and different filters on the top to search for logs matching an API call, for example to the Order Management API. Additionally, clicking on the "ORDER ID" link on each log, allows you to see all related logs to this order id.
- Request Timestamp - Time / Date of Klarna receiving / sending this request in UTC
- Status - HTTP Status Code returned in response to request
- Method - HTTP Request Method
- Action - Human-readable Klarna API action triggered by request
- Order ID - Where available, a Klarna Order ID
- Service - Underlying Klarna Service called
- Type - Outgoing: Merchant -> Klarna, Incoming: Klarna -> Merchant
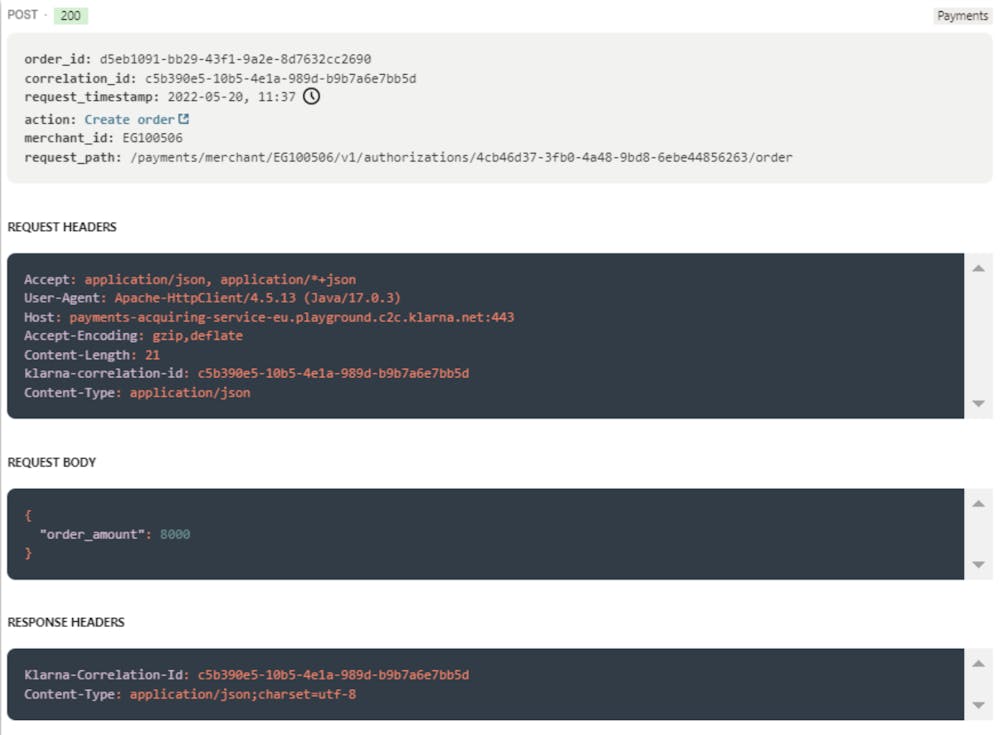
When you click on a log, you will be able to see the page of log detail as the screenshot shown below where the details of a log are displayed. The response status of the API calls in the top left corners shows if the API call was successful or not.
Areas such as the Response Body can be scrolled through for more information.
Service (API product) logs presented in the Logs app differ per environment, access rights and related geographical region.
Additionally, keep in mind that not all possible API "actions" are included in the logs.
Hovering on the clock icon gives you a relative time readout of the message’s timestamp.
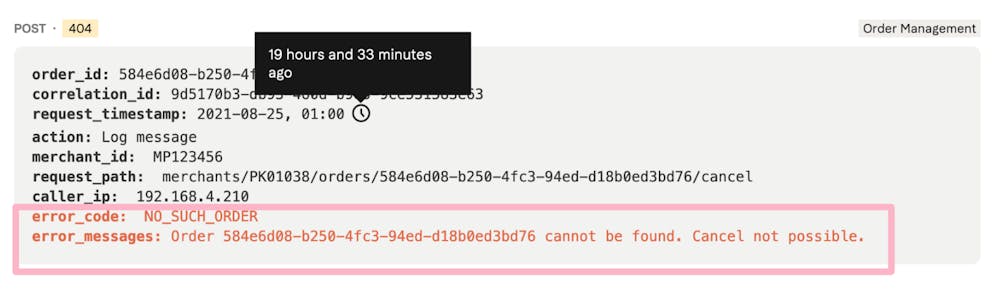
Information related to operations causing errors appears in red
Most operations like Klarna Payments create_session are highlighted with a link to API Documentation for the Klarna API endpoint that supports this operation.

The first user that will receive access to Merchant Portal is the email indicated in the agreement as ‘administrator in Merchant Portal’. This person will receive an activation email once the account has been created within Klarna and it will also be the person in charge of giving access to the rest of the users to Merchant Portal.
Also, the admin permission grants access to any kind of information regarding the account when contacting Merchant Support and also the possibility of making changes to the account such as modifying bank account details for Klarna payouts. (The activation link expires after 7 days).
If the activation link expired, please click the ‘forgot your password’ button in the Merchant Portal login page and follow the steps accordingly.
When accessing the users app, you are going to find a list of all the users that have been sent an invitation. You will also be able to see if the user is active or the activation is pending. Moreover, you have the option to invite new users, delete existing ones or reset the password by sending an email to the user. New users will have to accept or decline an invite when they are assigned a MID. They will see this option in the task list when accessing Merchant Portal.
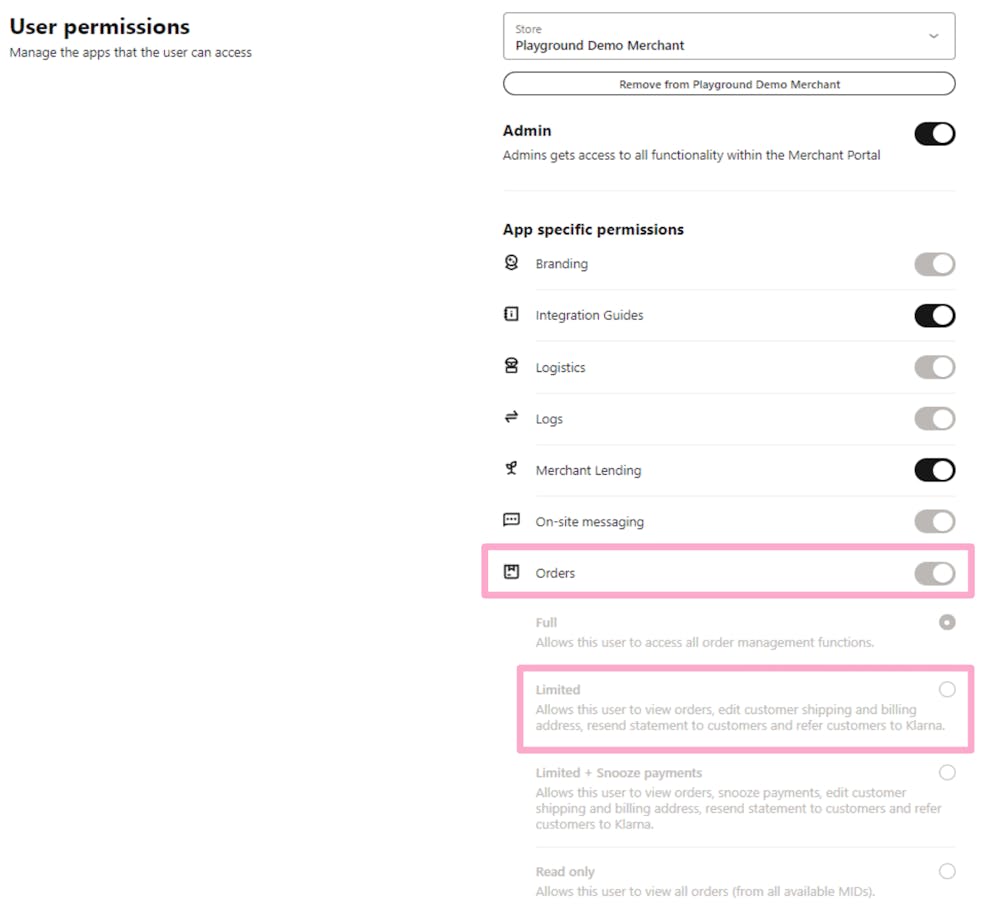
When inviting a new user, you have the option to choose what permissions they should be granted and what apps and sections they should be able to see and manage. In this way, you can invite users from several teams and let them only have access to the sections in Merchant Portal that belong to their working space. For example, in the orders app, users can have full, limited or read only access.
Two-factor authentication (2FA)
Two-factor authentication (2FA) for Merchant Portal acts as an additional layer of security to ensure that only the authorized user can access their account, even if someone else knows their password. It adds an additional step to a user’s login procedure and ensures that it is really the correct user that is logging in. 2FA is mandatory for all users. You can set up 2FA using:
- An authentication app
- SMS
- A browser extension
- An email authentication
The Disputes app is used when there is some sort of issue with an order. A Dispute is when a customer is not willing to pay their order in its current form since they claim that there is something wrong with it. There are 7 types of dispute for Klarna:
- Return
- Already paid invoice
- Incorrect invoice
- Goods not received
- Faulty goods
- Unauthorized purchases
- High risk orders
There are five tabs in the Disputes app:
- Open disputes: You can view escalated disputes where a request has been sent to you to response before deadline.
- Unauthorised: On this page, you will only find disputes with the reason “unauthorized purchases”. These cases are raised, or flagged, by the customer as potential fraud. Therefore, these disputes are more sensitive and have a shorter deadline (7 days) compared to general disputes such as ‘returns’.
- High-risk orders: ‘High-risk orders’ are not raised by a customer, these have been identified as high risk based on Klarna's internal alarm and flagging systems, set in place to protect our merchants from potential fraudulent activities. As the aim for you is to cancel such orders before sending them, these requests are very time-sensitive (4 days to response).
- All disputes: You can find an overview of all disputes raised with Klarna.
- Email settings: You can configure email notifications for disputes so you don’t miss deadlines.
On the ‘All disputes’ page, you can find an overview of all disputes raised with Klarna.
- All: The main overview page, displaying all of your disputes, including any possible dispute status.
- Open: Disputes where our customer service teams stepped in and requested information from you in order to resolve the case.
- No response required: Disputes that have been raised with Klarna, but have not yet been classified as cases that need our customer service support in order to be resolved. This refers only to disputes under the first 21 days after the customer has raised the issue.
- Closed: Disputes that have been resolved. Please note that the dispute with all it’s Merchant/Klarna communication will be removed from the Merchant Portal 90 days after the case was closed.

Search for specific disputes or use filters to narrow down the disputes shown. Click Export Results via a csv file.
- Disputes ID: Number to identify the dispute
- Deadline: by what date and time you need to respond to the dispute. The deadline has date and time.
- Assigned User: In each dispute, you can assign a user from your CS team to each dispute to avoid duplicative efforts. This field indicates who has the dispute assigned.
- Status: This shows the status of the dispute.
Accepting the loss for multiple disputes
On the "Open Disputes" page, you can take action on escalated disputes before going to the individual page. For example, if you don't want to handle disputes with a low value, you can select one or multiple disputes (by checking the box) and click the "Accept Loss" button.
Note that if you select the header checkbox, all disputes in the table (on all pages) will be selected. This checkbox is only selectable if all disputes in the table have the same currency and have a dispute amount available.
To quickly identify and sort disputes you want to accept the loss for, you can sort the "Dispute Amount" (e.g. from lowest to highest) or use the "Dispute Amount" filter.
Please beware: Once you have accepted the loss, the dispute(s) will be closed with a chargeback. Therefore, when clicking the ‘Accept loss’ button you will need to confirm their decision, to accept the loss, one more time.
Submitting response to the dispute
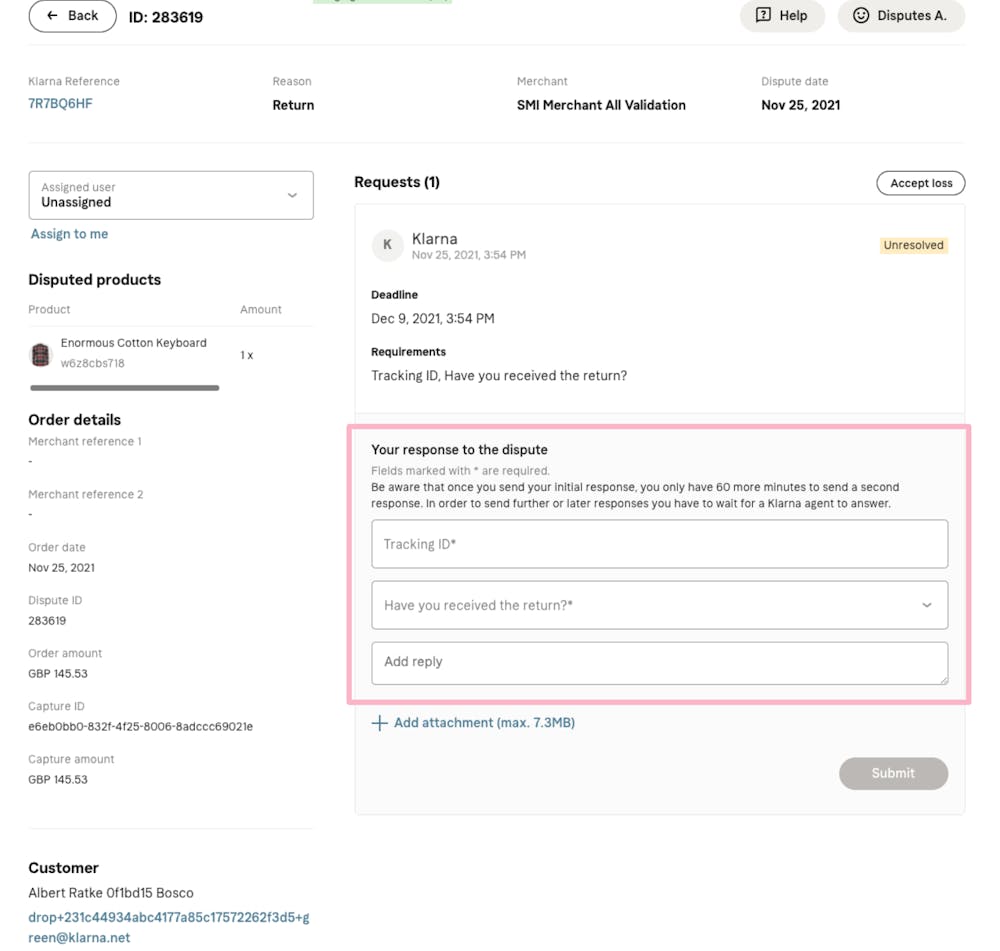
When you open a dispute, you will have a detailed view of the order and the articles that have been disputed (it could be just one or the whole order). You will also be able to see the reason of the dispute, the date it was created and the deadline to answer it.
Klarna will also provide the information obtained from the customer so you have visibility and, when answering to Klarna’s request, you just need to fill in the fields provided. It is mandatory to fill all the fields to be able to submit the answer (if you don’t have all the information, use the fields to explain why). Once you have submitted the response, you will still have 60 minutes to add more information. After these 60 minutes have passed, you will have to wait for Klarna’s answer in order to be able to reply again.
Klarna Reference: View the order details this dispute relates to by redirecting to Orders app.
Assigned user: Your staff can assign disputes to themselves or others in order to better indicate who is working on a specific dispute.
Disputed products: Shows a list of products the consumer selected while disputing. It shows for example, the items the consumer returned or items that were not received.
You can press Accept loss if you don’t have time for the request or if you already know that the customer should not pay for this order.
Requirements: See which information is required by Klarna for your response.
Your response to the dispute: Here you can respond to the requirements in the dispute request.
Submit: After submitting your response you have a 60 minute window for adding any other information. A Klarna agent will then pick up the case and evaluate your answer.
Once a dispute is closed, you can still view the close date, status, closing reason and chargeback amount (for disputes that end up with a chargeback)
However, the dispute with all it’s Merchant/Klarna communication will be removed from the Merchant Portal 90 days after the case was closed
NOTE: You can see these disputes in the ‘Closed’ heading, when opening the ‘All disputes’ page, accessible via the left navigation menu.
Disputes that customers have raised, but do not need any action from you yet, have the status: ‘No response required’. Within these raised disputes, two different banners can be displayed: No response required / Investigation started.
- No response required: a dispute has been raised at Klarna and the customers invoice has been paused. During this stage we encourage the customer to contact you directly to try and solve the dispute without Klarna’s intervention.
- Investigation started: if no resolution could be found between you and the customer, Klarna’s customer service will start an investigation. During this stage no action is required from you. If however, we do need any information from you,
the status will change and you will be able to respond to these disputes in the ‘Open disputes’ page.
You can see these disputes in the ‘No response required’ heading, when opening the ‘All disputes’ page, accessible via the left navigation menu.
Changing the contact email address
- In the Disputes tab, you can change the contact email and for each Merchant ID.
- To make these changes, simply press the Edit button.
- In the Unauthorized Purchases and High-risk orders tabs, the views are a little different.
- You can press the 3 dots under Edit to change the given email address.
- There is also the option to adjust the contact details per Market.
- Make sure you choose an email address that is handled by a group of people to avoid any missed reminders if someone is out of office.
Only users with Admin access can handle the settings in this view. You can add 1 email address for Disputes and several email addresses for Unauthorized Purchases and High-risk orders.
Notifications
- Set up your email notifications for the different Disputes tabs under Notifications.
- Choose the Merchant ID and switch the notifications on or off for all tabs by checking the box Enable notifications.
- Under Notification Preferences you can set up how you wish to receive your reminders via email. These set ups are for each separate category.
Grouped reminder email before expiration: You get the reminder email if there is any unresolved errands about to expire. For general disputes, you will receive notifications 72 hours before expiration. For Unauthorized and High-risk, 24 hours before expiration.
Daily grouped reminder emails: You will get the reminder email every day if you have any unresolved errands.
Email notification for each dispute: You will receive a notification for each dispute you have to response to.
Disabled: Deactivate reminder emails completely.
Available for SE, NO, FI, DK, DE, AT, NL, CH, UK and US only for Klarna Checkout. It gives the client the possibility of choosing different shipping methods at checkout and having tracking information available through Klarna.
This is a product that allows the merchant to apply for a loan and repay it with the sales made through Klarna. Please note that this is only available in the selected countries
This app is only available for merchants that have been onboarded through Klarna’s automatic flow (without contact with our commercial team). In it, there are three sections:
Account: you will be able to check the business information provided to Klarna.
Connect your store: this section allows you to create your API credentials to integrate Klarna to your backend.
Enable settlements: once Klarna is fully integrated, you will be able to provide your bank account details to receive payouts for your sales made with Klarna.