Klarna Payments Overview
The main idea behind Klarna payments is to give merchants the ability to offer Klarna as a payment option to their customers. Because Klarna doesn’t own the entire checkout flow, a check needs to be performed before an order is created.
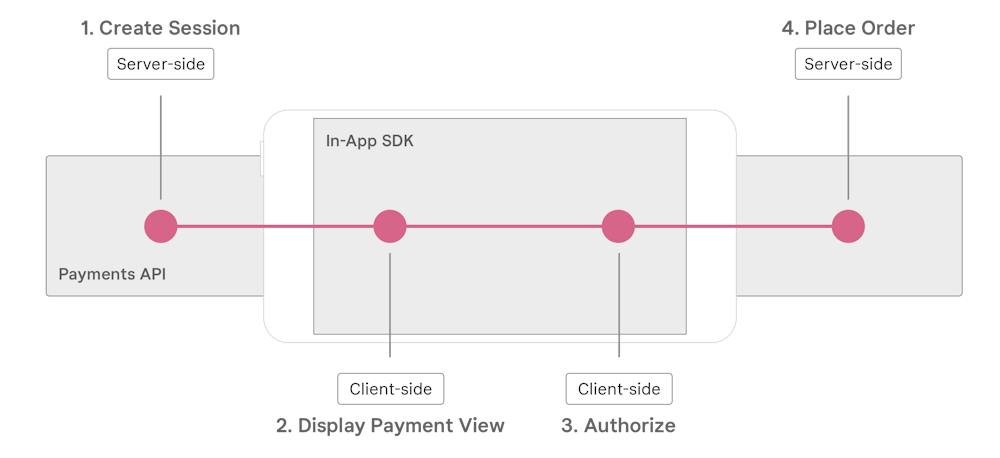
Our goal with this integration is to offer you the same simple development experience as you have on the web. As such, integrating Klarna payments consists of four simple steps:
- Creating a session.
- Rendering the payment view.
- Authorizing the session.
- Creating an order.
We offer a few extra features, if your application’s flow requires it:
- Reauthorizing the session.
- Finalizing the session.
- Showing a payment review.
This guide will explain how all of this works below. And if you’re ready to begin with your implementation, you can follow the iOS guide here, and the Android guide here.
When the user is ready to check out, your app will want to render Klarna’s payment views. These views provide customers with information about Klarna as a payment option.
Before rendering these views, your backend will need to create what we call a “Payment Session” with Klarna. This payment session contains details about your prospective order and customer. A session also contains a Client Token that identifies the session to the SDK.
This step is identical to how you do it when integrating Klarna Payments on the web. You can read more about it here.
You can add payment views to your checkout view at any point, but to render content in them, you’ll need to initialize and load them.
Once you have a client token, you can initialize the payment view in your app. Initializing the view loads resources and configures it before performing any rendering.
In your checkout view, you’ll need to initialize the view with:
- The session token you have from your previous step.
- The payment method category with the value you received from Initializing a payment (it is usually
"klarna"). - A “return URL” the SDK can use, when opening 3rd-party applications to complete payment, to return the user on completion. You can read more about this below.
You can do this by calling the initialize() method on the payment view.
The SDK will call your event listener once initialization is complete. This stage may fail if, for example, the token your app initializes the view with is invalid.
Once the view is successfully initialized, you can load the view. This is the stage at which content will be rendered into the payment view.
This is done by calling load() on the payment view.
Your listener will be notified if the view is loaded. At this stage, we can assume that you have a fully displayed checkout view in your app, presenting Klarna as a payment option and a buy button.
If you’re rendering more than one payment view, you’ll need to track which one the user selected. E.g. by tracking which view is tapped.
Once a user has tapped your buy button, you’ll need to authorize the session with Klarna. Authorizing the session:
- Evaluates whether the order and customer details Klarna has are valid.
- Performs a credit risk assessment.
- Evaluates whether an order can be created.
You can authorize the session by calling the authorize() function on the appropriate payment view.
It’s possible that you have created a session with all the information Klarna needs, but if any information is missing, the SDK may present the customer with a dialog where they can input additional information.
The SDK will call your event listener with the result of the authorization. If it’s successful, you will receive an authorization token that you can create an order with. This token will be valid for 60 minutes.
If you have an authorization token, you can go ahead and create an order.
The user may, in some cases, need to introduce data a second time (e.g. providing a legal authorization, or selecting a bank account). We call this the finalize step.
By default, the SDK performs authorization and finalization automatically after each other, but you can request to perform these separately if the flow in your app requires it. If that’s the case, your listener will be notified with a finalizeRequired parameter set to true.
With the authorization token from the SDK, your backend is ready to create an order.
This stage is performed in your store’s backend. As with session creation, we offer more details about this in our documentation about Klarna Payments, here.
A created order response from the backend contains a URL to a confirmation page. You should render this URL in your app in a web view, as it contains information about the order details that the customer must see.
There are cases when you might want to allow your customer to change their order after it has been authorized (e.g. in some form of order/summary view). In these cases, if the order or customer details have changed, you’ll need to perform a reauthorization.
You can reauthorize the session by calling the view’s reauthorize() method.
We recommend that this method is called as few times as possible. This is because it might prompt the customer for more information as well as because it might trigger additional network requests which might take time.
This should ideally only be called when the “complete order” step of checkout is performed, and then only if the state of the order has changed since authorization.
As with other methods, the SDK will notify your listener with the outcome of the reauthorization.
If the session needs to be finalized, you’ll need to perform this last step to get an authorization token. The finalization should be done just before the purchase is completed, meaning the last step in a multi-step checkout.
You can finalize the session by calling the view’s finalize() method.
You guessed it, your listener will be notified with the outcome of the finalization step.
If your checkout offers the customer an opportunity to review the order after the payment step (e.g. an order review page) it can make sense to present the payment method the customer selected when logging into user account.
This gives the customer a chance to review the payment method and its terms.
Once you have authorized the session, you can create a new payment view, initialize it with the same session token, then call loadPaymentReview() to show an overview of the payment method category that has been authorized.
Only specific payment method categories and countries are currently supported. Contact us to make sure that you can call this method.