
Express button solution has been deprecated.Express button solution has been deprecated. If you're interested in the a Express Checkout experience for Klarna payments, you can learn about our new solution Klarna Express CheckoutKlarna Express Checkout
Using the Klarna Express Button is easy to achieve and will provide a great user experience, just have to follow a few simple steps:
- Create the new Klarna Express Button with the parameters
- Setup event listener methods
- Add the view to the view hierarchy
- Setup the constraints
- Wait for user interaction
In order to initialize the express button the public API exposes the following initialization method which requires 4 parameters that can be later updated via setter methods:
| Parameter | Type | Description |
|---|---|---|
| clientId | String | Your client id. |
| locale | String | A string representing the user locale. |
| returnURL | URL | URL schema as defined in your app’s Plist to return from external applications. |
| eventHandler | KlarnaEventHandler | A listener that receives events generated by the express button, which includes errors or successful responses. |
self.button = KlarnaExpressButton(clientId: <YOUR-CLIENTID>, locale: String, returnURL: URL, eventHandler: KlarnaEventHandler)
To set up additional parameters that might be needed, the KlarnaComponent protocol which the express button implements, exposes a list of variables that can be used to update the values needed.
self.button.environment = .staging
The express button emits events to a handler every time something happens in the process, from initialization to completion. So it is important to pass a handler during init that conforms to the KlarnaEventHandler protocol.
This protocol exposes 2 useful methods, one for error cases and the other for everything else that is not considered an error:
// Events received
func klarnaComponent(_ klarnaComponent: KlarnaComponent, dispatchedEvent event: KlarnaProductEvent) {

}

// Errors received
func klarnaComponent(_ klarnaComponent: KlarnaComponent, encounteredError error: KlarnaError) {

}
self.button.translatesAutoresizingMaskIntoConstraints = false // When using autolayout
view.addSubView(self.button)
self.button.topAnchor.constraintEqual(to: view.topAnchor).isActive = true // or any other constraint method available
These are the predefined names for errors that can happen during the express button setup, or action:
| Error Name | Description |
|---|---|
| KlarnaExpressButtonErrorInvalidParams | Client Id is invalid |
| KlarnaExpressButtonErrorRender | Failed to render Klarna Express Button |
// Errors received
func klarnaComponent(_ klarnaComponent: KlarnaComponent, encounteredError error: KlarnaError) {
      if error.name == KlarnaExpressButtonErrorName.KlarnaExpressButtonErrorInvalidParams {
         // The parameters set for Klarna Express Button are invalid
      }
      if error.name == KlarnaExpressButtonErrorName.KlarnaExpressButtonErrorRender {
         // Rendering the Klarna Express Button has failed
      }
}
The Express Button emits the following events upon user interaction (touch of the button):
| Event Name | Description |
|---|---|
| klarnaButtonUserTappedButton | Received in the handler after user has tapped the button |
| klarnaExpressButtonUserAuthenticated | Informs that the Express Button flow has completed, as well as providing pre-fill data for the user who just completed the flow. |
| klarnaExpressButtonUserAuthenticatedDataToken | Informs that the Express Button flow has completed, as well as providing data token for the user who just completed the flow. |
// Events received
func klarnaComponent(_ klarnaComponent: KlarnaComponent, dispatchedEvent event: KlarnaProductEvent) {
      if event.action == .klarnaButtonUserTappedButton {
         // User tapped the Klarna Express Button
      }
      if event.action == .klarnaExpressButtonUserAuthenticated {
            // User is authenticated. You can read the user details
            // in event.params attribute.
            let userDetails = event.params
}Depending on your preferences, you can customize the Express button to fit the look and feel of your cart page. Klarna offers several theme, label, and shape options to customize the Klarna Express Button's appearance to match the look and feel of your application.
This guideline will help you understand the different options available.
KlarnaButtonTheme
KlarnaButtonTheme enumeration will be used to define which style to be used, depending on either the app’s configuration or the system setting.
| Name | Description | Express Button |
|---|---|---|
| Klarna | Renders the button in the Klarna pink theme. This is the recommended theme as it has the highest brand recognition and the likelihood of usage by your customers. | 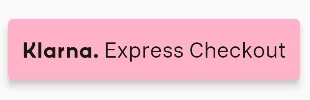 |
| Light | Renders the button in white. It is recommended to use this theme on dark backgrounds. | 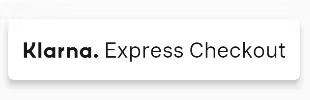 |
| Dark | Renders the button in black. It is recommended to use this theme on light backgrounds. | 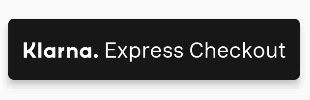 |
| Auto | Automatic theme (light or dark) that will use the system’s user interface style. |
KlarnaButtonShape
In order for the Klarna Express Button to fit into the aesthetic of your application, we offer different button shapes.
| Name | Description | Express Button |
|---|---|---|
| RoundedRect | Renders the button as a rectangle with rounded corners. | .jpg) |
| Pill | Renders the button as a pill-shaped button. | 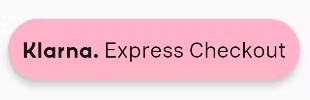 |
| Rectangle | Renders the button as a rectangle with square corners. | 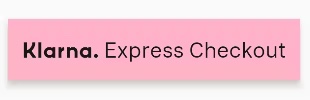 |
KlarnaButtonLabel
KlarnaButtonLabel enumeration will be used to select which label you wish to be shown on the button.
| Name | Description | Express Button |
|---|---|---|
| KlarnaProduct | Renders the button with this product’s specific label which is “Klarna. Express Checkout”. | |
| Klarna | Renders the button only with Klarna logo. |  |