

Mobile SDK integration
Integrate Klarna via Mobile SDK by embedding the payment form, tracking payment status, and completing authorization flows for a smoooth mobile checkout experience.
Prerequisites
Before you integrate, check that you meet the following prerequisites:
- Ensure that you have Klarna enabled with your Acquiring Partner.
- Confirm you have access to the Klarna Portal.
- Inside Klarna Portal:
- Confirm that you have generated a client identifier.
- Confirm that you have generated an API key.
- Confirm that you have registered webhooks for
payment.request.state-change.completedevents following Webhooks guidelines. - Add Terms and Conditions for client-side SDK usage.
- Your Acquiring Partner supports
interoperability_tokenexchange for client-side use with Klarna.
Integration overview
This guide will cover both iOS (Swift) and Android (Kotlin) integrations.
Here's an overview of all the steps to processing a payment with Klarna via the Mobile SDK:
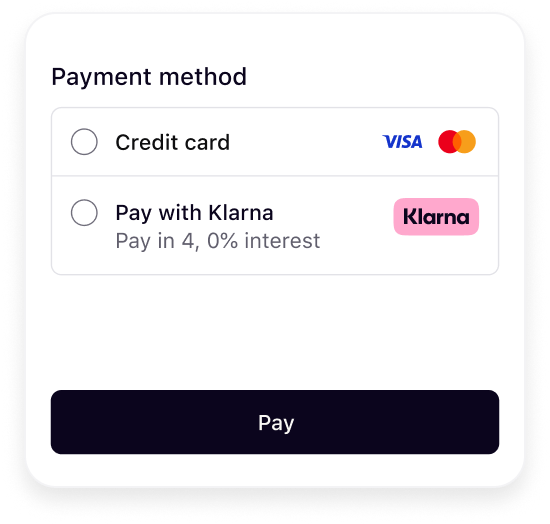
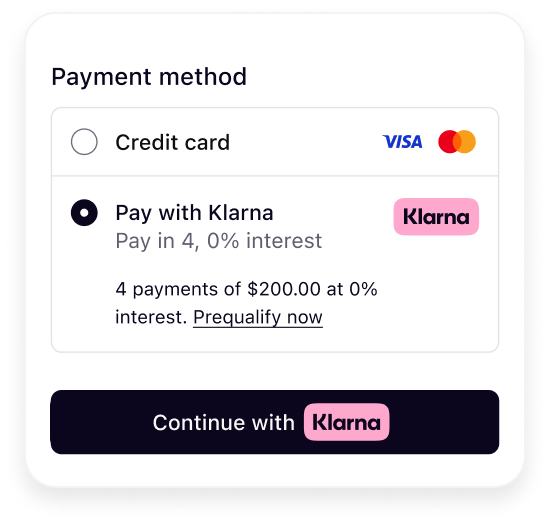
- Present Klarna as a payment option in the payment form.
- Customer clicks the Klarna payment button in your checkout.
- You create either a server-side payment request with your Acquiring Partner or use the Klarna Mobile SDK to initiate the payment request, sharing all available interoperability data points.
- If customer interaction is required:
- The Klarna Purchase Journey is launched.
- The customer completes the Klarna Purchase Journey.
- Klarna returns an
interoperability_tokenvia a webhook. - You create an authorization request with your Acquiring Partner and share the required interoperability data points.
- Acquiring Partner responds with an approval and order completion.
- Customer is redirected to your confirmation page.
Integration details
Present Klarna in the payment form
Integrate the Klarna Mobile SDK to display Klarna as a payment option within your own payment form. This approach lets you fully control the checkout experience while using Klarna’s ready-made UI components for secure payment handling.
This guide explains how to present Klarna in your payment form, both during the initial load and after the customer selects Klarna. By following these steps, you’ll ensure the payment flow meets Klarna’s design and functionality standards:
| Initial presentation | When Klarna is selected |
It's crucial that Klarna payment presentation is dynamic and not hardcoded on your server to deliver the best conversion outcome.
Klarna's best practice
To ensure the best user experience and optimal conversion rates when presenting Klarna as a payment option, please apply the following recommendations:
- Present Klarna dynamically alongside other payment options in your payment form.
- Embed Klarna’s UI elements directly in your frontend for a consistent and responsive design.
The next sections in this guideline will walk through how this can be achieved using Klarna Mobile SDK [link to public APIs].
Import the Mobile SDK
iOS
Swift Package Manager
To add the required dependency, do the following steps:
- In Xcode, select File → Add Package Dependencies...
- In the opened window, enter
https://github.com/klarna/klarna-mobile-sdk-iosin the search bar. - For Dependency Rule, select Up to Next Major Version and leave the default version as is.
- For Add to Project, select your project.
- Click Add Package.
- In the new window that opens, add
KlarnaNetworkPaymentto your desired target.
Cocoapods
First, add the Klarna Mobile SDK's Payment module dependency to your Podfile by running the following command:
pod "KlarnaMobileSDK/KlarnaNetworkPayment"
Next, run the command below and then you should be able to import KlarnaMobileSDK module in your workspace and start using it.
pod install
Android
Kotlin
First, add the Klarna Mobile SDK Maven repository:
repositories {
    maven("https://x.klarnacdn.net/mobile-sdk/")
}
Next, add the Klarna Mobile SDK's Payment library as a dependency to your application:
dependencies {
     implementation("com.klarna.mobile.sdk:klarna-network-payment:<LATEST_VERSION>")
}
To find the latest version you can always refer to this link.
Groovy
First, add the Klarna Mobile SDK Maven repository:
repositories {
    maven {
        url 'https://x.klarnacdn.net/mobile-sdk/'
    }
}
Next, add the Klarna Mobile SDK's Payment library as a dependency to your application:
dependencies {
    implementation 'com.klarna.mobile.sdk:klarna-network-payment:<LATEST_VERSION>'
}
To find the latest version you can always refer to this link.
Initialize the Mobile SDK
The first step to add Klarna Payment to your application is to initialize the Klarna SDK:
The following table lists the properties of KlarnaConfiguration.
| Name | Type | Presence | Description |
|---|---|---|---|
|
| required | The client ID of the partner account that is integrating the Mobile SDK. If the integration is done by a PSP/DP then this must be set to the distribution partners own client ID. |
|
| optional | The default locale (ISO 3166-1 alpha-2) that will be used by the SDK. If not set, the locale of the device will be used. |
|
| optional | The SDK token allows the SDK to be initialized with an existing session. Token is only retrievable server-side via the Interoperability API. |
Exchange an interoperability token for an SDK token
This step is only applicable if you are in possession of an interoperability token.
The SDK token is a single-use, browser-bound credential that restores the customer’s checkout context when Klarna’s Mobile SDK is initialized. This token should be exchanged server-side before initializing the SDK and displaying the checkout view to the customer.
You must exchange the acquired interoperability token for a short-lived SDK token using the generateSdkToken![]()
Consult the API reference for generateSdkToken![]()
Klarna payment presentation request
Klarna payment presentation provides all the visual assets, localized texts, and instructions needed to correctly display Klarna in your checkout screen.
To fetch the payment presentation, you need to call the KlarnaPaymentPresentation.fetch() method like below:
The following table lists the parameters of KlarnaPaymentPresentation.fetch() method.
| Name | Type | Presence | Description |
|---|---|---|---|
|
| required | Specifies the data that is used to tailor the payment presentation content. |
|
| required | The callback to get notified of the result of payment presentation fetch. |
The table below lists the properties of KlarnaPaymentPresentationData:
| Name | Type | Presence | Description |
|---|---|---|---|
|
Int64 (iOS) | required | The transaction amount in minor units following ISO 4217 exponents (e.g., $118.00 = 11800, ¥1400 = 1400). |
|
| required | Three-letter ISO 4217 currency code (e.g. USD, EUR). |
|
[KlarnaIntent] (iOS) | optional | Specifies the intent of the payment presentation content for your use case. It can be used when you need presentation elements tailored to specific payment scenarios. |
|
| optional | Specifies the interval of which the customer is charged for the subscription. |
| <code>Int<code> | required if the interval is set | Defines the subscription interval frequency. |
Klarna payment presentation response
After a successful payment presentation fetch, you will get an instance of KlarnaPaymentPresentationContent containing the full Klarna branding package and instructions that can be used to present Klarna as a payment option.
Follow Klarna payment presentation instruction
This section explains how to handle Klarna’s payment presentation instructions, which define how Klarna should appear within the checkout form. Adhering to these instructions is essential to maintain a consistent and optimized user experience—whether Klarna is displayed alongside other payment methods, preselected, or shown as the only available option.
Compliance with Klarna’s presentation instructions is especially important when integrating Klarna Conversion Boost features, such as Express Checkout or Sign in with Klarna, to ensure a seamless and unified customer experience.
The instruction property available in KlarnaPaymentPresentationContent can have the following possible values:
| Name | Description |
|---|---|
| Show Klarna alongside other payment methods. |
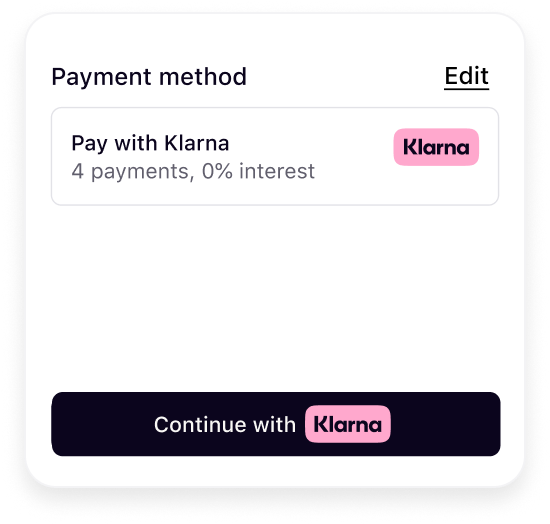
| Show Klarna pre-selected but still alongside other payment methods. This is returned when using the customer_token issued from the Sign in with Klarna feature or the tokenization flow. |
| Show Klarna as the only payment method. This is returned when the customer has finished the first step of multi-step Klarna Express Checkout. |
Skip this section if you don't use any Conversion Boost features from Klarna such as Klarna Express Checkout, Sign-in with Klarna, Klarna Messaging or Klarna Prequalification.
Here are example outcomes illustrating how Klarna should be displayed for each instruction:
 |  |  |
| Show Klarna | Preselect Klarna | Show only Klarna |
The presentation instructions are derived from possible customer purchase journeys described in the following article.
The following code snippet shows an example of how instruction can be used to decide how to present Klarna as a payment option.
Mount Klarna payment option components
After fetching the payment presentation, you have access to an instance of KlarnaPaymentPresentationContent. It can be used to present Klarna as a payment option. The Klarna payment option must be rendered in the payment selector according to Klarna’s presentation guidelines.
The following table lists the properties of KlarnaPaymentPresentationContent.
| Name | Type | Presence | Description |
|---|---|---|---|
|
| required | Specifies how Klarna should be displayed as a payment option (e.g., whether to show, preselect, or display as show-only). Adhering to these payment presentation instructions ensures customers have the best possible experience and optimizes conversion rates. |
|
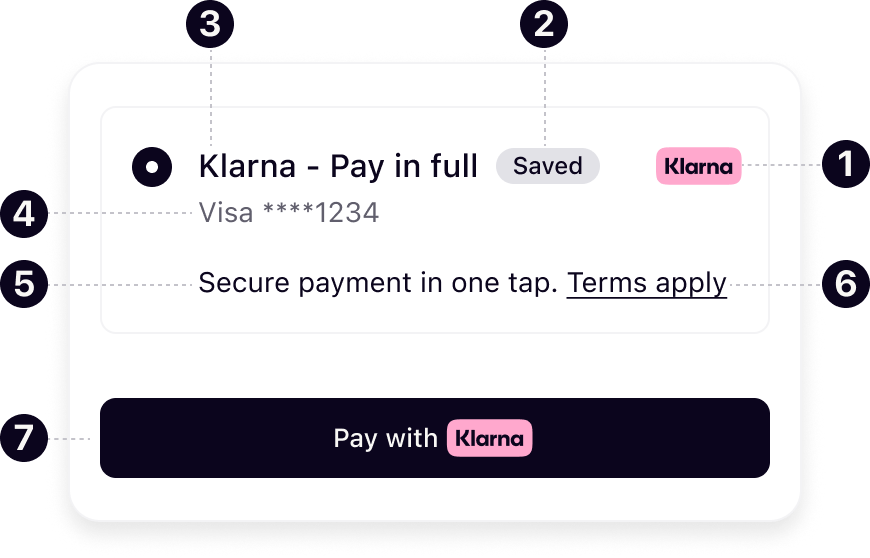
| optional | Specifies the default payment option applicable to all purchase types. It includes the visual elements required to represent Klarna during checkout. |
|
| optional | Specifies the payment status of the presentation. |
The KlarnaPaymentPresentationPaymentOption type has the following properties:
| Name | Presence | Description |
|---|---|---|
| required | The identifier of the payment option. This value is required to be sent to the Payment Authorize API or the Payment Request API when initiating the payment. |
| optional | The main descriptor that introduces Klarna in the payment form. The value will be dynamically adjusted based on the locale provided when you initialized the Klarna SDK. |
| optional | The sub-header descriptor that must be loaded inline below the main descriptor header. It's a short and enriched descriptive text that provides transparency on available options like installments, pay later, etc. |
| optional | Enriched tailored description with link. |
| optional | Badge used for saved options or promotions. |
| optional | Defines terms/disclosures potentially with links. |
- icon
- badge
- header
- subheader
- message
- terms
- button
Present the Klarna payment option elements within your Klarna payment method view to render them in the payment form. The code snippet below shows a very basic sample of how you can do so:
Handle Klarna payment option selection and deselection
When a Klarna payment option is selected/deselected, ensure the additional visual components are shown/hidden properly.
Handling Links in the Message
The message contained within the payment object contains two different classifications of links as set forth by the context value.
| Context Value | Purpose |
|---|---|
| This indicates that the content of the URL is purely informational. |
| This value indicates that the content of the URL requires customer authentication. |
Due to the authentication requirements associated with the auth context, it is necessary for the link to be opened in a non-ephemeral ASWebAuthenticationSession on iOS and a CustomTab on Android. By contrast, info context links can be opened in any WebView. To simply the requirements associated with properly handling these links, we have created the following method for you to call.
The following table lists the parameters of KlarnaPaymentPresentation.handleLink() method.
| Name | Type | Presence | Description |
|---|---|---|---|
|
| required for Android only | The Activity instance of your app. |
|
| required | The presentation content that you've already fetched using the KlarnaPaymentPresentation.fetch() method. |
|
| required | The URL to handle. |
|
| required | The callback to get notified of the result of payment presentation link handling. |
Rendering the Klarna payment button
The Mobile SDK provides a native UI view called KlarnaPaymentButton that follows Klarna's visual identity.
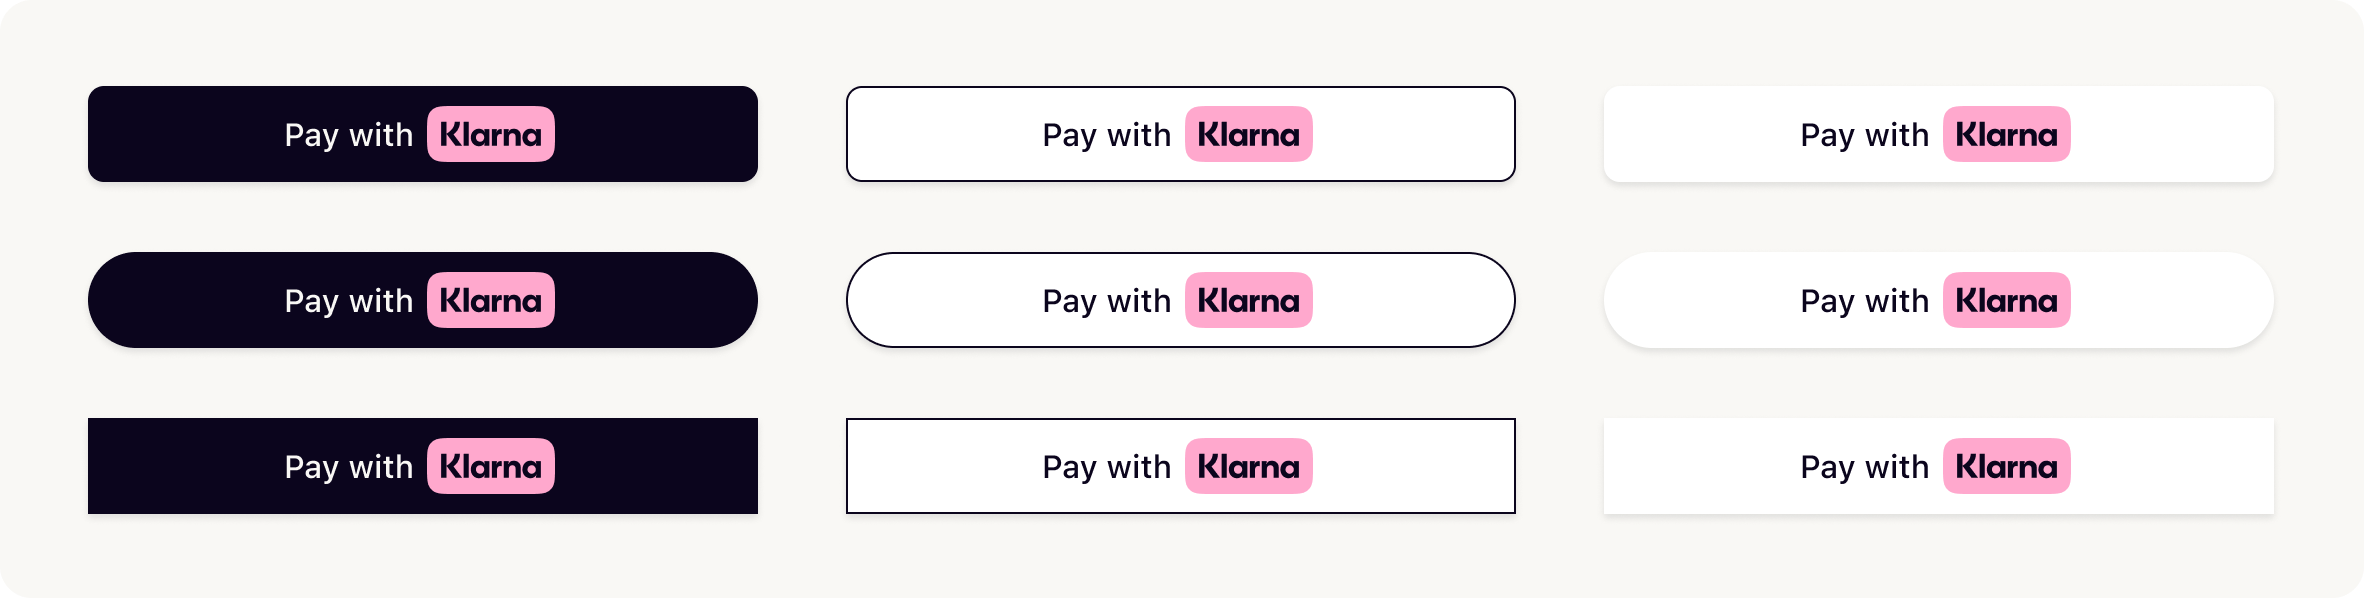
Klarna payment button variants
Choose the theme and shape of the payment button to best fit into your online store in a way that complements your brand and encourages user engagement. More details on the button styling can be found here.
Creating Klarna payment button
To add the Klarna payment button to your app you can do something like below:
The table below list the properties of KlarnaPaymentButtonConfiguration:
| Name | Type | Presence | Description |
|---|---|---|---|
|
| optional | Sets the initial state of the button. If not set, "default" will be used. |
|
| optional | Defines the shape of the button. If not set, "rounded rect" will be used. |
|
| optional | Defines the style of the button. If not set, "filled" will be used. |
|
| optional | Defines the theme of the button. If not set, "dark" will be used. |
|
[KlarnaIntent] (iOS) | optional | Defines the intent(s) that the payment button will be used for. |
Handle payment button tap
When the payment button is tapped, you should initiate the payment request process. This is done by calling the KlarnaPayment.initiate() method. There are two options for initiating the payment request using the initiate() method:
- Client-side, sharing the details of customer's checkout session (
paymentRequestData) when calling theinitiate()method. - Using the Klarna
payment_request_idassociated with the customer's checkout session that was generated server-side via your Acquiring Partner.
Client-side payment request initiation
In client-side payment request initiation, you pass all the data needed to create and initiate a payment request to the Mobile SDK and the Mobile SDK takes care of creating and initiating the payment request.
The following table lists the parameters of KlarnaPayment.initiate() method.
| Name | Type | Presence | Description |
|---|---|---|---|
| Activity | required for Android only | The Activity instance of your app. |
| KlarnaPaymentRequestData | required | The data needed to create and initiate the payment request. |
| KlarnaPaymentRequestCallback | required | The callback to get notified of the result of payment request initiation. |
The table below lists all the properties of KlarnaPaymentRequestData.
| Parameter | Presence | Description |
|---|---|---|
| required | Three-letter ISO 4217 currency code (e.g., USD, EUR). |
| required | Total amount of a one-off purchase, including tax and any available discounts. The value should be in non-negative minor units. Eg: 25 Dollars should be 2500. |
| optional | Reference to the payment session or equivalent resource created on the integrator's side. |
| optional | Provides additional details about the transaction to help reduce fraud risk and enhance transparency. |
| optional | Configure how the shipping collection form will behave in the purchase flow. Without the shipping config, no shipping collection form will be displayed. |
| optional | Object to request customer account linking to be set up, effectively returning a token called customer_token on successful confirmation of the payment request. |
Server-side payment request initiation
Call the Payment Request API to initiate a transaction. If customer verification is required, Klarna processes the request and creates a unique payment identifier for tracking. The payment request is then returned in the SUBMITTED state with the interaction details needed to complete the payment flow.
Request
{{#lst:Klarna Docs - Payment Request - Content Source|payment request: create: request: one-time payment}}
Configure customer interaction parameters
When integrating Klarna’s purchase flow, it’s essential to define how the customer should be redirected after completing or exiting the Klarna experience. Depending on whether the flow runs in a web or mobile app environment, Klarna uses one or both return URLs to ensure a seamless handoff back to the Partner’s experience.
The parameters return_url and app_return_url specify where Klarna should redirect the customer once the interaction ends—whether they’ve approved or aborted the purchase. Correctly configuring these URLs ensures that customers always return to the appropriate context (webpage or mobile app) and can smoothly continue the checkout or post-purchase process.
| Parameter name | Description |
|---|---|
| If the Klarna purchase flow is launched in a web environment, Klarna will redirect the customer to this URL after the customer finishes their interaction with Klarna, either by approving or aborting the purchase flow. This could either be a URL from the Acquiring Partner who will handle the redirection logic or a URL collected from the Partner. | |
The customer may be redirected to a third party app (bank app) or the Klarna app during the Klarna purchase journey on mobile environments. This URL enables Klarna to return the customer back to the Partner’s mobile app. Ensure the app_return_url is set up to register a URL scheme (e.g., partnerapp://klarna) or universal link that resumes the payment flow. The Partner is expected to open the integrating mobile application in its last state (no state changes or deeplink navigations). |
Visual representations for Web flow and App handover flow:
 |  |
| Web handover | App handover |
return_url and app_return_url are not mutually exclusive
In different scenarios, either or both of the return_url and app_return_url can be triggered:
Example 1: Only return_url is triggered – Pure web flow
The customer starts the Klarna purchase flow in a web browser on a desktop. After approving the purchase, they are redirected to the return_url.
Example 2: Only app_return_url is triggered – App-to-app flow
The Partner’s native mobile app opens the Klarna purchase flow using a universal link. If the Klarna app is installed, the customer is taken directly into the Klarna app. After approval, they are redirected to the app_return_url, returning them to the Partner's app.
Example 3: Both URLs are triggered – WebView flow with app handover
The Partner’s native mobile app starts the Klarna purchase flow in a System WebView. If the customer needs to authenticate via an external banking app, they’re handed back to the Partner's app using app_return_url. They then resume the purchase flow in the WebView and, upon completion, are redirected to the return_url.
Provide supplementary purchase data
Supplementary Purchase Data refers to additional transaction details shared with Klarna that provide greater context about a purchase. These data points—such as line items, subscription details, or industry-specific attributes—help improve underwriting accuracy, fraud assessment, and the customer’s post-purchase experience. They may be required in certain industries and support multiple use cases, including better acceptance rates, enhanced fraud prevention, improved customer experiences within the Klarna app, and more effective risk monitoring.
Data requirements
Depending on the business type, certain supplementary_purchase_data fields are required under the Klarna Network Rules. However, purchase_reference, line_items, customer and shipping whenever available must always be submitted, as they enable transaction-level traceability, power Klarna’s fraud prevention and underwriting models, dispute handling, and ensure a consistent customer experience across Klarna’s ecosystem.
Response
/v2/accounts/{partner_account_id}/payment/requests| Parameter | Required | Description |
|---|---|---|
state | Yes | The current state of the Payment Request.
|
payment_request_id | Yes | The unique identifier for the payment request. This is the identifier you will use to reference the payment request in subsequent API calls. You should not make any assumption about the format of this identifier, you should treat it as an... Show more |
expires_at | Yes | The expiry time of the payment request. After this timestamp the payment request will be canceled and deleted. |
currency | Yes | Currency in ISO 4217 format. |
amount | No | Total amount of a one-off purchase, including tax and any available discounts. The value should be in non-negative minor units. Eg: 25 Dollars should be 2500. This is the amount that Klarna will charge the customer for a one-off purchase. S... Show more |
When the request succeeds, Klarna returns a payment request in the SUBMITTED state.
The response includes:
payment_request_id— a unique identifier for the payment request.payment_request_url— the URL used to initiate the customer’s purchase journey.
Sample payload
{
  "payment_request_id": "krn:payment:eu1:request:10be1d49-7beb-6b24-b9dd-8c14d0528503",
  "state": "SUBMITTED",
  "state_context": {
    "customer_interaction": {
      "method": "HANDOVER",
      "payment_request_id": "krn:payment:eu1:request:10be1d49-7beb-6b24-b9dd-8c14d0528503",
      "payment_request_url": "https://pay.klarna.com/l/ZjW2Xipgh0tjbrBGD7hzJM"
    }
  },
  "expires_at": "2025-02-26T17:25:34.534721775Z",
"created_at": "2025-02-24T17:25:34.534721775Z",Once you have created the payment request, take the payment_request_id from the server-side response and provide it in the Mobile SDK initiate method as highlighted in the code below.
| Name | Type | Presence | Description |
|---|---|---|---|
| Activity | required for Android only | The Activity instance of your app. |
| String | required | The ID of the payment request that has been created server-side. |
| KlarnaPaymentRequestCallback | required | The callback to get notified of the result of payment request initiation. |
Optional functionality available via the Mobile SDK
Klarna payment request fetching
To get the information associated with a payment request, you can use the KlarnaPayment.fetch() method. The following code shows a sample implementation:
The following table lists the parameters of KlarnaPayment.fetch() method.
| Name | Type | Presence | Description |
|---|---|---|---|
|
| required | The ID of the payment request to fetch. |
|
| required | The callback to get notified of the result of payment request fetch. |
Klarna payment request cancelation
To cancel a payment request, you can use the KlarnaPayment.cancel() method. The following code shows a sample implementation:
The following table lists the parameters of KlarnaPayment.cancel() method.
| Name | Type | Presence | Description |
|---|---|---|---|
|
| required | The ID of the payment request to cancel. |
|
| required | The callback to get notified of the result of payment request cancelation. |