

Integrate Klarna’s Web SDK to deliver a seamless, optimized checkout experience on your site. Initialize the SDK, present Klarna in the payment selector, and finalize the flow with Klarna’s payment button.
Overview
This guide explains how to integrate the Klarna Web SDK to (1) display Klarna as a payment option during checkout, (2) start the payment process, and (3) transfer authorization to Worldline. This flow is designed for one-time payment scenarios, where customers initiate payments directly from the Partner’s user interface.
This integration approach applies only when you build and control your own payment form within the checkout. It provides full ownership of the customer experience while Klarna delivers ready-made UI components to manage the payment interface.
What you'll build
- Dynamic presentation of Klarna as a payment option.
- A payment process which launches the Klarna Purchase Journey.
- Return to the checkout and authorization via Worldline.
Out of scope
- Tokenized payment flows.
- Fully server‑side or native mobile SDK integrations.
Prerequisites
Before you integrate, check that you meet the following prerequisites:
- Ensure that you have Klarna enabled with Worldline.
- Confirm you have access to the Klarna Portal.
- Inside Klarna Portal:
- Confirm that you have generated a client identifier with your domain URL allowlisted.
- Confirm that you have generated an API key.
- Confirm that you have registered webhooks for
payment.request.state-change.completedevents following Webhooks guidelines. - Add Terms and Conditions for Web SDK.
Subscribing to webhooks in the Klarna Portal will be available in a future release.
Integration overview
Here's an overview of all the steps to display Klarna and initiate payments via the WebSDK:
- Present Klarna as a payment option in the payment form.
- Customer clicks the Klarna payment button in your checkout.
- You create a server-side payment request to Klarna and share available interoperability data points.
- If customer interaction is required, Klarna returns a
payment_request_id.- The
payment_request_idis used to initiate the purchase flow with Klarna’s WebSDK. - The Klarna purchase journey is launched.
- The customer completes the Klarna purchase journey.
- The
- Klarna returns an
interoperability_tokenvia webhook. - You create an authorization request with Worldline and share the required interoperability data points.
- Worldline responds with an approval and order completion.
- Customer is redirected to your confirmation page.
Integration details
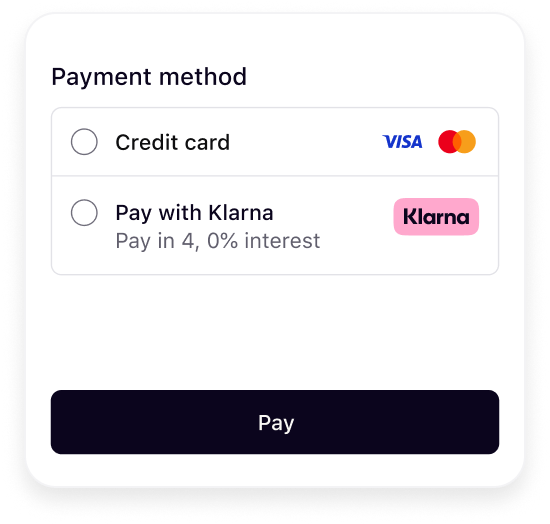
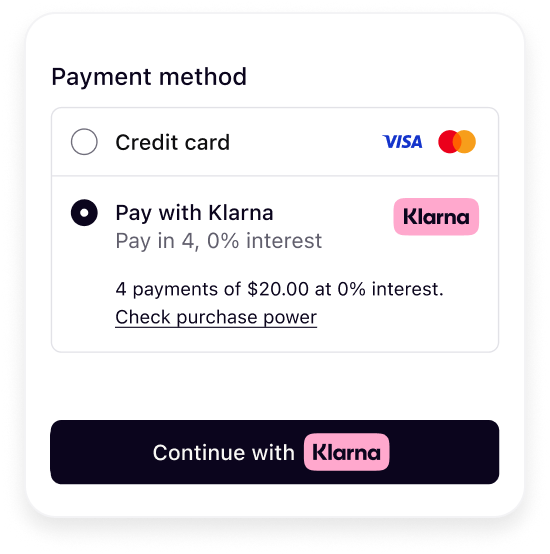
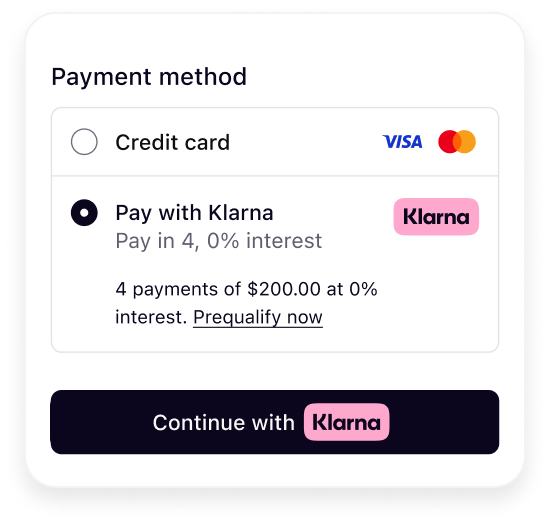
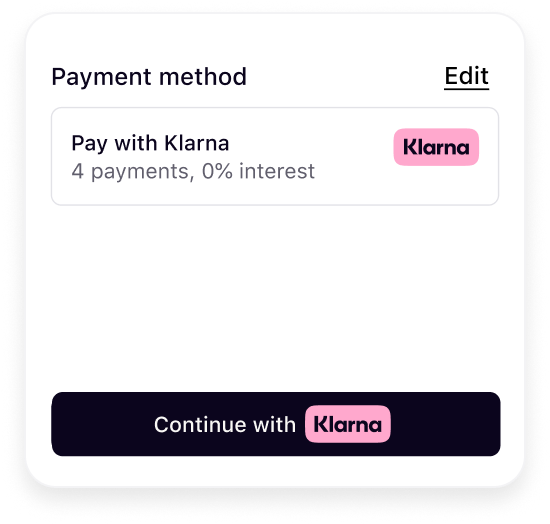
Present Klarna in the payment form (frontend)
Presenting Klarna in the payment form involves retrieving the visual assets, localized text, and display instructions required to correctly render Klarna as a payment option and display the payment button. This dynamic presentation ensures a consistent customer experience, accurate localization, and optimized conversion performance, while adapting seamlessly to different checkout states.
On a high level, the process involves:
- Initialize Klarna Web SDK in your checkout experience.
- Request Klarna’s payment presentation for the current payment context.
- Render Klarna payment option(s) dynamically in the payment form according to the instructions.
- Allow the customer to select and deselect a Klarna payment option.
- Display the Klarna button and start the payment process when clicked.
The expected outcomes are as follows:
 |  |
| Initial presentation | When Klarna is selected |
Klarna's payment presentation best practice
To ensure the best user experience and optimal conversion rates when presenting Klarna as a payment option, please apply the following recommendations:
- Display Klarna descriptor dynamically alongside other payment options in your payment form.
- Embed Klarna’s UI elements directly in your frontend for a consistent and responsive design.
The next sections in this guideline will walk through how this can be achieved using Klarna Web SDK.
Initialize the Web SDK
The Klarna Web SDK (klarna.mjs) follows the JavaScript module approach and should be included in places where you need to have a reference to the SDK such as while rendering any components or initiating a payment flow. Here are the initialization parameters:
| Parameter | Presence | Description |
|---|---|---|
| required | A credential used to identify the Partner, which can be obtained from the Klarna Portal. To ensure the credential functions properly, make sure to register all domains where the Web SDK will be used. |
| optional | An array used to specify which products should be loaded to optimize performance by limiting the amount of data downloaded. If the PAYMENT product is included, only the Klarna.Payment package will be loaded. If the products array is omitted, all available packages will be loaded by default. |
| optional | Language and region code (e.g., en-US). If omitted, Klarna may default based on the customer’s browser settings. |
| optional | The short-lived token exchanged from the klarna_network_session_token. Enables restoring the customer's session state securely on the client. |
For the full API specifications, refer to Klarna Web SDK.
SDK initialization sample
<script type="module">
  const { KlarnaSDK } = await import("https://js.klarna.com/web-sdk/v2/klarna.mjs")

  const Klarna = await KlarnaSDK({
    clientId: "[client-id]",
    products: ["PAYMENT"],
    locale: "en-US", // optional
  })

  // Klarna SDK ready to be utilized
  // Klarna.Payment.button().mount('#payment_container')
</script>If the domain is not registered, subsequent method calls will result in an error.
- Load the Web SDK from https://js.klarna.com/web-sdk/v2/klarna.mjs to remain compliant.
- Keep the SDK in the top‑level (1st‑party) browsing context.
- Specify products for performance.
- Disclose Web SDK tracking in your site’s notices. Learn more here.
- Don’t include the Web SDK in a bundle or host it yourself.
- Don't load the Web SDK inside an iframe.
- Don't omit products.
- Don't use the Web SDK without disclosing tracking technologies.
Request payment presentation
Klarna payment presentation provides all the visual assets, localized texts, and instructions needed to correctly display Klarna in your checkout form.
Use the initialized SDK instance to call the Klarna.Payment.presentation() method.
Basic checkout context parameters must be provided:
| Parameter | Presence | Description |
|---|---|---|
| conditional | The transaction amount in minor units following ISO 4217 exponents (e.g., $118.00 = 11800, ¥1400 = 1400). This field is required if any of the intents include PAY, SUBSCRIBE, or DONATE; otherwise, it is optional. |
| required | Three-letter ISO 4217 currency code (e.g., USD, EUR). |
| optional | Locale code to localize texts and formats (e.g., en-US, de-DE). If you don’t set this, it will automatically use the value chosen when you first set up the Web SDK. If that’s not available, it will use your browser’s settings instead. |
| optional | Specify the intent of the checkout flow: PAY, SUBSCRIBE, SIGNUP, SIGNIN, DONATE, ADD_TO_WALLET.If omitted, intents defaults to ["PAY"]. |
For the full API specifications, refer to Klarna Web SDK.
Performance optimization
It is important to ensure that Klarna is displayed at roughly the same time as other payment methods, with an acceptable delay of less than 100 ms. To achieve this, begin initializing the Klarna Web SDK and invoke the payment presentation method concurrently while loading the list of all enabled payment methods from your server.
Sample code
const paymentPresentation = await klarna.Payment.presentation({
  amount: 11800,
  currency: "USD",
  locale: "en-US",
  intents: ["PAY"]
});
Render Klarna according to instructions
The PaymentPresentation interface provides the full Klarna branding package and instructions tailored to the customer's purchase:
| Attribute | Presence | Purpose |
|---|---|---|
| required | Specifies how Klarna as a payment option(s) should be displayed (e.g., whether to show, preselect, or display as show-only). Adhering to these payment presentation instructions ensures customers have the best possible experience and optimizes conversion rates. |
| optional | Defines the default payment option applicable to all purchase types. This object includes the visual elements required to represent Klarna during checkout. |
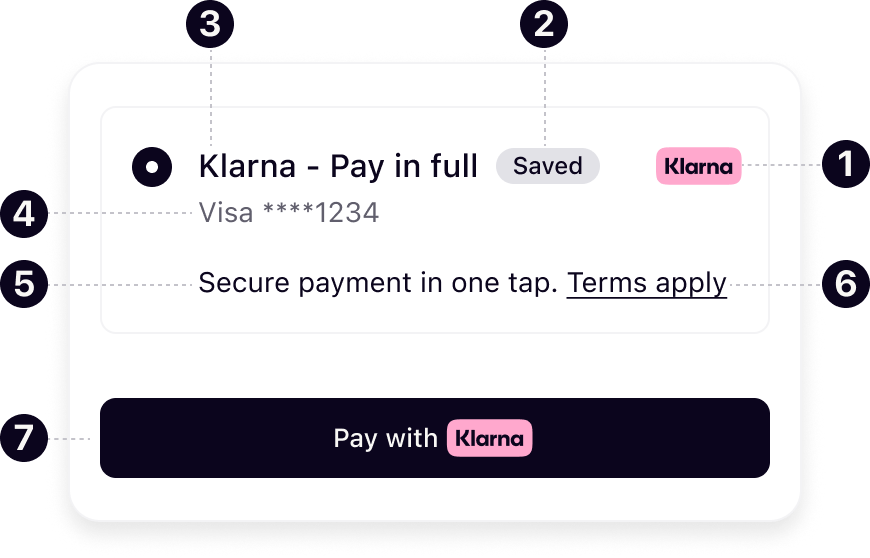
The paymentOption object structure is as follows:
| Attribute | Presence | Purpose |
|---|---|---|
| required | The identifier of the payment option. The value is required to be sent to the Payment Authorize API or the Payment Request API when initiating the payment. |
required | Klarna badge/logo suitable for checkout forms. | |
required | The main descriptor that introduces Klarna in the payment form. The value will be dynamically adjusted based on the locale provided. | |
| required | The descriptor subheader which must be loaded inline below the main descriptor header. Short and enriched descriptive texts. Provides transparency on available options like installments, pay later, etc. |
| optional | Enriched tailored description with link. |
| optional | Badge used for saved options or promotions. |
| optional | Defines terms/disclosures potentially with links. |
| required | Payment button that starts the Klarna purchase journey. |
For the full API specifications, refer to Klarna Web SDK.
Follow the payment presentation instruction
This section describes how to apply Klarna’s payment presentation instructions, which define how Klarna should appear in your checkout. Following these instructions ensures a consistent experience across payment states and is required for features like Klarna Express Checkout and Sign in with Klarna.
The instruction attribute has the following values:
| Instruction | Description |
|---|---|
| Show Klarna alongside other payment methods. |
| Show Klarna pre-selected but still alongside others. This is returned when using the customer_token issued from the Sign in with Klarna feature or the tokenization flow. |
| Show Klarna as the only payment method. This is returned when the customer has finished the first step of Klarna Express Checkout multistep. |
For the full API specifications, refer to Klarna Web SDK.
Skip this section if you don't use any Conversion Boost features from Klarna such as Klarna Express Checkout, Sign-in with Klarna, Klarna Messaging or Klarna Prequalification.
Here are example outcomes illustrating how Klarna should be displayed for each instruction:
|  |  |
| Show Klarna | Preselect Klarna | Show only Klarna |
The presentation instructions are derived from possible customer purchase journeys described in the How to present Klarna article.
Sample code:
function renderKlarna(paymentPresentation) {
  if (!paymentPresentation) return;

  const root = qs("#klarna-payment-method");
  if (!root) {
    console.error("Missing #klarna-payment-method container.");
    return;
  }

  root.innerHTML = `<div id="klarna-option-default" class="klarna-option default" style="display:none;">

</div>Mount payment option components
Once an instance of PaymentPresentation is created, the Klarna payment option(s) must be rendered dynamically in the payment selector according to Klarna’s presentation guidelines. The following diagram displays different visual components and how they are rendered in different selection states:
- Icon
- Badge
- Header
- Subheader
- Message
- Terms
- Button
Mount the Klarna payment option components within your designated Klarna payment method container to render them dynamically in the payment form. Ensure that all components—including those not immediately visible—are mounted during initialization, and manage their visibility through your own logic or UI controls.
function renderKlarnaOption(containerId, option) {
  const container = qs(`#${containerId}`);
  if (!container) {
    console.error(`Missing #${containerId} container.`);
    return;
  }

  const ids = {
    icon:    `${containerId}-icon`,
    header:  `${containerId}-header`,
    subhdr:  `${containerId}-subheader`,
badge: `${containerId}-badge`,Handle payment option selection and deselection
When a Klarna payment option is selected/deselected, ensure the additional visual components are shown/hidden properly.
/**
 * Toggle the Klarna payment option selected state.
 * Use for both SDK preselection (PRESELECT_KLARNA) and user interactions.
 */
function toggleKlarnaPaymentOptionSelection(containerId, isSelected) {
  const container = qs(`#${containerId}`);
  if (!container) {
    console.error(`Missing container #${containerId}.`);
    return;
  }

const display = isSelected ? "block" : "none";Configure payment button
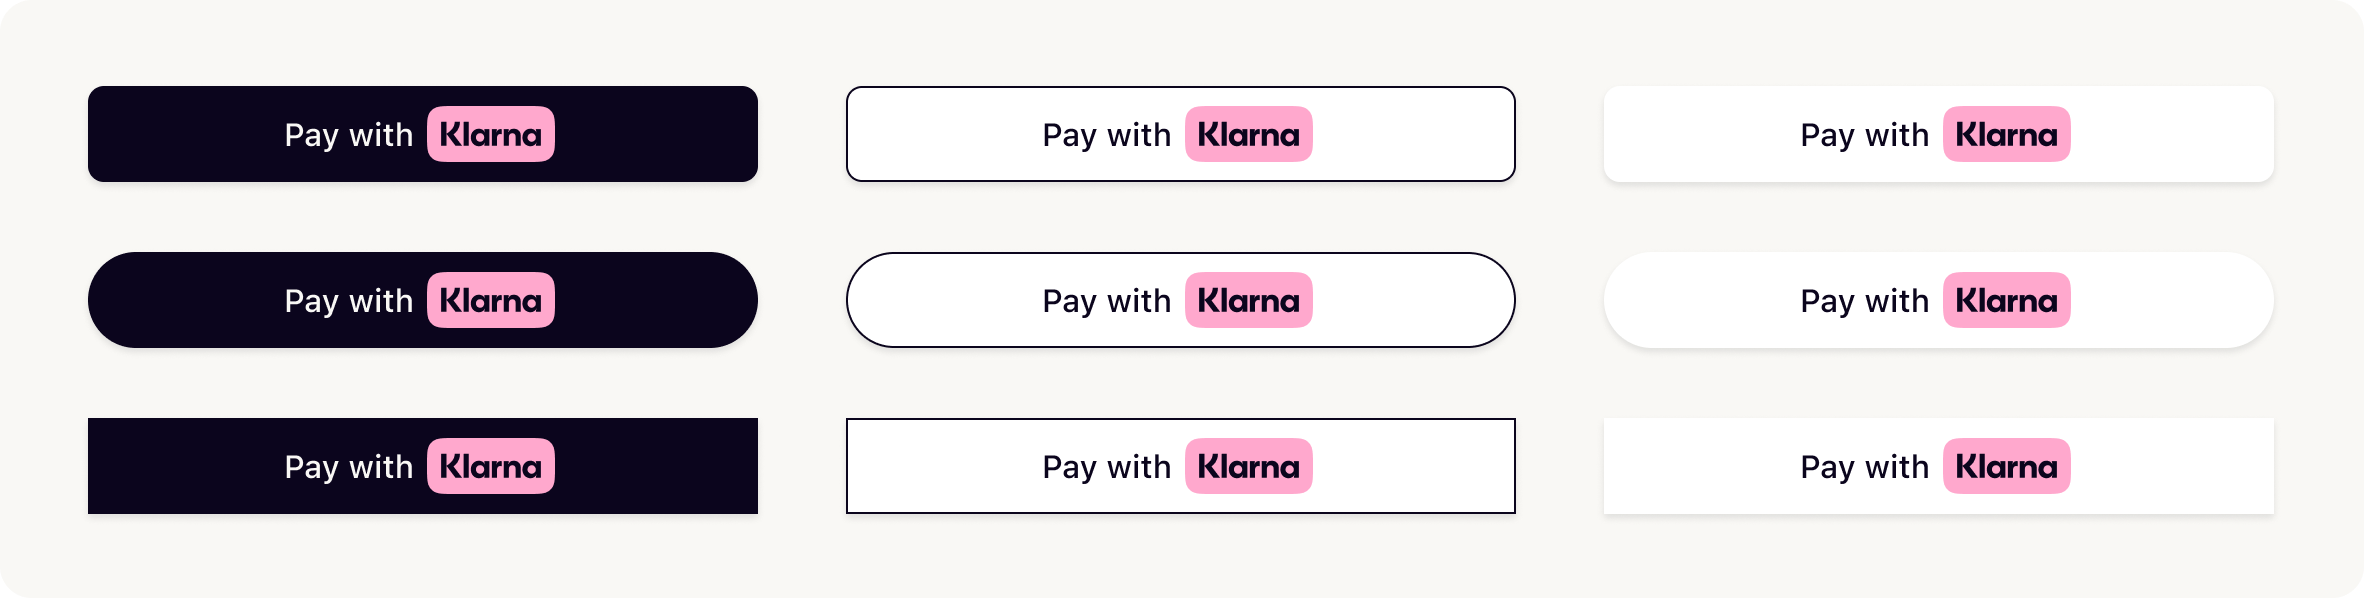
The payment presentation instance allows you to mount the prebuilt button component. The Klarna Payment Button is context-aware and dynamically adapts to your configuration.
[ Klarna payment button variants]
Choose the theme and shape of the payment button to best fit into your online store in a way that complements your brand and encourages user engagement. More details on the button styling can be found here.
[ Configure Klarna payment button]
The paymentButton.component() can be configured with the following set of parameters:
| Parameter | Description |
|---|---|
| Sets a custom DOM ID on the rendered button. Useful for testing or styling. |
| Defines the button’s shape. Possible values are:default, pill, rect |
| Sets the visual theme of the button. Possible values are: default, light, dark, outlined |
| Sets the language and region (e.g., en-US). If you don’t set this, it will automatically use the value chosen when you first set up the Web SDK. If that’s not available, it will use your browser’s settings instead. |
| Disables the button when set to true. Useful during form validation or async operations. |
| Forces the button into a loading state. Useful when awaiting async setup or validation. |
| Sets the purpose of the payment. Used to personalize the button and flow if not set when creating the PaymentPresentation instance. |
| Function that returns a Promise resolving to either a PaymentRequestData, a paymentRequestId, or a returnUrl. This will be handled differently depending on the integration path. |
| Defines how Klarna launches the purchase journey. |
For the full API specifications, refer to Klarna Web SDK.
Sample code
option
  .paymentButton
  .component({
    id: "klarna-payment-button",  // optional test hook
    shape: "pill",                // "default" | "pill" | "rect"
    theme: "default",             // "default" | "light" | "dark" | "outlined"
    intents: ["PAY"],
    initiationMode: "DEVICE_BEST", // "DEVICE_BEST" | "ON_PAGE" | "REDIRECT"
    initiate: (klarnaNetworkSesionToken, paymentOptionId) => initiateKlarnaPayment(klarnaNetworkSesionToken, paymentOptionId)
  })
  .mount(`#${containerId}-payment-button`);
The button will automatically handle customer interaction and trigger the Klarna purchase flow via the initiate function.
Start payment processing on payment button click (frontend and backend)
Starting payment processing involves coordinating the frontend and backend to securely initiate the Klarna Purchase Journey once the customer clicks the Klarna button. This process ensures the customer’s intent is captured, a Payment Request is created, and Klarna Purchase Journey is launched in a seamless and reliable way.
On a high level, the process involves:
- Capturing the customer’s action when they click the Klarna button.
- Forward the payment context to the backend.
- Creating a Payment Request through Klarna’s APIs.
- Returning the result to the frontend to start the Klarna Purchase Journey.
Retrieve the interoperability_token and payment_option_id (frontend)
async function initiateKlarnaPayment(paymentOptionId) {
  try {
    // 1) Get a klarna network session token from the Klarna SDK
    const klarnaNetworkSessionToken = await klarna.Network.Session.token();

    // 2) Ask your backend to create a payment request
    const response = await fetch('/api/payment-request', {
      method: 'POST',
      headers: { 'Content-Type': 'application/json' },
      body: JSON.stringify({ klarnaNetworkSessionToken, paymentOptionId })
    });
Create Payment Request (backend)
Call the Payment Request API to initiate a transaction. If customer verification is required, Klarna processes the request and creates a unique payment identifier for tracking. The payment request is then returned in the SUBMITTED state with the interaction details needed to complete the payment flow.
Request
{{#lst:Klarna Docs - Payment Request - Content Source|payment request: create: request: one-time payment}}
Configure customer interaction parameters
The return_url and app_return_url parameters define the redirect targets when the Klarna interaction ends, regardless of whether the purchase is approved or aborted. Correct configuration of these URLs is required to ensure customers return to the correct web or mobile app context and can continue the checkout or post-purchase flow without interruption.
return_url- Used for web-based flows. After the customer completes or aborts the Klarna purchase flow, Klarna redirects the customer to this URL. This may be a URL owned by the Acquiring Partner (which then handles further redirection) or a URL provided by the Partner.
app_return_url- Used for mobile app flows. During the purchase journey, the customer may be redirected to the Klarna app or a third-party app (for example, a bank app). This URL allows Klarna to return the customer to the Partner’s mobile app. The
app_return_urlmust be a registered URL scheme (for example,partnerapp://klarna) or a universal link that resumes the payment flow. The Partner must reopen the integrating app in its previous state, without triggering additional navigation or state changes.
- Used for mobile app flows. During the purchase journey, the customer may be redirected to the Klarna app or a third-party app (for example, a bank app). This URL allows Klarna to return the customer to the Partner’s mobile app. The
Visual representations for Web flow and App handover flow:
 |  |
| Web handover | App handover |
return_url and app_return_url are not mutually exclusive
In different scenarios, either or both of the return_url and app_return_url can be triggered:
Example 1: Only return_url is triggered – Pure web flow
The customer starts the Klarna purchase flow in a web browser on a desktop. After approving the purchase, they are redirected to the return_url.
Example 2: Only app_return_url is triggered – App-to-app flow
The Partner’s native mobile app opens the Klarna purchase flow using a universal link. If the Klarna app is installed, the customer is taken directly into the Klarna app. After approval, they are redirected to the app_return_url, returning them to the Partner's app.
Example 3: Both URLs are triggered – WebView flow with app handover
The Partner’s native mobile app starts the Klarna purchase flow in a System WebView. If the customer needs to authenticate via an external banking app, they’re handed back to the Partner's app using app_return_url. They then resume the purchase flow in the WebView and, upon completion, are redirected to the return_url.
Requirements
- Accept the return URL parameters in the Partner-facing APIs.
- Validation should be implemented, but it must not be more restrictive than what is specified in Klarna’s Payment Authorize API

- Forward the return URL parameters unmodified to Klarna.
Provide supplementary purchase data
Supplementary Purchase Data refers to additional transaction details shared with Klarna that provide greater context about a purchase. These data points—such as line items, subscription details, or industry-specific attributes—help improve underwriting accuracy, fraud assessment, and the customer’s post-purchase experience. They may be required in certain industries and support multiple use cases, including better acceptance rates, enhanced fraud prevention, improved customer experiences within the Klarna app, and more effective risk monitoring.
Data requirements
Depending on the business type, certain supplementary_purchase_data fields are required under the Klarna Network Rules. However, purchase_reference, line_items, customer and shipping whenever available must always be submitted, as they enable transaction-level traceability, power Klarna’s fraud prevention and underwriting models, dispute handling, and ensure a consistent customer experience across Klarna’s ecosystem.
Response
/v2/accounts/{partner_account_id}/payment/requests| Parameter | Required | Description |
|---|---|---|
state | Yes | The current state of the Payment Request.
|
payment_request_id | Yes | The unique identifier for the payment request. This is the identifier you will use to reference the payment request in subsequent API calls. You should not make any assumption about the format of this identifier, you should treat it as an... Show more |
expires_at | Yes | The expiry time of the payment request. After this timestamp the payment request will be canceled and deleted. |
currency | Yes | Currency in ISO 4217 format. |
amount | No | Total amount of a one-off purchase, including tax and any available discounts. The value should be in non-negative minor units. Eg: 25 Dollars should be 2500. This is the amount that Klarna will charge the customer for a one-off purchase. S... Show more |
When the request succeeds, Klarna returns a payment request in the SUBMITTED state.
The response includes:
payment_request_id— a unique identifier for the payment request.payment_request_url— the URL used to initiate the customer’s purchase journey.
Sample payload
{
  "payment_request_id": "krn:payment:eu1:request:10be1d49-7beb-6b24-b9dd-8c14d0528503",
  "state": "SUBMITTED",
  "state_context": {
    "customer_interaction": {
      "method": "HANDOVER",
      "payment_request_id": "krn:payment:eu1:request:10be1d49-7beb-6b24-b9dd-8c14d0528503",
      "payment_request_url": "https://pay.klarna.com/l/ZjW2Xipgh0tjbrBGD7hzJM"
    }
  },
  "expires_at": "2025-02-26T17:25:34.534721775Z",
"created_at": "2025-02-24T17:25:34.534721775Z",Handle the response (frontend)
Share the payment request ID acquired from the server side as a response to the initiate callback:
async function initiateKlarnaPayment(paymentOptionId) {
  try {
    // 1) Get a klarna network session token from the Klarna SDK
    const klarnaNetworkSessionToken = await klarna.Network.Session.token();

    // 2) Ask your backend to create a payment request
    const response = await fetch('/api/payment-request', {
      method: 'POST',
      headers: { 'Content-Type': 'application/json' },
      body: JSON.stringify({ klarnaNetworkSessionToken, paymentOptionId })
    });
Configure initiationMode
The initiationModeis a parameter which controls how the Klarna Purchase Journey is launched (redirect / modal window) on different devices (mobile/desktop/native):
| initiationMode | Description |
|---|---|
| Automatically selects the best way to launch the Klarna Purchase Journey depending on the device - this is the default and recommended value:
Note: for this initiationMode, a return_url is required in the customer_interaction_config object. |
| The Klarna Purchase Journey is triggered on the same page. The customer never leaves the page. The Klarna Purchase Journey is open in a pop-up if possible and fallback to fullscreen iframe if necessary. |
| The customer will be redirected to the Klarna Purchase Journey. Note: for this initiationMode, a return_url is required in the customer_interaction_config object. |
After a successful initiation, the Klarna Purchase Flow is presented to the customer, allowing them to:
- Authenticate with Klarna (e.g., via login or one-time passcode)
- Select their preferred payment method (such as Pay in 3, Pay Later, etc.)
- Confirm and complete the payment
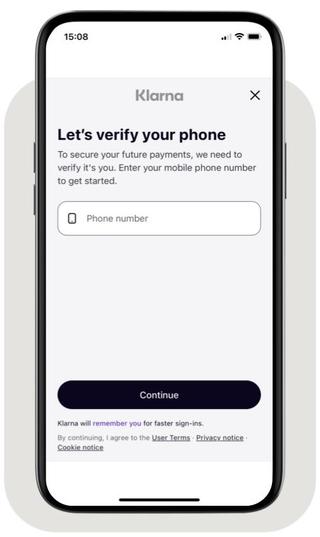
Phone collection in the Klarna Purchase Journey
Monitor and retrieve interoperability_token
To retrieve the required token(s), Klarna provides multiple integration methods. Subscribing to Klarna webhook events is required and may be combined with additional methods to improve resilience.
Using webhooks ensures reliable completion handling, particularly when the customer closes the browser before returning, network interruptions occur during redirects, or post-processing is required before notifying the customer.
The klarna_network_session_token is issued by Klarna after the customer approves the purchase. Use this token to finalize the authorization and create the corresponding Klarna payment transaction.
The klarna_network_session_token is valid for only 1 hour and must be used within this time frame to finalize the authorization.
Method: Subscribe to webhook events (required)
Subscribe to the payment.request.state-change.completed webhook event using the guidelines provided here. Klarna sends this event when the Payment Request reaches the COMPLETED state.
This event indicates that the customer has finished the step-up interaction and that the Acquiring Partner can proceed with finalizing the authorization.
Sample payload
{
  "metadata": {
    "event_type": "payment.request.state-change.completed",
    "event_id": "d9f9b1a0-5b1a-4b0e-9b0a-9e9b1a0d5b1a",
    "event_version": "v2",
    "occurred_at": "2024-01-01T12:00:00Z",
    "correlation_id": "2d1557e8-17c3-466c-924a-bbc3e91c2a02",
    "subject_account_id": "krn:partner:global:account:live:HGBY07TR",
    "recipient_account_id": "krn:partner:global:account:live:LWT2XJSE",
    "product_instance_id": "krn:partner:product:payment:ad71bc48-8a07-4919-[...]",
    "webhook_id": "krn:partner:global:notification:webhook:120e5b7e-abcd-4def-[...]",
"live": falseConsult the API reference![]()
Method: Read the payment request
As an alternative method, retrieve the Klarna token(s) by calling the Read Payment Request API![]()
Once the Payment Request reaches the COMPLETED state, the token(s) are available in the state_context object of the Payment Request.
Sample payload
{
  "payment_request_id": "krn:payment:eu1:request:10be1d49-7beb-6b24-b9dd-8c14d0528503",
  "state": "COMPLETED",
  "previous_state": "IN_PROGRESS",
  "state_context": {
    "klarna_network_session_token":"krn:network:eu1:live:session-token:[...]"
  },
  "expires_at": "2025-02-26T17:25:34.534721775Z",
  "created_at": "2025-02-24T17:25:34.534721775Z",
  "updated_at": "2025-02-24T17:25:34.534721775Z",
  "payment_request_reference": "request-reference-1234",
"amount": 11836,Authorize the payment (backend)
Make sure to add the interoperability_token received via the webhook and the purchase details within the call to Worldline. If everything is implemented correctly, Klarna will approve the payment transaction.
curl -X POST https://api.acquiring-partner.com/payment \
  -H "Content-Type: application/json" \
  -d '{
    "amount": 1000,
    "currency": "USD",
    "payment_methods": {
      "klarna": {
        "klarna_interoperability_token": ""
      }
    }
  }'
In rare cases where there's discrepancy between the amount and purchase details submitted in the original payment request and the information submitted to Worldline, Klarna may reject and ask the customer to approve the purchase again.